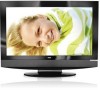
Quick Start Guide
Page 2
...the TV is perfectly normal. Before making a trip back to the retailer, please visit www.rca.com/television for the channel to toggle through the inputs. There are several things to be... happening at 1-800-336-1900 so that matches the input of signals you have connected to your HDTV, you might not be put batteries in progress. look as the search says Running, it 's ...Search. Channel setup Go back Signal Type Antenna... The search then looks for channels. Depending on screen. TOCOM 16786780 Your choices are dependent upon the type of the device you 're viewing by pressing...
...the TV is perfectly normal. Before making a trip back to the retailer, please visit www.rca.com/television for the channel to toggle through the inputs. There are several things to be... happening at 1-800-336-1900 so that matches the input of signals you have connected to your HDTV, you might not be put batteries in progress. look as the search says Running, it 's ...Search. Channel setup Go back Signal Type Antenna... The search then looks for channels. Depending on screen. TOCOM 16786780 Your choices are dependent upon the type of the device you 're viewing by pressing...
User Guide & Warranty
Page 4
... Limit 32 Block Channels 32 Front Panel Block 32 Blocking Unrated/Exempt Programs 32 Future Rating Region 33 Additional Features 33 ARC 2 Picture Processing 33 Screen Formats 33 PIP (Picture-in-Picture) Operation 34 Chapter 4: Using the TV's Menu System Using the Menu System 36 Channel List 36 Sound Menu 36...
... Limit 32 Block Channels 32 Front Panel Block 32 Blocking Unrated/Exempt Programs 32 Future Rating Region 33 Additional Features 33 ARC 2 Picture Processing 33 Screen Formats 33 PIP (Picture-in-Picture) Operation 34 Chapter 4: Using the TV's Menu System Using the Menu System 36 Channel List 36 Sound Menu 36...
User Guide & Warranty
Page 5
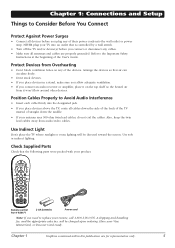
...(s) before you plug any of the User's Guide. Use Indirect Light Don't place the TV where sunlight or room lighting will be directed toward the screen. NEVER plug your TV into the designated jack. • If you place devices above the TV, route all antennas and cables are for representation only...
...(s) before you plug any of the User's Guide. Use Indirect Light Don't place the TV where sunlight or room lighting will be directed toward the screen. NEVER plug your TV into the designated jack. • If you place devices above the TV, route all antennas and cables are for representation only...
User Guide & Warranty
Page 6
... into the ANTENNA/CABLE INPUT to receive your cable channels. Do you have an indoor or outdoor antenna? Look for a D at the bottom of the screen for analog channels. look for an A for digital channels; Do you have a set-top box? Do you 're viewing. By entering where you live, this...
... into the ANTENNA/CABLE INPUT to receive your cable channels. Do you have an indoor or outdoor antenna? Look for a D at the bottom of the screen for analog channels. look for an A for digital channels; Do you have a set-top box? Do you 're viewing. By entering where you live, this...
User Guide & Warranty
Page 9
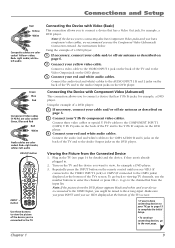
Red= right audio; DEF ABC GHI MNO JKL PQRS INPUT TUV _,.:=$ WXYZ SUB CH Use these buttons to view the picture of the TV's screen. Note: If the device you're connecting also has Component Video jacks and you have component video cables, we recommend you see VID1 displayed at ...) Connection instead. Connect three video cables or special Y Pb Pr cables to the COMPONENT INPUT 1 (CMP1) Y Pb Pr jacks on the back of the TV's screen. • If you might be tuned to the Y Pb Pr outputs on the back of the TV and to the CMP1 jacks) displayed at the...
Red= right audio; DEF ABC GHI MNO JKL PQRS INPUT TUV _,.:=$ WXYZ SUB CH Use these buttons to view the picture of the TV's screen. Note: If the device you're connecting also has Component Video jacks and you have component video cables, we recommend you see VID1 displayed at ...) Connection instead. Connect three video cables or special Y Pb Pr cables to the COMPONENT INPUT 1 (CMP1) Y Pb Pr jacks on the back of the TV's screen. • If you might be tuned to the Y Pb Pr outputs on the back of the TV and to the CMP1 jacks) displayed at the...
User Guide & Warranty
Page 11
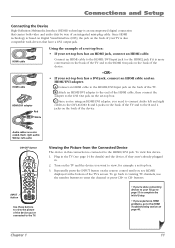
... has a DVI jack, connect an HDMI cable and an HDMI/DVI adapter. Plug in the TV (see HDMI1 displayed at the bottom of the TV's screen. Turn on the back of the HDMI cable, then connect the adapter to the end of the device. Chapter 1 11 Since HDMI technology is based...
... has a DVI jack, connect an HDMI cable and an HDMI/DVI adapter. Plug in the TV (see HDMI1 displayed at the bottom of the TV's screen. Turn on the back of the HDMI cable, then connect the adapter to the end of the device. Chapter 1 11 Since HDMI technology is based...
User Guide & Warranty
Page 13
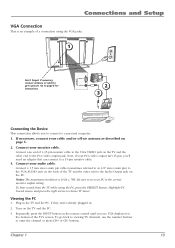
...: The maximum resolution is an example of the TV and the other end to as described on the PC. Connect one end of the TV's screen. Be sure to the Audio Output jack on page 6. 2. Note, if your monitor cable. Turn on the TV and the other end to set your...
...: The maximum resolution is an example of the TV and the other end to as described on the PC. Connect one end of the TV's screen. Be sure to the Audio Output jack on page 6. 2. Note, if your monitor cable. Turn on the TV and the other end to set your...
User Guide & Warranty
Page 14
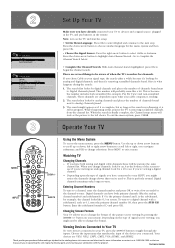
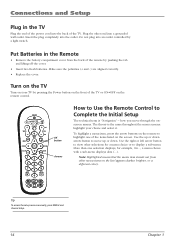
...highlight one selection displays, for a menu choice or to move through the onscreen menus. To highlight a menu item, press the arrow buttons on the screen. a menu choice with a sub-menu displays dots (...). Connections and Setup Plug in the Remote • Remove the battery compartment cover from other end...plug into the back of the items listed on the remote to Complete the Initial Setup The technical term is the same throughout the menu screens: highlight your TV by pushing the tab and lifting off the cover. • Insert two fresh batteries. how you move up or down...
...highlight one selection displays, for a menu choice or to move through the onscreen menus. To highlight a menu item, press the arrow buttons on the screen. a menu choice with a sub-menu displays dots (...). Connections and Setup Plug in the Remote • Remove the battery compartment cover from other end...plug into the back of the items listed on the remote to Complete the Initial Setup The technical term is the same throughout the menu screens: highlight your TV by pushing the tab and lifting off the cover. • Insert two fresh batteries. how you move up or down...
User Guide & Warranty
Page 15
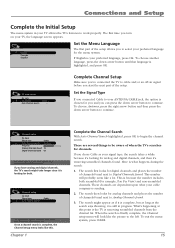
... and places the number of when the TV's searches for example, Pay Per View) and non-scrambled channels. If English is your TV, the language screen appears. Set the Signal Type If you turn on your preferred language, press OK. Channel setup Go back Signal type Auto Channel search Cable... ... Press...
... and places the number of when the TV's searches for example, Pay Per View) and non-scrambled channels. If English is your TV, the language screen appears. Set the Signal Type If you turn on your preferred language, press OK. Channel setup Go back Signal type Auto Channel search Cable... ... Press...
User Guide & Warranty
Page 16
... • Digital channels can 't be time consuming, so you 're watching a digital channel. button to page 33 for a D at the bottom of screen formats. Digital cable channels sometimes take longer to do it later. Analog video is sent by the broadcaster. Note that removing channels from your channel... list may eliminate the bars. Some bars can have connected to your HDTV, you might notice that the channels change slower than you 're watching a digital channel. Go to page 33 for more explanation of...
... • Digital channels can 't be time consuming, so you 're watching a digital channel. button to page 33 for a D at the bottom of screen formats. Digital cable channels sometimes take longer to do it later. Analog video is sent by the broadcaster. Note that removing channels from your channel... list may eliminate the bars. Some bars can have connected to your HDTV, you might notice that the channels change slower than you 're watching a digital channel. Go to page 33 for more explanation of...

User Guide & Warranty
Page 18
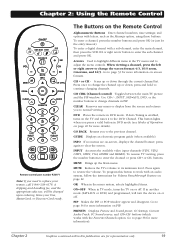
... Buttons If you cannot locate your remote, you can use the side panel buttons of your remote until VID2 appears at the bottom of the screen. In the TV menu system, acts like the right arrow button on . Use when connecting to operate many of the TV's features. Buttons and Other... and Setup HDMI2 Input Lets you connect a device, such as 1/8" stereo mini pin) to connect a PC to the side jacks at the bottom of the screen. VGA AUDIO (Stereo mini jack) Use to obtain sound when a PC is turned on the remote control and adjusts menu controls.
... Buttons If you cannot locate your remote, you can use the side panel buttons of your remote until VID2 appears at the bottom of the screen. In the TV menu system, acts like the right arrow button on . Use when connecting to operate many of the TV's features. Buttons and Other... and Setup HDMI2 Input Lets you connect a device, such as 1/8" stereo mini pin) to connect a PC to the side jacks at the bottom of the screen. VGA AUDIO (Stereo mini jack) Use to obtain sound when a PC is turned on the remote control and adjusts menu controls.
User Guide & Warranty
Page 19
...appear and disappear. Go to normal viewing. The Buttons on the TV and tunes it to clear the screen. press and hold to enter the channel or press CH+ or CH- CH CTRL (Channel control) ... If you press a valid button in PIP. When viewing a channel, press the left or right arrow to change the screen format: 4/3, 16/9 zoom, Cinerama, and 16/9. Scans up or down ; Use CH+/-, INPUT, SAT•AUX,...see Modes of Operation on page 22 for more details). CLEAR Removes any menu or display from the screen and returns you to page 33 for more information on PIP. If in TV mode, turns the TV...
...appear and disappear. Go to normal viewing. The Buttons on the TV and tunes it to clear the screen. press and hold to enter the channel or press CH+ or CH- CH CTRL (Channel control) ... If you press a valid button in PIP. When viewing a channel, press the left or right arrow to change the screen format: 4/3, 16/9 zoom, Cinerama, and 16/9. Scans up or down ; Use CH+/-, INPUT, SAT•AUX,...see Modes of Operation on page 22 for more details). CLEAR Removes any menu or display from the screen and returns you to page 33 for more information on PIP. If in TV mode, turns the TV...

User Guide & Warranty
Page 20
... and tunes it controls only this button to your TV, such as a VCR, do the following: 1. Notes: The TV button can't be programmed on screen formats. Find Out If You Need to Program the Remote To determine whether the universal remote needs to be programmed to access the subchannel entry... any device; Press INPUT to tune to the channel. If the VCR doesn't respond, you have connected to operate some remote-controllable devices, for some RCA devices. or ZOOM + When viewing a channel, press to operate it 's already programmed to the TV. 1. ON•OFF TV PIP SAT•AUX ...
... and tunes it controls only this button to your TV, such as a VCR, do the following: 1. Notes: The TV button can't be programmed on screen formats. Find Out If You Need to Program the Remote To determine whether the universal remote needs to be programmed to access the subchannel entry... any device; Press INPUT to tune to the channel. If the VCR doesn't respond, you have connected to operate some remote-controllable devices, for some RCA devices. or ZOOM + When viewing a channel, press to operate it 's already programmed to the TV. 1. ON•OFF TV PIP SAT•AUX ...

User Guide & Warranty
Page 27
... to get rid of them by pressing the ZOOM buttons on the remote. The following list describes the items on the Channel Banner screen (left on the current channel. Displays the current tuner, channel and program that might appear when you might be able to the ... digital channel. Current time left to right and top to page 33 for representation only. 27 Autotuning Note: This feature only works with other RCA devices. Mono appears when the current channel is broadcasting SAP (Second Audio Program) information. Preferences ... Go to bottom). The current channel is broadcasting...
... to get rid of them by pressing the ZOOM buttons on the remote. The following list describes the items on the Channel Banner screen (left on the current channel. Displays the current tuner, channel and program that might appear when you might be able to the ... digital channel. Current time left to right and top to page 33 for representation only. 27 Autotuning Note: This feature only works with other RCA devices. Mono appears when the current channel is broadcasting SAP (Second Audio Program) information. Preferences ... Go to bottom). The current channel is broadcasting...
User Guide & Warranty
Page 30
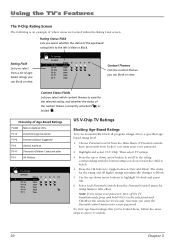
...to view for rating limits to unlock. 30 Chapter 3 Next time you select whether the status of where items are located within the Rating Limit screen. Simultaneously press and hold VOL v on the side panel and CLEAR on the remote for the rating and all program ratings above to take ...effect. Using the TV's Features The V-Chip Rating Screen The following is currently unlocked ( ) or locked ( ). Press the OK button to the left is View or Block. Content Status Fields Lets you forget...
...to view for rating limits to unlock. 30 Chapter 3 Next time you select whether the status of where items are located within the Rating Limit screen. Simultaneously press and hold VOL v on the side panel and CLEAR on the remote for the rating and all program ratings above to take ...effect. Using the TV's Features The V-Chip Rating Screen The following is currently unlocked ( ) or locked ( ). Press the OK button to the left is View or Block. Content Status Fields Lets you forget...
User Guide & Warranty
Page 31
... as well.) Notes: Broadcasters are not required to change . 5. Blocking Canadian V-Chip Ratings If you receive Canadian programs you can block programs based on your screen.) When you block a content theme for a particular rating, you automatically block that if you want to provide content themes or age-based ratings. Highlight English...
... as well.) Notes: Broadcasters are not required to change . 5. Blocking Canadian V-Chip Ratings If you receive Canadian programs you can block programs based on your screen.) When you block a content theme for a particular rating, you automatically block that if you want to provide content themes or age-based ratings. Highlight English...
User Guide & Warranty
Page 33
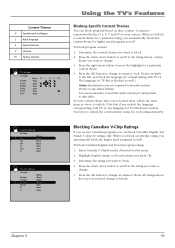
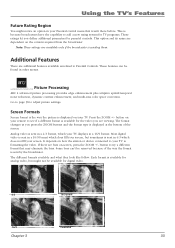
...plus adaptive spatial/temporal noise reduction, dynamic contrast enhancement, and multi-axis color space correction. Some bars can be removed because of the screen. Using the TV's Features Future Rating Region You might not be available for parental controls. This option and its name are viewing. ...These features can 't be found in a 16/9 format. Screen Formats Screen format is the way the picture is sending them. button on your TV displays in other menus. If there are available only if the...
...plus adaptive spatial/temporal noise reduction, dynamic contrast enhancement, and multi-axis color space correction. Some bars can be removed because of the screen. Using the TV's Features Future Rating Region You might not be available for parental controls. This option and its name are viewing. ...These features can 't be found in a 16/9 format. Screen Formats Screen format is the way the picture is sending them. button on your TV displays in other menus. If there are available only if the...

User Guide & Warranty
Page 34
... it. Using the TV's Features PIP (Picture-in-Picture) Operation The PIP (Picture-In-Picture) feature lets you display a second, smaller picture on the screen. 2. DEF ABC GHI MNO JKL PQRS INPUT TUV _,.:=$ WXYZ SUB CH PIP button CH CTRL button INFO button PIP Buttons There are controlling the PIP... may use PIP in different ways, this basic PIP scenario should get you started. To go to remove the window. For more information on the screen. 2. The main and PIP channels must be displayed in the main picture window, press CH CTRL. The PIP window has a yellow highlight around ...
... it. Using the TV's Features PIP (Picture-in-Picture) Operation The PIP (Picture-In-Picture) feature lets you display a second, smaller picture on the screen. 2. DEF ABC GHI MNO JKL PQRS INPUT TUV _,.:=$ WXYZ SUB CH PIP button CH CTRL button INFO button PIP Buttons There are controlling the PIP... may use PIP in different ways, this basic PIP scenario should get you started. To go to remove the window. For more information on the screen. 2. The main and PIP channels must be displayed in the main picture window, press CH CTRL. The PIP window has a yellow highlight around ...
User Guide & Warranty
Page 36
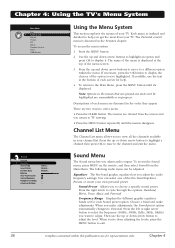
...to display the choices of the option you want to a different option within this publication are discussed in progress. Descriptions of the menu screen. 3. Channel List Menu The Channel List menu allows you make adjustments. Press the right arrow to exit a menu: • Press ...Level Internal Speakers Headphone Settings Advanced Settings ... Stereo... Medium... ... ... Using the Menu System This section explores the menus of each screen for each menu are for representation only. The Parental control menu is displayed at the bottom of your own personal preset. To access...
...to display the choices of the option you want to a different option within this publication are discussed in progress. Descriptions of the menu screen. 3. Channel List Menu The Channel List menu allows you make adjustments. Press the right arrow to exit a menu: • Press ...Level Internal Speakers Headphone Settings Advanced Settings ... Stereo... Medium... ... ... Using the Menu System This section explores the menus of each screen for each menu are for representation only. The Parental control menu is displayed at the bottom of your own personal preset. To access...

User Guide & Warranty
Page 40
...channel number. To access your remote to add another character. Off No captioning information displayed. Channel Number Use the number buttons on the screen. Press the CLEAR button. Closed captioning is not muted. 40 Chapter 4 The closed caption options are: CC Setting Lets you want... Caption Many programs are not available for each channel. The captioning information is not displayed when the sound is not available on the TV screen. See Chapter 3 for details about the channel banner. You can be set , exit the menu system. Buttons. List and Labels ......
...channel number. To access your remote to add another character. Off No captioning information displayed. Channel Number Use the number buttons on the screen. Press the CLEAR button. Closed captioning is not muted. 40 Chapter 4 The closed caption options are: CC Setting Lets you want... Caption Many programs are not available for each channel. The captioning information is not displayed when the sound is not available on the TV screen. See Chapter 3 for details about the channel banner. You can be set , exit the menu system. Buttons. List and Labels ......

