
Ri383 Product Manual
Page 2
...: - NO USER-SERVICEABLE PARTS INSIDE. Operation is connected. - This equipment generates, uses and can be determined by one or more of the FCC Rules. Connect the equipment into an outlet on the bottom of product. WARNING: Changes or modifications to this unit not expressly approved by the party responsible for a Class B digital device, pursuant to correct the interference by turning the equipment...
...: - NO USER-SERVICEABLE PARTS INSIDE. Operation is connected. - This equipment generates, uses and can be determined by one or more of the FCC Rules. Connect the equipment into an outlet on the bottom of product. WARNING: Changes or modifications to this unit not expressly approved by the party responsible for a Class B digital device, pursuant to correct the interference by turning the equipment...
Ri383 Product Manual
Page 3
... batteries according to dripping or splashing and that no objects filled with any ventilation openings. however, as with liquids, such as power-supply cord or plug is required when the apparatus has been damaged in accordance with the manufacturer's instructions. • Do not install near water. • Clean only with dry cloth. • Do not block any electronic product...
... batteries according to dripping or splashing and that no objects filled with any ventilation openings. however, as with liquids, such as power-supply cord or plug is required when the apparatus has been damaged in accordance with the manufacturer's instructions. • Do not install near water. • Clean only with dry cloth. • Do not block any electronic product...
Ri383 Product Manual
Page 4
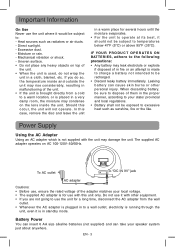
... standby mode. The supplied AC adapter operates on top of the unit. • If the unit is brought directly from the wall outlet. • Whenever the AC adapter is for a long time, disconnect the AC adapter from a cold to temperatures below 41°F (5°C) or above 95°F (35°C). If you are not going to use the unit for use...
... standby mode. The supplied AC adapter operates on top of the unit. • If the unit is brought directly from the wall outlet. • Whenever the AC adapter is for a long time, disconnect the AC adapter from a cold to temperatures below 41°F (5°C) or above 95°F (35°C). If you are not going to use the unit for use...
Ri383 Product Manual
Page 5
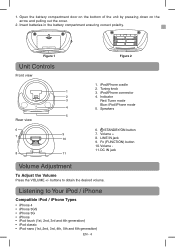
... Figure 1 Unit Controls Front view 1 2 3 4 5 Rear view 6 7 9 10 8 11 Figure 2 1. iPod/iPhone connector 4. Listening to obtain the desired volume. Volume + 8. Volume 11. LINE IN jack 9. STANDBY/ON button 7. iPod/iPhone cradle 2. buttons to Your iPod / iPhone Compatible iPod / iPhone Types • iPhone 4 • iPhone 3GS • iPhone 3G • iPhone • iPod touch (1st, 2nd, 3rd and 4th generation) • iPod classic • iPod nano (1st, 2nd, 3rd, 4th, 5th and 6th generation) EN - 4 Indicator Red: Tuner mode Blue: iPod/iPhone mode 5.
... Figure 1 Unit Controls Front view 1 2 3 4 5 Rear view 6 7 9 10 8 11 Figure 2 1. iPod/iPhone connector 4. Listening to obtain the desired volume. Volume + 8. Volume 11. LINE IN jack 9. STANDBY/ON button 7. iPod/iPhone cradle 2. buttons to Your iPod / iPhone Compatible iPod / iPhone Types • iPhone 4 • iPhone 3GS • iPhone 3G • iPhone • iPod touch (1st, 2nd, 3rd and 4th generation) • iPod classic • iPod nano (1st, 2nd, 3rd, 4th, 5th and 6th generation) EN - 4 Indicator Red: Tuner mode Blue: iPod/iPhone mode 5.
Ri383 Product Manual
Page 6
... cable is available on the back cabinet to the line out or earphone jack of the dock, then slowly rotate the cabinet to TUNER mode (red indicator will be on . 2. EN - 5 Installing an iPod / iPhone 1. Hold the lower part (under the iPod) of the other audio devices. Press the Fn (FUNCTION) button to switch to 90o direction anticlockwise. Specifications DC: 9V 1.5A external DC supply or 6 x AA size batteries...
... cable is available on the back cabinet to the line out or earphone jack of the dock, then slowly rotate the cabinet to TUNER mode (red indicator will be on . 2. EN - 5 Installing an iPod / iPhone 1. Hold the lower part (under the iPod) of the other audio devices. Press the Fn (FUNCTION) button to switch to 90o direction anticlockwise. Specifications DC: 9V 1.5A external DC supply or 6 x AA size batteries...
Ri383 Product Manual
Page 7
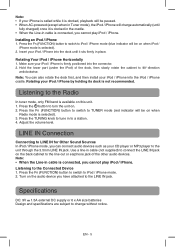
... limited to your iPod/iPhone manual for obstruction on the connectors in the outlet, and outlet has power. iPod/iPhone does not dock properly or does not install properly. • Remove your iPod/iPhone from the date of the product. Please refer to non-commercial use solvents as a guarantee. Need More Help? More Information Troubleshooting Tips System does not turn on • • Make sure AC adapter is secure in...
... limited to your iPod/iPhone manual for obstruction on the connectors in the outlet, and outlet has power. iPod/iPhone does not dock properly or does not install properly. • Remove your iPod/iPhone from the date of the product. Please refer to non-commercial use solvents as a guarantee. Need More Help? More Information Troubleshooting Tips System does not turn on • • Make sure AC adapter is secure in...
Ri383 Product Manual
Page 8
... Date purchased Dealer name...FOR SUPPORT, SERVICE AND REPAIR, PLEASE VISIT www.RCAav.com Specifications and external appearance are subject to make the necessary repairs. This limitation does not apply to our Product Returns Center. With the exception of instructions provided with respect to products or parts thereof which have had the serial number removed or changed. Your Responsibility (1) You must use in violation of any...
... Date purchased Dealer name...FOR SUPPORT, SERVICE AND REPAIR, PLEASE VISIT www.RCAav.com Specifications and external appearance are subject to make the necessary repairs. This limitation does not apply to our Product Returns Center. With the exception of instructions provided with respect to products or parts thereof which have had the serial number removed or changed. Your Responsibility (1) You must use in violation of any...

Ri383 Quick Start Guide
Page 1
Open the door to insert batteries Connect AC Turn on unit Insert your iPod/iPhone Rotate the dock with iPod/iPhone Adjust Volume or Swith to radio mode Adjust radio frequency switch back from radio to iPhone Enjoy ......
Open the door to insert batteries Connect AC Turn on unit Insert your iPod/iPhone Rotate the dock with iPod/iPhone Adjust Volume or Swith to radio mode Adjust radio frequency switch back from radio to iPhone Enjoy ......

