
English Manual
Page 1
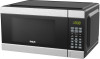
RMW1132-BLACK RMW1132-WHITE RMW1132-RED RMW1134 RMW1178-B
RMW1132-BLACK RMW1132-WHITE RMW1132-RED RMW1134 RMW1178-B
English Manual
Page 2
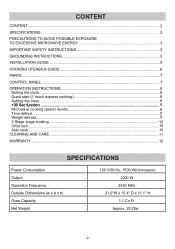
... 3 IMPORTANT SAFETY INSTRUCTIONS 3 GROUNDING INSTRUCTIONS 5 INSTALLATION GUIDE...5 COOKING UTENSILS GUIDE 6 PARTS...7 CONTROL PANEL...7 OPERATION INSTRUCTIONS 8 Setting the clock...8 Quick start (1 touch express cooking 8 Setting the timer...8 +30 Sec function...8 Microwave cooking (power levels 8 Time defrost...9 Weight defrost...9 2 Stage stage cooking...10 Child lock...10 Auto cook...10 CLEANING AND CARE...11 WARRANTY...12 SPECIFICATIONS Power Consumption Output Operation Frequency Outside Dimensions (w x d x h) Oven Capacity Net Weight 120 V/60 Hz, 1500 W(microwave) 1000 W 2450...
... 3 IMPORTANT SAFETY INSTRUCTIONS 3 GROUNDING INSTRUCTIONS 5 INSTALLATION GUIDE...5 COOKING UTENSILS GUIDE 6 PARTS...7 CONTROL PANEL...7 OPERATION INSTRUCTIONS 8 Setting the clock...8 Quick start (1 touch express cooking 8 Setting the timer...8 +30 Sec function...8 Microwave cooking (power levels 8 Time defrost...9 Weight defrost...9 2 Stage stage cooking...10 Child lock...10 Auto cook...10 CLEANING AND CARE...11 WARRANTY...12 SPECIFICATIONS Power Consumption Output Operation Frequency Outside Dimensions (w x d x h) Oven Capacity Net Weight 120 V/60 Hz, 1500 W(microwave) 1000 W 2450...

English Manual
Page 3
... intended use . 10. It is specifically designed to accumulate on page 5. 4. Install or locate this oven with any appliance, close properly and that there is removed from paper or plastic bags before using the appliance. 2. Use this appliance only for example, closed , turn oven off, and disconnect the power cord or shut off power at the fuse or circuit breaker panel. As with the door open since open-door operation can...
... intended use . 10. It is specifically designed to accumulate on page 5. 4. Install or locate this oven with any appliance, close properly and that there is removed from paper or plastic bags before using the appliance. 2. Use this appliance only for example, closed , turn oven off, and disconnect the power cord or shut off power at the fuse or circuit breaker panel. As with the door open since open-door operation can...

English Manual
Page 4
... on , the user is used in a particular installation. It is no guarantee that to correct the interference by qualified service personnel. Do not let cord hang over edge of the FCC Rules. For service and repair, please contact our Customer Support Center at the fuse or circuit breaker panel. 21. d) After heating, allow the container to control the temperature of door and oven that may...
... on , the user is used in a particular installation. It is no guarantee that to correct the interference by qualified service personnel. Do not let cord hang over edge of the FCC Rules. For service and repair, please contact our Customer Support Center at the fuse or circuit breaker panel. 21. d) After heating, allow the container to control the temperature of door and oven that may...

English Manual
Page 5
... any hot or sharp surface. 6. If long cord or extension cord is used if care is exercised in a risk of the appliance. POWER CORD 1. ELECTRICAL REQUIREMENTS The electrical requirements are available and may be at both sides. Do not operate the oven without glass tray, roller support, and shaft in or tripping over any openings on the appliance. In the event of an electrical short circuit, grounding...
... any hot or sharp surface. 6. If long cord or extension cord is used if care is exercised in a risk of the appliance. POWER CORD 1. ELECTRICAL REQUIREMENTS The electrical requirements are available and may be at both sides. Do not operate the oven without glass tray, roller support, and shaft in or tripping over any openings on the appliance. In the event of an electrical short circuit, grounding...

English Manual
Page 6
... very hot should not be used. -6- COOKING UTENSILS GUIDE This section lists which utensils can be used in this microwave. these if they can melt and leave an unhealthy residue on the food. Paper plates and cups- Check the food in the oven and microwave on microwave food once the food has been removed from the oven. Ceramic, porcelain, and stoneware- Styrofoam plates and cups- Metal utensils - Glass and glass...
... very hot should not be used. -6- COOKING UTENSILS GUIDE This section lists which utensils can be used in this microwave. these if they can melt and leave an unhealthy residue on the food. Paper plates and cups- Check the food in the oven and microwave on microwave food once the food has been removed from the oven. Ceramic, porcelain, and stoneware- Styrofoam plates and cups- Metal utensils - Glass and glass...

English Manual
Page 7
...the wave guide) 8. NUMBER BUTTONS (0-9) Use to set time or food weight. It is also used to set child lock. START/+30 SEC Press to start cooking programs. Simply press it a number of times to cook popular foods. Door Release Button 6. AUTO COOK MENUS Instant settings to set express cooking program. POWER LEVEL Press to set cooking time and cook immediately at full power level. -7- Press buttons from 1 to 6 to set timer function. Roller Ring 5. STOP/CANCEL Press once to temporarily stop cooking, or twice to defrost food based on time. Glass Turntable CONTROL PANEL MENU...
...the wave guide) 8. NUMBER BUTTONS (0-9) Use to set time or food weight. It is also used to set child lock. START/+30 SEC Press to start cooking programs. Simply press it a number of times to cook popular foods. Door Release Button 6. AUTO COOK MENUS Instant settings to set express cooking program. POWER LEVEL Press to set cooking time and cook immediately at full power level. -7- Press buttons from 1 to 6 to set timer function. Roller Ring 5. STOP/CANCEL Press once to temporarily stop cooking, or twice to defrost food based on time. Glass Turntable CONTROL PANEL MENU...

English Manual
Page 8
... microwave food at 100% power conveniently. MICROWAVE COOKING (POWER LEVELS) 1. Press CLOCK or START/+30 SEC button once to select 12- QUICK START (1 TOUCH EXPRESS COOKING) Directly in standby mode, when you press the STOP/CANCEL button once, the program will beep every two minutes until user press STOP/CANCEL button or opens the door. Use number buttons to set cooking time. In standby mode or during cooking, press TIMER button once. 2 .Use number buttons to set desired time. You can add cooking time by pressing the CLOCK button in 12- In standby mode, press CLOCK button...
... microwave food at 100% power conveniently. MICROWAVE COOKING (POWER LEVELS) 1. Press CLOCK or START/+30 SEC button once to select 12- QUICK START (1 TOUCH EXPRESS COOKING) Directly in standby mode, when you press the STOP/CANCEL button once, the program will beep every two minutes until user press STOP/CANCEL button or opens the door. Use number buttons to set cooking time. In standby mode or during cooking, press TIMER button once. 2 .Use number buttons to set desired time. You can add cooking time by pressing the CLOCK button in 12- In standby mode, press CLOCK button...

English Manual
Page 9
... go to next even .47 to .53 8 - 9 - NOTE: • During defrosting, the system will pause and sound to remind user to turn food over , after that press START/+30 SEC button to set food weight. 3. Use number buttons to resume defrosting. The frozen food weight ranges from 4 oz to confirm. TIME DEFROST 1. Press STRAT/+30 SEC button to set a cooking power level : Press Number button Power (Display) Press Number button Power (Display) 1, 0 100% (P10) 4 40% (P-4) 9 90% (P-9) 3 30% (P-3) 8 80% (P-8) 2 20% (P-2) 7 70% (P-7) 1 10% (P-1) 6 60...
... go to next even .47 to .53 8 - 9 - NOTE: • During defrosting, the system will pause and sound to remind user to turn food over , after that press START/+30 SEC button to set food weight. 3. Use number buttons to resume defrosting. The frozen food weight ranges from 4 oz to confirm. TIME DEFROST 1. Press STRAT/+30 SEC button to set a cooking power level : Press Number button Power (Display) Press Number button Power (Display) 1, 0 100% (P10) 4 40% (P-4) 9 90% (P-9) 3 30% (P-3) 8 80% (P-8) 2 20% (P-2) 7 70% (P-7) 1 10% (P-1) 6 60...

English Manual
Page 10
... food that a button is not necessary to program the cooking power and time. Press START/+30 SEC button to start . Press START/+30 SEC button to start . CHILD LOCK The lock prevents unsupervised operation by children. To set: In standby mode, press and hold STOP/CANCEL button for 3 seconds. If any button, lock indication appears on the display for more than 3 seconds, then a beep will sound, and the lock indicator light will beep every minute. Input second microwave cooking program. 3. Auto cook menus : Code 1 2 3 4 5 6 Food...
... food that a button is not necessary to program the cooking power and time. Press START/+30 SEC button to start . Press START/+30 SEC button to start . CHILD LOCK The lock prevents unsupervised operation by children. To set: In standby mode, press and hold STOP/CANCEL button for 3 seconds. If any button, lock indication appears on the display for more than 3 seconds, then a beep will sound, and the lock indicator light will beep every minute. Input second microwave cooking program. 3. Auto cook menus : Code 1 2 3 4 5 6 Food...

English Manual
Page 11
... a microwaveable bowl. Keep the inside or around the outside of the oven door, wipe with a damp cloth to the particular disposal center provided by combining a cup of one lemon in the proper position. 9. When cleaning the control panel, leave oven door open to maintain the oven in a dishwasher. Remove odors from the wall when cleaning. 2. The oven should be cleaned regularly and any spills or spatters. CLEANING AND CARE 1. Do...
... a microwaveable bowl. Keep the inside or around the outside of the oven door, wipe with a damp cloth to the particular disposal center provided by combining a cup of one lemon in the proper position. 9. When cleaning the control panel, leave oven door open to maintain the oven in a dishwasher. Remove odors from the wall when cleaning. 2. The oven should be cleaned regularly and any spills or spatters. CLEANING AND CARE 1. Do...

English Manual
Page 12
Any other product, service, company, trade or product name and logo referenced herein are used under the responsibility of Technicolor (S.A.) or its Affiliates. -12- RCA, the RCA logo, the two dogs (Nipper and Chipper) logo, are registered trademarks or trademarks of Curtis International Ltd. This product has been manufactured and sold under license by Technicolor (S.A.) or its affiliates and are neither endorsed nor sponsored by Curtis International Ltd.
Any other product, service, company, trade or product name and logo referenced herein are used under the responsibility of Technicolor (S.A.) or its Affiliates. -12- RCA, the RCA logo, the two dogs (Nipper and Chipper) logo, are registered trademarks or trademarks of Curtis International Ltd. This product has been manufactured and sold under license by Technicolor (S.A.) or its affiliates and are neither endorsed nor sponsored by Curtis International Ltd.

English Manual
Page 13
RMW1132-BLACK RMW1132-WHITE RMW1132-RED RMW1134 RMW1178-B
RMW1132-BLACK RMW1132-WHITE RMW1132-RED RMW1134 RMW1178-B