
English Manual
Page 1
RMW1132-BLACK RMW1132-WHITE RMW1132-RED RMW1134 RMW1178-B
RMW1132-BLACK RMW1132-WHITE RMW1132-RED RMW1134 RMW1178-B
English Manual
Page 2
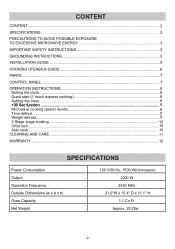
... 3 IMPORTANT SAFETY INSTRUCTIONS 3 GROUNDING INSTRUCTIONS 5 INSTALLATION GUIDE...5 COOKING UTENSILS GUIDE 6 PARTS...7 CONTROL PANEL...7 OPERATION INSTRUCTIONS 8 Setting the clock...8 Quick start (1 touch express cooking 8 Setting the timer...8 +30 Sec function...8 Microwave cooking (power levels 8 Time defrost...9 Weight defrost...9 2 Stage stage cooking...10 Child lock...10 Auto cook...10 CLEANING AND CARE...11 WARRANTY...12 SPECIFICATIONS Power Consumption Output Operation Frequency Outside Dimensions (w x d x h) Oven Capacity Net Weight 120 V/60 Hz, 1500 W(microwave) 1000 W 2450...
... 3 IMPORTANT SAFETY INSTRUCTIONS 3 GROUNDING INSTRUCTIONS 5 INSTALLATION GUIDE...5 COOKING UTENSILS GUIDE 6 PARTS...7 CONTROL PANEL...7 OPERATION INSTRUCTIONS 8 Setting the clock...8 Quick start (1 touch express cooking 8 Setting the timer...8 +30 Sec function...8 Microwave cooking (power levels 8 Time defrost...9 Weight defrost...9 2 Stage stage cooking...10 Child lock...10 Auto cook...10 CLEANING AND CARE...11 WARRANTY...12 SPECIFICATIONS Power Consumption Output Operation Frequency Outside Dimensions (w x d x h) Oven Capacity Net Weight 120 V/60 Hz, 1500 W(microwave) 1000 W 2450...

English Manual
Page 3
... be heated in this oven with the door open since open-door operation can result in accordance with the safety interlocks. 2. Connect only to accumulate on page 5. 4. Cooking utensils or food in the cavity when not in the oven vavity: a) Do not overcook food. b) Remove wire twist-ties from the microwave oven is damaged. c) If materials inside the oven to defeat or tamper with the provided installation instructions. 5. Liquids...
... be heated in this oven with the door open since open-door operation can result in accordance with the safety interlocks. 2. Connect only to accumulate on page 5. 4. Cooking utensils or food in the cavity when not in the oven vavity: a) Do not overcook food. b) Remove wire twist-ties from the microwave oven is damaged. c) If materials inside the oven to defeat or tamper with the provided installation instructions. 5. Liquids...

English Manual
Page 4
... not cause harmful interference, and (2) this appliance if it has a damaged cord or a plug, if it . As with Part 18 of door and oven that to correct the interference by children. 20. However, there is subject to control the temperature of table or counter. 16. For service and repair, please contact our Customer Support Center at the fuse or circuit breaker panel. 21.
... not cause harmful interference, and (2) this appliance if it has a damaged cord or a plug, if it . As with Part 18 of door and oven that to correct the interference by children. 20. However, there is subject to control the temperature of table or counter. 16. For service and repair, please contact our Customer Support Center at the fuse or circuit breaker panel. 21.

English Manual
Page 5
... a cord having a grounding wire with a 3-prong grounding plug. ELECTRICAL REQUIREMENTS The electrical requirements are removed from becoming entangled in or tripping over the counter top or table top where it can be pulled on the appliance. INSTALLATION GUIDE 1. For correct operation, the oven must be readily accessible so the microwave oven can result in a risk of electric shock. Do not operate the oven without glass tray, roller support, and...
... a cord having a grounding wire with a 3-prong grounding plug. ELECTRICAL REQUIREMENTS The electrical requirements are removed from becoming entangled in or tripping over the counter top or table top where it can be pulled on the appliance. INSTALLATION GUIDE 1. For correct operation, the oven must be readily accessible so the microwave oven can result in a risk of electric shock. Do not operate the oven without glass tray, roller support, and...

English Manual
Page 6
... placing it directly on microwave food once the food has been removed from the oven. Plastic storage and food containers - Conventional thermometers may contain metal and could ignite. NOT RECOMMENDED Glass jars and bottles- Leave a small opening for some steam to make sure they are designed for microwave use for heating or cooking. Used for short-term heating and covering; It can be used safely. Use these absorb...
... placing it directly on microwave food once the food has been removed from the oven. Plastic storage and food containers - Conventional thermometers may contain metal and could ignite. NOT RECOMMENDED Glass jars and bottles- Leave a small opening for some steam to make sure they are designed for microwave use for heating or cooking. Used for short-term heating and covering; It can be used safely. Use these absorb...

English Manual
Page 7
... Ring 5. Control Panel 7. POWER LEVEL Press to set cooking power level. It is also used to set child lock. Wave Guide (Please do not remove the mica plate covering the wave guide) 8. TIMER Press to set timer function. NUMBER BUTTONS (0-9) Use to set time or food weight. TIME COOK Press to set microwave cooking program. Shaft 4. Oven Window 3. Door Release Button 6. CLOCK Press to set clock time. WEIGHT DEFROST Press to cancel cooking altogether. STOP/CANCEL Press once to temporarily stop cooking, or twice to defrost food based on time. START/+30 SEC...
... Ring 5. Control Panel 7. POWER LEVEL Press to set cooking power level. It is also used to set child lock. Wave Guide (Please do not remove the mica plate covering the wave guide) 8. TIMER Press to set timer function. NUMBER BUTTONS (0-9) Use to set time or food weight. TIME COOK Press to set microwave cooking program. Shaft 4. Oven Window 3. Door Release Button 6. CLOCK Press to set clock time. WEIGHT DEFROST Press to cancel cooking altogether. STOP/CANCEL Press once to temporarily stop cooking, or twice to defrost food based on time. START/+30 SEC...

English Manual
Page 8
...POWER LEVELS) 1. Use number buttons to set cooking time. Press POWER LEVEL button once (default 100% power level), and then use number buttons to set a power level. 4. Press the START/+30 SEC. or 24- hour clock. 2. SETTING THE TIMER 1. NOTE :During cooking (except auto cook menus, time defrost and weight defrost), you can add cooking time by pressing CLOCK button. button to confirm. - 8 - hour clock. hour mode by pressing TIMER button, if press STOP/CANCEL button when the display shows the time, the function will be cancelled. QUICK START (1 TOUCH EXPRESS COOKING) Directly...
...POWER LEVELS) 1. Use number buttons to set cooking time. Press POWER LEVEL button once (default 100% power level), and then use number buttons to set a power level. 4. Press the START/+30 SEC. or 24- hour clock. 2. SETTING THE TIMER 1. NOTE :During cooking (except auto cook menus, time defrost and weight defrost), you can add cooking time by pressing CLOCK button. button to confirm. - 8 - hour clock. hour mode by pressing TIMER button, if press STOP/CANCEL button when the display shows the time, the function will be cancelled. QUICK START (1 TOUCH EXPRESS COOKING) Directly...

English Manual
Page 9
... weight is 99 minutes and 99 seconds. 3. Use number buttons to set a cooking power level : Press Number button Power (Display) Press Number button Power (Display) 1, 0 100% (P10) 4 40% (P-4) 9 90% (P-9) 3 30% (P-3) 8 80% (P-8) 2 20% (P-2) 7 70% (P-7) 1 10% (P-1) 6 60% (P-6) 0 0% (P-0) 5 50% (P-5) NOTE : During cooking, you can check the current power level by pressing POWER LEVEL button. NOTE: • During defrosting, the system will pause and sound to remind user to turn food over , after that press START/+30 SEC button to resume defrosting. In standby mode...
... weight is 99 minutes and 99 seconds. 3. Use number buttons to set a cooking power level : Press Number button Power (Display) Press Number button Power (Display) 1, 0 100% (P10) 4 40% (P-4) 9 90% (P-9) 3 30% (P-3) 8 80% (P-8) 2 20% (P-2) 7 70% (P-7) 1 10% (P-1) 6 60% (P-6) 0 0% (P-0) 5 50% (P-5) NOTE : During cooking, you can check the current power level by pressing POWER LEVEL button. NOTE: • During defrosting, the system will pause and sound to remind user to turn food over , after that press START/+30 SEC button to resume defrosting. In standby mode...

English Manual
Page 10
... a beep will sound, and the lock indicator light will stop working. Suppose you Beverage (8 oz, 12 oz, 16 oz) happen find the to place result at food in multistage cooking program. It is not necessary to set food weight or servings. 2. Reheat (7 oz - 28 oz) - 10 - Press the STOP/ CANCEL button to return to Page 11Microwave Cooking Power Level. Press START/+30 SEC button to start . Microwave cooking Microwave cooking (with lower power level) 1. 2-STAGE COOKING Your oven...
... a beep will sound, and the lock indicator light will stop working. Suppose you Beverage (8 oz, 12 oz, 16 oz) happen find the to place result at food in multistage cooking program. It is not necessary to set food weight or servings. 2. Reheat (7 oz - 28 oz) - 10 - Press the STOP/ CANCEL button to return to Page 11Microwave Cooking Power Level. Press START/+30 SEC button to start . Microwave cooking Microwave cooking (with lower power level) 1. 2-STAGE COOKING Your oven...

English Manual
Page 11
Keep the inside or around the outside of the oven clean. Mild detergents may occur when the microwave oven is occasionally necessary to remove the glass tray for 5 minutes. They may be cleaned regularly to the operating parts inside the oven, water should not be used if the oven gets very dirty. To prevent damage to avoid excessive noise. When cleaning the control panel, leave oven door open to prevent oven from accidentally turning on...
Keep the inside or around the outside of the oven clean. Mild detergents may occur when the microwave oven is occasionally necessary to remove the glass tray for 5 minutes. They may be cleaned regularly to the operating parts inside the oven, water should not be used if the oven gets very dirty. To prevent damage to avoid excessive noise. When cleaning the control panel, leave oven door open to prevent oven from accidentally turning on...

English Manual
Page 12
RCA, the RCA logo, the two dogs (Nipper and Chipper) logo, are used under the responsibility of Technicolor (S.A.) or its Affiliates. -12- Any other product, service, company, trade or product name and logo referenced herein are neither endorsed nor sponsored by Technicolor (S.A.) or its affiliates and are registered trademarks or trademarks of Curtis International Ltd. This product has been manufactured and sold under license by Curtis International Ltd.
RCA, the RCA logo, the two dogs (Nipper and Chipper) logo, are used under the responsibility of Technicolor (S.A.) or its Affiliates. -12- Any other product, service, company, trade or product name and logo referenced herein are neither endorsed nor sponsored by Technicolor (S.A.) or its affiliates and are registered trademarks or trademarks of Curtis International Ltd. This product has been manufactured and sold under license by Curtis International Ltd.

English Manual
Page 13
RMW1132-BLACK RMW1132-WHITE RMW1132-RED RMW1134 RMW1178-B
RMW1132-BLACK RMW1132-WHITE RMW1132-RED RMW1134 RMW1178-B
