
User Guide
Page 1
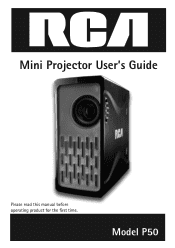
Mini Projector User's Guide Please read this manual before Model P50
Mini Projector User's Guide Please read this manual before Model P50
User Guide
Page 3
.... 2 Observe all instructions. 5. Do not block any heat sources such as laptops, radiators, heat that produce heat. 9. Do not use the projector near any ventilation openings. Read these instructions. 3. Protect the power cord from being walked on or pinched particularly at plugs, convenience receptacles, and the... point where they exit from the apparatus. 10 11. Clean only with the manufacturer's instructions. 8. Unplug the projector during lightning storms or when unused for long periods of electric shock, do not remove the cover or back, do not expose the...
.... 2 Observe all instructions. 5. Do not block any heat sources such as laptops, radiators, heat that produce heat. 9. Do not use the projector near any ventilation openings. Read these instructions. 3. Protect the power cord from being walked on or pinched particularly at plugs, convenience receptacles, and the... point where they exit from the apparatus. 10 11. Clean only with the manufacturer's instructions. 8. Unplug the projector during lightning storms or when unused for long periods of electric shock, do not remove the cover or back, do not expose the...
User Guide
Page 4
The projector should not be used in any way, such as when a power-supply cord or plug is damaged, liquid has been spilled or objects have fallen into the projector, the projector has been exposed to rain or moisture, does not operate normally, or has been dropped. 13. 12. The projector should placed on the projector. 14. required when the projector has been damaged in a well ventilated area to dripping or splashing should be exposed to prevent overheating. 3
The projector should not be used in any way, such as when a power-supply cord or plug is damaged, liquid has been spilled or objects have fallen into the projector, the projector has been exposed to rain or moisture, does not operate normally, or has been dropped. 13. 12. The projector should placed on the projector. 14. required when the projector has been damaged in a well ventilated area to dripping or splashing should be exposed to prevent overheating. 3
User Guide
Page 8
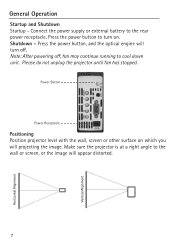
Make sure the projector is at a right angle to the wall or screen, or the image will unit. Connect the power supply or external battery to turn on which you will projecting the image. Press the power button, and the optical engine will appear distorted. 7 Horizontal Alignment Vertical Alignment General Operation Startup and Shutdown Startup - Press the power button to the rear power receptacle. Power Button Power Receptacle Positioning Position projector level with the wall, screen or other surface on . Shutdown - Please do not unplug the projector until fan has stopped.
Make sure the projector is at a right angle to the wall or screen, or the image will unit. Connect the power supply or external battery to turn on which you will projecting the image. Press the power button, and the optical engine will appear distorted. 7 Horizontal Alignment Vertical Alignment General Operation Startup and Shutdown Startup - Press the power button to the rear power receptacle. Power Button Power Receptacle Positioning Position projector level with the wall, screen or other surface on . Shutdown - Please do not unplug the projector until fan has stopped.
User Guide
Page 9
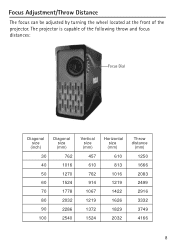
Focus Adjustment/Throw Distance The focus can be adjusted by turning the wheel located at the front of the following throw and focus distances: us Focus Dial t nt Focus Adjustment Diagonal size (inch) 30 40 50 60 70 80 90 100 Diagonal size (mm) 762 1016 1270 1524 1778 2032 2286 2540 Vertical size (mm) 457 610 762 914 1067 1219 1372 1524 Horizontal size (mm) 610 813 1016 1219 1422 1626 1829 2032 Throw distance (mm) 1250 1666 2083 2499 2916 3332 3749 4166 8 The projector is capable of the projector.
Focus Adjustment/Throw Distance The focus can be adjusted by turning the wheel located at the front of the following throw and focus distances: us Focus Dial t nt Focus Adjustment Diagonal size (inch) 30 40 50 60 70 80 90 100 Diagonal size (mm) 762 1016 1270 1524 1778 2032 2286 2540 Vertical size (mm) 457 610 762 914 1067 1219 1372 1524 Horizontal size (mm) 610 813 1016 1219 1422 1626 1829 2032 Throw distance (mm) 1250 1666 2083 2499 2916 3332 3749 4166 8 The projector is capable of the projector.
User Guide
Page 10
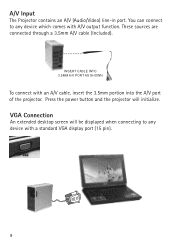
A/V Input The Projector contains an A/V (Audio/Video) line-in port. You can connect to any device which comes with A/V output function. These sources are connected through a 3.5mm A/V cable (Included). VGA Connection An extended desktop screen will initialize. INSERT CABLE INTO 3.5MM A/V PORT AS SHOWN To connect with a standard VGA display port (15 pin). 9 Press the power button and the projector will be displayed when connecting to any device with an A/V cable, insert the 3.5mm portion into the A/V port of the projector.
A/V Input The Projector contains an A/V (Audio/Video) line-in port. You can connect to any device which comes with A/V output function. These sources are connected through a 3.5mm A/V cable (Included). VGA Connection An extended desktop screen will initialize. INSERT CABLE INTO 3.5MM A/V PORT AS SHOWN To connect with a standard VGA display port (15 pin). 9 Press the power button and the projector will be displayed when connecting to any device with an A/V cable, insert the 3.5mm portion into the A/V port of the projector.
User Guide
Page 11
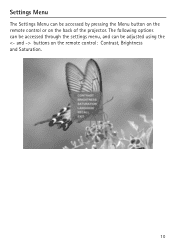
Settings Menu The Settings Menu can be accessed by pressing the Menu button on the remote control or on the remote control: Contrast, Brightness and Saturation. 10 The following options can be accessed through the settings menu, and can be adjusted using the buttons on the back of the projector.
Settings Menu The Settings Menu can be accessed by pressing the Menu button on the remote control or on the remote control: Contrast, Brightness and Saturation. 10 The following options can be accessed through the settings menu, and can be adjusted using the buttons on the back of the projector.
User Guide
Page 13
...lens clean and free of the case. • Lamp Replacement - Maintenance The RCA P50 Projector requires very little maintenance. • Lens Cleaning - Do not attempt to replace the LED lamp. • Opening the Projector - Please use alcohol, benzene, or other cleaning detergents as this may cause ...discoloration or warping of dirt and debris by using a soft lint-free cloth. • General Cleaning - , projector and wipe the projector with a soft lint-free cloth. Do not use only CR2025 type batteries for replacement. 12 There are no serviceable parts in...
...lens clean and free of the case. • Lamp Replacement - Maintenance The RCA P50 Projector requires very little maintenance. • Lens Cleaning - Do not attempt to replace the LED lamp. • Opening the Projector - Please use alcohol, benzene, or other cleaning detergents as this may cause ...discoloration or warping of dirt and debris by using a soft lint-free cloth. • General Cleaning - , projector and wipe the projector with a soft lint-free cloth. Do not use only CR2025 type batteries for replacement. 12 There are no serviceable parts in...
User Guide
Page 14
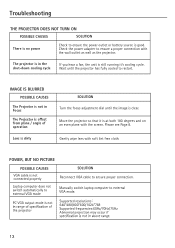
...in Focus from plane / angle of operation Lens is dirty SOLUTION Turn the focus adjustment dial until the projector has fully cooled to restart. Wait until the image is not the projector Manually switch laptop computer to external VGA mode. Supported resolutionsɿ 640*480/800*600/1024*768 ...SOLUTION Reconnect VGA cable to ensure proper connection. Check the power adapter to ensure a proper connection with the wall outlet as well as the projector. Please see Page 8. POWER, BUT NO PICTURE POSSIBLE CAUSES VGA cable is at both 180 degrees and on an even plane with soft lint...
...in Focus from plane / angle of operation Lens is dirty SOLUTION Turn the focus adjustment dial until the projector has fully cooled to restart. Wait until the image is not the projector Manually switch laptop computer to external VGA mode. Supported resolutionsɿ 640*480/800*600/1024*768 ...SOLUTION Reconnect VGA cable to ensure proper connection. Check the power adapter to ensure a proper connection with the wall outlet as well as the projector. Please see Page 8. POWER, BUT NO PICTURE POSSIBLE CAUSES VGA cable is at both 180 degrees and on an even plane with soft lint...
User Guide
Page 17
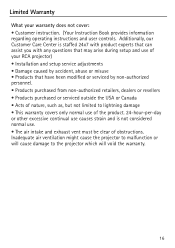
Limited Warranty What your RCA projector) • Installation and setup service adjustments • Damage caused by accident, abuse or misuse • ...; Products purchased or serviced outside the USA or Canada • Acts of nature, such as, but not limited to the projector which will cause damage to lightning damage • This warranty covers only normal use of the product. 24-hour-per-day...(Your Instruction Book provides information regarding operating instructions and user controls. Inadequate air ventilation might cause the projector to malfunction or will void the warranty. 16
Limited Warranty What your RCA projector) • Installation and setup service adjustments • Damage caused by accident, abuse or misuse • ...; Products purchased or serviced outside the USA or Canada • Acts of nature, such as, but not limited to the projector which will cause damage to lightning damage • This warranty covers only normal use of the product. 24-hour-per-day...(Your Instruction Book provides information regarding operating instructions and user controls. Inadequate air ventilation might cause the projector to malfunction or will void the warranty. 16