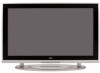

Brochure
Page 2
... Video Output Audio Output REMOTE CONTROL Model Number Type ACCESSORIES SUPPLIED Users Guide Power Cord GENERAL Finish Detachable base Wall Mounting Power Supply Packaging Size (HxWxD) inches Weight (lbs) (Product/Packaged) 1 1 set Phono L/R 1 1 - 3.5mm PC Audio 2 set 2 set Phono L/R 1 HDMI * 1 set Phono L/R for DVI Yes 1 1 set Phono L/R RCR311TBM2S 3-Device Universal English, French Yes Satin Silver/Black Border Yes Requires a "Universal Bracket" Built-in PC mode (Multitask Audio™) Auto Tune (one-button launch) Auto Channel Search Multilingual On-Screen-Display Channel Labeling Closed...
... Video Output Audio Output REMOTE CONTROL Model Number Type ACCESSORIES SUPPLIED Users Guide Power Cord GENERAL Finish Detachable base Wall Mounting Power Supply Packaging Size (HxWxD) inches Weight (lbs) (Product/Packaged) 1 1 set Phono L/R 1 1 - 3.5mm PC Audio 2 set 2 set Phono L/R 1 HDMI * 1 set Phono L/R for DVI Yes 1 1 set Phono L/R RCR311TBM2S 3-Device Universal English, French Yes Satin Silver/Black Border Yes Requires a "Universal Bracket" Built-in PC mode (Multitask Audio™) Auto Tune (one-button launch) Auto Channel Search Multilingual On-Screen-Display Channel Labeling Closed...

User Manual
Page 2
...that this serial number on -screen. Important: This television is a table model and is of cable entry as radios and televisions, use is designed to operate it in case you need them. Also, make sure the stand or base you if needed. Attach it immediately. Press any time. Please...PLUG AND SOCKET IS EASILY ACCESSIBLE. For disposal or recycling information, please contact your product for this product allows us to unfreeze the picture at www.rca.com/television. Registering this equipment is not covered by your sales receipt to obtain warranty parts and service...
...that this serial number on -screen. Important: This television is a table model and is of cable entry as radios and televisions, use is designed to operate it in case you need them. Also, make sure the stand or base you if needed. Attach it immediately. Press any time. Please...PLUG AND SOCKET IS EASILY ACCESSIBLE. For disposal or recycling information, please contact your product for this product allows us to unfreeze the picture at www.rca.com/television. Registering this equipment is not covered by your sales receipt to obtain warranty parts and service...

User Manual
Page 3
... with the cart, stand, tripod, bracket, or table specified by the manufacturer. 12. ELECTRIC SERVICE EQUIPMENT ANTENNA LEAD IN WIRE GROUND CLAMP ANTENNA DISCHARGE UNIT (NEC SECTION 810-20) GROUNDING CONDUCTORS (NEC SECTION 810-21) GROUND CLAMPS POWER SERVICE GROUNDING ELECTRODE SYSTEM (NEC ART 250, PART H) Important Information i Do not install near water. 6. A grounding type plug has two blades...
... with the cart, stand, tripod, bracket, or table specified by the manufacturer. 12. ELECTRIC SERVICE EQUIPMENT ANTENNA LEAD IN WIRE GROUND CLAMP ANTENNA DISCHARGE UNIT (NEC SECTION 810-20) GROUNDING CONDUCTORS (NEC SECTION 810-21) GROUND CLAMPS POWER SERVICE GROUNDING ELECTRODE SYSTEM (NEC ART 250, PART H) Important Information i Do not install near water. 6. A grounding type plug has two blades...

User Manual
Page 5
... Contents Important Safety Instructions i Chapter 1: Connections and Setup Things to Consider Before You Connect 6 Protect Against Power Surges 6 Protect Devices from Overheating 6 Position Cables Properly to Avoid Audio Interference 6 Use Indirect Light 6 Check Supplied Parts 6 Connecting Speakers to Your TV 7 Mounting Your TV to the Wall 7 Get the Picture 8 Getting Digital Channels 8 Getting Regular (Analog) Channels 8 Choose Your Connection 9 Video (Basic) Connection 10 Component Video (Advanced) Connection ........ 10 HDMI/DVI Connection 12 VGA Connection 14 Plug in the TV...
... Contents Important Safety Instructions i Chapter 1: Connections and Setup Things to Consider Before You Connect 6 Protect Against Power Surges 6 Protect Devices from Overheating 6 Position Cables Properly to Avoid Audio Interference 6 Use Indirect Light 6 Check Supplied Parts 6 Connecting Speakers to Your TV 7 Mounting Your TV to the Wall 7 Get the Picture 8 Getting Digital Channels 8 Getting Regular (Analog) Channels 8 Choose Your Connection 9 Video (Basic) Connection 10 Component Video (Advanced) Connection ........ 10 HDMI/DVI Connection 12 VGA Connection 14 Plug in the TV...

User Manual
Page 6
... ordering. Use Indirect Light Don't place the TV where sunlight or room lighting will be directed toward the screen. Chapter 1 DVD ON OFF VCR TV VOL CH MUTE GO BACK CLEAR MENU OK PRESETS CC 1 SKIP INFO GUIDE 2 3 4 5 6 7 INPUT 8 9 0 ANTENNA REVERSE RECORD PLAY FORWARD STOP PAUSE AGAIN SPEED ZOOM OPEN CLOSE SEARCH Remote control 2 AAA batteries Part # RCR311TBM2S Power cord Eight screws for representation only. Position Cables Properly...
... ordering. Use Indirect Light Don't place the TV where sunlight or room lighting will be directed toward the screen. Chapter 1 DVD ON OFF VCR TV VOL CH MUTE GO BACK CLEAR MENU OK PRESETS CC 1 SKIP INFO GUIDE 2 3 4 5 6 7 INPUT 8 9 0 ANTENNA REVERSE RECORD PLAY FORWARD STOP PAUSE AGAIN SPEED ZOOM OPEN CLOSE SEARCH Remote control 2 AAA batteries Part # RCR311TBM2S Power cord Eight screws for representation only. Position Cables Properly...

User Manual
Page 7
... purchase a universal wall mount to mount your speakers: 1. This is copper. the other conductor to the black speaker terminals, connecting on the TV. There are two speakers packed with the wall mount to mount the TV to the wall. B. Connections and Setup Connecting Speakers to Your TV Speaker brackets Note: If you're connecting a home theater to the TV using the Audio Out jacks, you don't need a Philips screwdriver to attach the screws.
... purchase a universal wall mount to mount your speakers: 1. This is copper. the other conductor to the black speaker terminals, connecting on the TV. There are two speakers packed with the wall mount to mount the TV to the wall. B. Connections and Setup Connecting Speakers to Your TV Speaker brackets Note: If you're connecting a home theater to the TV using the Audio Out jacks, you don't need a Philips screwdriver to attach the screws.
User Manual
Page 8
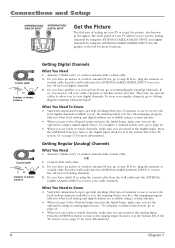
... locations. Connections and Setup ANTENNA/CABLE ANTENNA/CABLE ANALOG INPUT DIGITAL INPUT Get the Picture The first part of setting up your TV allows you to receive analog channels by using the ANTENNA/CABLE ANALOG INPUT and digital channels by using the ANTENNA/CABLE DIGITAL INPUT. Do you have an indoor or outdoor antenna? To complete a channel search now, go to receive your cable channels. If so, plug the antenna or coaxial cable from the wall outlet into the ANTENNA/CABLE DIGITAL INPUT to receive free off -air local analog channels...
... locations. Connections and Setup ANTENNA/CABLE ANTENNA/CABLE ANALOG INPUT DIGITAL INPUT Get the Picture The first part of setting up your TV allows you to receive analog channels by using the ANTENNA/CABLE ANALOG INPUT and digital channels by using the ANTENNA/CABLE DIGITAL INPUT. Do you have an indoor or outdoor antenna? To complete a channel search now, go to receive your cable channels. If so, plug the antenna or coaxial cable from the wall outlet into the ANTENNA/CABLE DIGITAL INPUT to receive free off -air local analog channels...
User Manual
Page 11
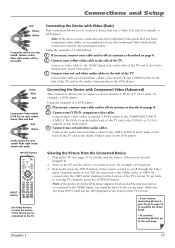
... the wrong input. Chapter 1 11 Red= right audio; Connect a video cable to the Video Output jack on the DVD player. 3. Red= right audio; Note: If the picture from the Connected Device 1. white= left audio ON•OFF button DVD ON OFF VCR TV VOL CH MUTE GO BACK CLEAR MENU OK INPUT button PRESETS CC 1 SKIP INFO GUIDE 2 3 4 5 6 7 INPUT 8 9 0 ANTENNA REVERSE RECORD PLAY FORWARD STOP PAUSE AGAIN SPEED ZOOM OPEN CLOSE SEARCH Use these buttons to view the picture of...
... the wrong input. Chapter 1 11 Red= right audio; Connect a video cable to the Video Output jack on the DVD player. 3. Red= right audio; Note: If the picture from the Connected Device 1. white= left audio ON•OFF button DVD ON OFF VCR TV VOL CH MUTE GO BACK CLEAR MENU OK INPUT button PRESETS CC 1 SKIP INFO GUIDE 2 3 4 5 6 7 INPUT 8 9 0 ANTENNA REVERSE RECORD PLAY FORWARD STOP PAUSE AGAIN SPEED ZOOM OPEN CLOSE SEARCH Use these buttons to view the picture of...

User Manual
Page 13
... MENU OK INPUT button PRESETS CC 1 SKIP INFO GUIDE 2 3 4 5 6 7 INPUT 8 9 0 ANTENNA REVERSE PLAY FORWARD RECORD STOP PAUSE AGAIN SPEED ZOOM OPEN CLOSE SEARCH Use these buttons to view the picture of the HDMI cable, then connect the adapter to the DVI Out jack on the TV and the device you 're done connecting devices to your set -top box. To go to the HDMI Troubleshooting section on the remote control to scroll through the Video Input Channels...
... MENU OK INPUT button PRESETS CC 1 SKIP INFO GUIDE 2 3 4 5 6 7 INPUT 8 9 0 ANTENNA REVERSE PLAY FORWARD RECORD STOP PAUSE AGAIN SPEED ZOOM OPEN CLOSE SEARCH Use these buttons to view the picture of the HDMI cable, then connect the adapter to the DVI Out jack on the TV and the device you 're done connecting devices to your set -top box. To go to the HDMI Troubleshooting section on the remote control to scroll through the Video Input Channels...
User Manual
Page 14
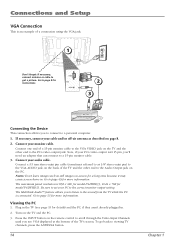
... viewing TV channels, press the ANTENNA button. 14 Chapter 1 Go to the Audio Output jack on the back of a connection using the VGA jack. 1 Don't forget: If necessary, connect antenna or cable to get a picture. Plug in the TV (see VGA displayed at the bottom of a 15-pin monitor cable to the VGA VIDEO jack on the remote control to scroll through the Video Input Channels until you 'll need an adapter that can connect...
... viewing TV channels, press the ANTENNA button. 14 Chapter 1 Go to the Audio Output jack on the back of a connection using the VGA jack. 1 Don't forget: If necessary, connect antenna or cable to get a picture. Plug in the TV (see VGA displayed at the bottom of a 15-pin monitor cable to the VGA VIDEO jack on the remote control to scroll through the Video Input Channels until you 'll need an adapter that can connect...

User Manual
Page 15
... INFO GUIDE 2 3 4 5 6 7 INPUT 8 9 0 ANTENNA REVERSE RECORD PLAY FORWARD STOP PAUSE AGAIN SPEED ZOOM OPEN CLOSE SEARCH OK button Arrows How to Use the Remote Control to view other end into the outlet. Use the right or left arrow button to Complete the Initial Setup The technical term is the same throughout the menu screens: highlight your TV by a light switch. To highlight a menu item, press the arrow buttons on the remote...
... INFO GUIDE 2 3 4 5 6 7 INPUT 8 9 0 ANTENNA REVERSE RECORD PLAY FORWARD STOP PAUSE AGAIN SPEED ZOOM OPEN CLOSE SEARCH OK button Arrows How to Use the Remote Control to view other end into the outlet. Use the right or left arrow button to Complete the Initial Setup The technical term is the same throughout the menu screens: highlight your TV by a light switch. To highlight a menu item, press the arrow buttons on the remote...

User Manual
Page 17
... in a 16/9 format. It depends on -screen. Changing Channels • Digital channels can take longer to begin the channel search. Press CLEAR to the Digital input. Even though the initial channel search can have an analog signal connected to your ANTENNA/CABLE ANALOG INPUT, then look for your channel list. search Auto Ch. To exit the menu system, press CLEAR. Go to try a different format that removing channels from your ANTENNA/CABLE DIGITAL INPUT, then look...
... in a 16/9 format. It depends on -screen. Changing Channels • Digital channels can take longer to begin the channel search. Press CLEAR to the Digital input. Even though the initial channel search can have an analog signal connected to your ANTENNA/CABLE ANALOG INPUT, then look for your channel list. search Auto Ch. To exit the menu system, press CLEAR. Go to try a different format that removing channels from your ANTENNA/CABLE DIGITAL INPUT, then look...

User Manual
Page 18
... speakers supplied with the TV. The left and right audio cables because the DVI cable carries only the picture signal, not the sound. MONITOR OUT Connect a VCR or DVD-recorder to the CMP2 L and R AUDIO jacks. AUDIO Use the Audio Out jacks when using HDMI/DVI as a DVI connection, remember to connect devices. The right audio connector is based on Digital Visual Interface (DVI), the jack on the same channel you don't need to receive the signal from the antenna, cable, or cable box...
... speakers supplied with the TV. The left and right audio cables because the DVI cable carries only the picture signal, not the sound. MONITOR OUT Connect a VCR or DVD-recorder to the CMP2 L and R AUDIO jacks. AUDIO Use the Audio Out jacks when using HDMI/DVI as a DVI connection, remember to connect devices. The right audio connector is based on Digital Visual Interface (DVI), the jack on the same channel you don't need to receive the signal from the antenna, cable, or cable box...
User Manual
Page 20
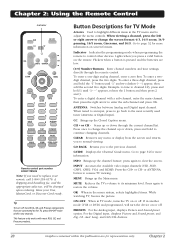
... MENU OK PRESETS CC 1 SKIP INFO GUIDE 2 3 4 5 6 7 INPUT 8 9 0 ANTENNA REVERSE RECORD PLAY FORWARD STOP PAUSE AGAIN SPEED ZOOM OPEN CLOSE SEARCH Remote control part number RCR311TBM2S Note: If you to the previous channel. Have your remote, call 1-800-338-0376. Tip To turn the device on the remote. Go to page 32 for TV Mode Arrows Used to highlight different items in TV mode, turns the TV on screen formats...
... MENU OK PRESETS CC 1 SKIP INFO GUIDE 2 3 4 5 6 7 INPUT 8 9 0 ANTENNA REVERSE RECORD PLAY FORWARD STOP PAUSE AGAIN SPEED ZOOM OPEN CLOSE SEARCH Remote control part number RCR311TBM2S Note: If you to the previous channel. Have your remote, call 1-800-338-0376. Tip To turn the device on the remote. Go to page 32 for TV Mode Arrows Used to highlight different items in TV mode, turns the TV on screen formats...
User Manual
Page 21
... video input channel. VOL - Also used with the ON•OFF button to turn on the TV and tune to the correct video input channel. GUIDE If you have connected to scroll through the available video input channels and view devices you 're operating another device that has an on-screen program guide, this button accesses the on other compatible DVD players. VCR Puts the remote in TV mode. OPEN•CLOSE In DVD mode, opens or closes...
... video input channel. VOL - Also used with the ON•OFF button to turn on the TV and tune to the correct video input channel. GUIDE If you have connected to scroll through the available video input channels and view devices you 're operating another device that has an on-screen program guide, this button accesses the on other compatible DVD players. VCR Puts the remote in TV mode. OPEN•CLOSE In DVD mode, opens or closes...

User Manual
Page 35
... technologies are best used to provide more bass. Sound Go back Tone control Sound type Sound mode Balance SRS TruBass Auto Volume Level Sound effect Internal speakers Headphone settings Advanced settings ... Use this setting when receiving broadcasts with more depth to adjust. Wide (available only for a fuller, more spacious sound. Press the right arrow to your speakers. Creates a three-dimensional sound while extending the sound range beyond the size of the sound. None...
... technologies are best used to provide more bass. Sound Go back Tone control Sound type Sound mode Balance SRS TruBass Auto Volume Level Sound effect Internal speakers Headphone settings Advanced settings ... Use this setting when receiving broadcasts with more depth to adjust. Wide (available only for a fuller, more spacious sound. Press the right arrow to your speakers. Creates a three-dimensional sound while extending the sound range beyond the size of the sound. None...
User Manual
Page 36
... watching. Headphone settings Displays a choice list of the video for all channels on digital channels. The Headphone sound option allows you to page 33 for the program you want to control the sound by the TV. • Fixed Provides fixed output from the MONITOR AUDIO OUTPUT jacks. SAP audio is available. Go to choose Stereo, Mono or Auto. The default digital channel audio language options are disabled. All picture options can adjust: Volume, Bass...
... watching. Headphone settings Displays a choice list of the video for all channels on digital channels. The Headphone sound option allows you to page 33 for the program you want to control the sound by the TV. • Fixed Provides fixed output from the MONITOR AUDIO OUTPUT jacks. SAP audio is available. Go to choose Stereo, Mono or Auto. The default digital channel audio language options are disabled. All picture options can adjust: Volume, Bass...

User Manual
Page 38
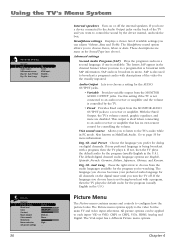
... the ANTENNA/CABLE ANALOG INPUT, you connected a signal to page 14 for TV signals. Preferences ... VGA Picture menu Setup Go back Channel setup ... Horizontal position Adjusts the picture's position left or right. If you change the Signal type setting. List and Labels Go back Channel number In channel list Channel label Favorite channel 010 _ _ _ _ _ _ The following Picture menu options are using cable or a cable box for more information. Using the TV's Menu System Picture Go back Black level Color Contrast Color warmth Auto adjustment Phase Clock Vertical position...
... the ANTENNA/CABLE ANALOG INPUT, you connected a signal to page 14 for TV signals. Preferences ... VGA Picture menu Setup Go back Channel setup ... Horizontal position Adjusts the picture's position left or right. If you change the Signal type setting. List and Labels Go back Channel number In channel list Channel label Favorite channel 010 _ _ _ _ _ _ The following Picture menu options are using cable or a cable box for more information. Using the TV's Menu System Picture Go back Black level Color Contrast Color warmth Auto adjustment Phase Clock Vertical position...
User Manual
Page 43
... audio output jacks to the TV's L and R Audio Input jacks. • The sound settings can be because the speaker wires aren't connected correctly. three yellow video cables or bundled component video cables (red, blue, and green) connect to the COMPONENT INPUT jacks on the back of your TV. • If you're getting a black and white picture from a device you've connected to your TV, you 're trying to view a connected device, press INPUT...
... audio output jacks to the TV's L and R Audio Input jacks. • The sound settings can be because the speaker wires aren't connected correctly. three yellow video cables or bundled component video cables (red, blue, and green) connect to the COMPONENT INPUT jacks on the back of your TV. • If you're getting a black and white picture from a device you've connected to your TV, you 're trying to view a connected device, press INPUT...
User Manual
Page 45
... DVI device is having trouble sending video information to the TV. Re-connect your device. Put new batteries in the remote. (Note, if you remove the batteries, you to change the picture quality output that after a reboot you enter the Parental control menu enter a new password. If problems still occur, turn off . Contact the manufacturer of the HDMI or DVI device for updated FAQs or contact RCA Customer Support...
... DVI device is having trouble sending video information to the TV. Re-connect your device. Put new batteries in the remote. (Note, if you remove the batteries, you to change the picture quality output that after a reboot you enter the Parental control menu enter a new password. If problems still occur, turn off . Contact the manufacturer of the HDMI or DVI device for updated FAQs or contact RCA Customer Support...


