
Warranty Card
Page 1
Warranty information Limited warranty 12 Month Limited Warranty Applies to RCA Audio/Video Products AUDIOVOX ELECTRONICS CORP. (the Company) warrants to the original retail purchaser of this product that should this product or any part thereof, ...
Warranty information Limited warranty 12 Month Limited Warranty Applies to RCA Audio/Video Products AUDIOVOX ELECTRONICS CORP. (the Company) warrants to the original retail purchaser of this product that should this product or any part thereof, ...

Warranty Card
Page 2
However DO NOT return any charges billed to you by the Exchange Center for service not covered by the warranty. • A new or refurbished unit will do: Provide you freight prepaid. Attn: Service Department. 150 Marcus Blvd. The exchange unit is under warranty for loss or damage. For Canada Customers, please ship to : Audiovox Electronics Corp. with the original purchase. We recommend using the original carton and packing materials. • Include evidence of purchase date such as the bill of the original product's warranty period. Audiovox accepts no liability in case of ...
However DO NOT return any charges billed to you by the Exchange Center for service not covered by the warranty. • A new or refurbished unit will do: Provide you freight prepaid. Attn: Service Department. 150 Marcus Blvd. The exchange unit is under warranty for loss or damage. For Canada Customers, please ship to : Audiovox Electronics Corp. with the original purchase. We recommend using the original carton and packing materials. • Include evidence of purchase date such as the bill of the original product's warranty period. Audiovox accepts no liability in case of ...

Owner/User Manual
Page 1
user manual EZ2000 EZ2000RD EZ2000BL EZ2000PL EZ2000BK It is important to read this user manual prior to using your new product for the first time.
user manual EZ2000 EZ2000RD EZ2000BL EZ2000PL EZ2000BK It is important to read this user manual prior to using your new product for the first time.

Owner/User Manual
Page 2
Important safety instructions IMPORTANT SAFETY INSTRUCTIONS PLEASE READ AND SAVE FOR FUTURE REFERENCE Some of the polarized or grounding-type plug. Install in a bookcase or cabinet that may not apply to disconnect the apparatus from the mains completely, the mains plug should be observed during handling and use . The wide blade or the third prong is provided for ventilation. In order to your particular product; on the product. • Connect power cord only to AC power source as vases, shall be exposed to dripping or splashing and no objects filled with liquids, such as ...
Important safety instructions IMPORTANT SAFETY INSTRUCTIONS PLEASE READ AND SAVE FOR FUTURE REFERENCE Some of the polarized or grounding-type plug. Install in a bookcase or cabinet that may not apply to disconnect the apparatus from the mains completely, the mains plug should be observed during handling and use . The wide blade or the third prong is provided for ventilation. In order to your particular product; on the product. • Connect power cord only to AC power source as vases, shall be exposed to dripping or splashing and no objects filled with liquids, such as ...

Owner/User Manual
Page 3
They may result. • Do not store the unit near fire, places with a soft cloth or a damp chamois leather. condensation problems may cause skin burns or other personal injury. • Please help to protect the environment by recycling or disposing of used batteries by qualified personnel. 2 Never use the unit immediately after transportation from the product if you dispose of batteries according to use it for a month or more. • If your product for the unit • Do not use solvents. • The unit must only be recharged, do not incinerate, and do not mix ...
They may result. • Do not store the unit near fire, places with a soft cloth or a damp chamois leather. condensation problems may cause skin burns or other personal injury. • Please help to protect the environment by recycling or disposing of used batteries by qualified personnel. 2 Never use the unit immediately after transportation from the product if you dispose of batteries according to use it for a month or more. • If your product for the unit • Do not use solvents. • The unit must only be recharged, do not incinerate, and do not mix ...
Owner/User Manual
Page 4
... the user's authority to operate the equipment. FCC Information This equipment has been tested and found to comply with the limits for technical support RCA EZ2000 RCA EZ2000PL RCA EZ2000RD RCA EZ2000BK RCA EZ2000BL This Class B digital apparatus complies with the instructions, may cause harmful interference to radio communications. These limits are designed to correct the...
... the user's authority to operate the equipment. FCC Information This equipment has been tested and found to comply with the limits for technical support RCA EZ2000 RCA EZ2000PL RCA EZ2000RD RCA EZ2000BK RCA EZ2000BL This Class B digital apparatus complies with the instructions, may cause harmful interference to radio communications. These limits are designed to correct the...

Owner/User Manual
Page 5
Contents Important safety instructions IMPORTANT SAFETY INSTRUCTIONS 1 Important battery precautions ...2 Ecology...2 Precautions for the unit ...2 FCC Information 3 End user license agreement 6 Getting started Content of the box...8 Charging the battery ...8 Inserting microSD memory card ...9 Turning on the camcorder ...9 Resetting the camcorder...10 Setting date and time...10 General controls General controls ...11 Operation modes ...12 Recording videos Recording quality...13 Quality settings...13 Recording videos...14 Taking photos To take photos...15 Playback mode Playing back ...
Contents Important safety instructions IMPORTANT SAFETY INSTRUCTIONS 1 Important battery precautions ...2 Ecology...2 Precautions for the unit ...2 FCC Information 3 End user license agreement 6 Getting started Content of the box...8 Charging the battery ...8 Inserting microSD memory card ...9 Turning on the camcorder ...9 Resetting the camcorder...10 Setting date and time...10 General controls General controls ...11 Operation modes ...12 Recording videos Recording quality...13 Quality settings...13 Recording videos...14 Taking photos To take photos...15 Playback mode Playing back ...
Owner/User Manual
Page 6
Connecting to external devices Viewing videos on TV ...20 Recording videos to VHS tape or DVD 20 Managing videos on your computer Computer system requirements...21 Connecting to a PC...21 About RCA Memory Manager ...22 Viewing videos on PC ...22 Additional information Tips and troubleshooting...23 Product registration ...24 For your records ...24 Service Information...24 Copyright warning...24 Back up your data ...24 Visiting RCA website ...24 Technical specifications ...25 Warranty information Limited warranty ...27 5
Connecting to external devices Viewing videos on TV ...20 Recording videos to VHS tape or DVD 20 Managing videos on your computer Computer system requirements...21 Connecting to a PC...21 About RCA Memory Manager ...22 Viewing videos on PC ...22 Additional information Tips and troubleshooting...23 Product registration ...24 For your records ...24 Service Information...24 Copyright warning...24 Back up your data ...24 Visiting RCA website ...24 Technical specifications ...25 Warranty information Limited warranty ...27 5
Owner/User Manual
Page 7
...IS A LEGAL AGREEMENT BETWEEN YOU AND AUDIOVOX CORPORATION AND, AS APPLICABLE, ANY AUDIOVOX SUBSIDIARY, AS DEFINED BELOW (COLLECTIVELY "AUDIOVOX"), FOR THE RCA BRANDED PORTABLE DIGITAL AUDIO/VIDEO DEVICE APPLICATION/DRIVER SOFTWARE PROGRAM WHICH MAY INCLUDE ASSOCIATED SOFTWARE COMPONENTS, SOFTWARE LICENSED BY AUDIOVOX FROM THIRD PARTIES ("...this EULA. In such case, the Program may transfer the Program and license to another party only as a part of the RCA branded Portable Digital Audio/Video Device ("A/V Device"), and only if the other party agrees to accept the terms and conditions of ...
...IS A LEGAL AGREEMENT BETWEEN YOU AND AUDIOVOX CORPORATION AND, AS APPLICABLE, ANY AUDIOVOX SUBSIDIARY, AS DEFINED BELOW (COLLECTIVELY "AUDIOVOX"), FOR THE RCA BRANDED PORTABLE DIGITAL AUDIO/VIDEO DEVICE APPLICATION/DRIVER SOFTWARE PROGRAM WHICH MAY INCLUDE ASSOCIATED SOFTWARE COMPONENTS, SOFTWARE LICENSED BY AUDIOVOX FROM THIRD PARTIES ("...this EULA. In such case, the Program may transfer the Program and license to another party only as a part of the RCA branded Portable Digital Audio/Video Device ("A/V Device"), and only if the other party agrees to accept the terms and conditions of ...

Owner/User Manual
Page 8
THE ENTIRE RISK AS TO THE QUALITY AND PERFORMANCE OF THE PROGRAM IS WITH YOU. If you and AUDIOVOX, relating to the subject matter of this A/V Device outside the United States or the European Union, then local law may apply. 9. This exclusion of the voting interest in the entity in and to the content which supersedes all proposals or prior agreements, oral or written, and all full or partial copies thereof. 4. All title and intellectual property rights in question. 7 LIMITATION OF LIABILITY (a) TO THE MAXIMUM EXTENT PERMITTED BY APPLICABLE LAW, IN NO EVENT SHALL AUDIOVOX, ...
THE ENTIRE RISK AS TO THE QUALITY AND PERFORMANCE OF THE PROGRAM IS WITH YOU. If you and AUDIOVOX, relating to the subject matter of this A/V Device outside the United States or the European Union, then local law may apply. 9. This exclusion of the voting interest in the entity in and to the content which supersedes all proposals or prior agreements, oral or written, and all full or partial copies thereof. 4. All title and intellectual property rights in question. 7 LIMITATION OF LIABILITY (a) TO THE MAXIMUM EXTENT PERMITTED BY APPLICABLE LAW, IN NO EVENT SHALL AUDIOVOX, ...
Owner/User Manual
Page 9
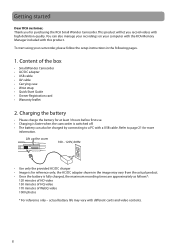
... cards and video contents. 8 Lift up the cover 100 - 120V, 60Hz • Use only the provided AC/DC charger • Image is for purchasing the RCA Small Wonder Camcorder. actual battery life may vary from the actual product. • Once the battery is switched off. • The battery can also manage... leaflet 2. Refer to a PC with this product. Charging the battery • Please charge the battery for more information. To start using your computer with the RCA Memory Manager included with a USB cable.
... cards and video contents. 8 Lift up the cover 100 - 120V, 60Hz • Use only the provided AC/DC charger • Image is for purchasing the RCA Small Wonder Camcorder. actual battery life may vary from the actual product. • Once the battery is switched off. • The battery can also manage... leaflet 2. Refer to a PC with this product. Charging the battery • Please charge the battery for more information. To start using your computer with the RCA Memory Manager included with a USB cable.

Owner/User Manual
Page 10
A microSD memory card is empty) Memory card indicator • Slide and hold the power switch to turn off the camcorder. • The camcorder will automatically turn off after 3 minutes if not in size, it . Recording quality Battery indicator (recharge when the icon is recommended for more information on the screen with memory card inserted. • To remove card, push card in the internal memory, remove the microSD card. 4. 3. As card is recommended for recording. Inserting microSD memory card • A microSD memory card (not included) is under minimal tension ...
A microSD memory card is empty) Memory card indicator • Slide and hold the power switch to turn off the camcorder. • The camcorder will automatically turn off after 3 minutes if not in size, it . Recording quality Battery indicator (recharge when the icon is recommended for more information on the screen with memory card inserted. • To remove card, push card in the internal memory, remove the microSD card. 4. 3. As card is recommended for recording. Inserting microSD memory card • A microSD memory card (not included) is under minimal tension ...

Owner/User Manual
Page 11
Resetting the camcorder • To reset the camcorder (if it is recommended to "Menu settings" on page 19 for more information. 10 Setting date and time • It is not functioning properly), slide and hold the On/Off switch for more than 10 seconds. 6. Refer to set the date and time before using the camcorder. 5.
Resetting the camcorder • To reset the camcorder (if it is recommended to "Menu settings" on page 19 for more information. 10 Setting date and time • It is not functioning properly), slide and hold the On/Off switch for more than 10 seconds. 6. Refer to set the date and time before using the camcorder. 5.
Owner/User Manual
Page 12
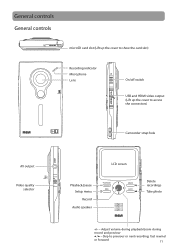
Adjust volume during playback/zoom during record and preview / - Skip to access the connectors) Camcorder strap hole AV output Video quality selector Playback/pause Setup menu Record Audio speaker LCD screen Delete recordings Take photo +/- - fast rewind or forward 11 General controls General controls microSD card slot (Lift up the cover to show the card slot) Recording indicator Microphone Lens On/off switch USB and HDMI video output (Lift up the cover to previous or next recording;
Adjust volume during playback/zoom during record and preview / - Skip to access the connectors) Camcorder strap hole AV output Video quality selector Playback/pause Setup menu Record Audio speaker LCD screen Delete recordings Take photo +/- - fast rewind or forward 11 General controls General controls microSD card slot (Lift up the cover to show the card slot) Recording indicator Microphone Lens On/off switch USB and HDMI video output (Lift up the cover to previous or next recording;
Owner/User Manual
Page 13
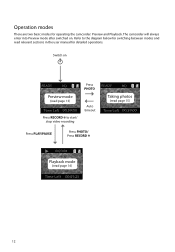
Refer to start/ stop video recording Press PHOTO Auto timeout Press PLAY/PAUSE Press PHOTO/ Press RECORD Taking photos (read page 15) Playback mode (read relevant sections in the user manual for operating the camcorder: Preview and Playback. Switch on . Operation modes There are two basic modes for detailed operations. The camcorder will always enter into Preview mode after switched on Preview mode (read page 13) Press RECORD to the diagram below for switching between modes and read page 16) 12
Refer to start/ stop video recording Press PHOTO Auto timeout Press PLAY/PAUSE Press PHOTO/ Press RECORD Taking photos (read page 15) Playback mode (read relevant sections in the user manual for operating the camcorder: Preview and Playback. Switch on . Operation modes There are two basic modes for detailed operations. The camcorder will always enter into Preview mode after switched on Preview mode (read page 13) Press RECORD to the diagram below for switching between modes and read page 16) 12
Owner/User Manual
Page 14
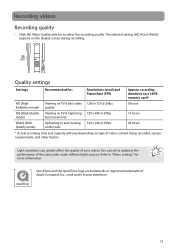
Refer to optimize the performance of video content being recorded, system requirements, and other factors. Light conditions can set to "Menu settings" for : Resolutions (pixel) and Frame Rate (FPS) Approx. Quality settings Settings Recommended for more information. You can greatly affect the quality of Apple Computer, Inc., used under different light sources. The selected setting (HD, HQ or WebQ) appears on type of the camcorder under license therefrom. 13 QuickTime and the QuickTime logo are trademarks or registered trademarks of your videos. recording durations ...
Refer to optimize the performance of video content being recorded, system requirements, and other factors. Light conditions can set to "Menu settings" for : Resolutions (pixel) and Frame Rate (FPS) Approx. Quality settings Settings Recommended for more information. You can greatly affect the quality of Apple Computer, Inc., used under different light sources. The selected setting (HD, HQ or WebQ) appears on type of the camcorder under license therefrom. 13 QuickTime and the QuickTime logo are trademarks or registered trademarks of your videos. recording durations ...

Owner/User Manual
Page 15
Press PLAY/PAUSE to begin recording. Press + or - In Preview mode, press the red RECORD button to pause a recording. • A pause indicator II replaces the red at the top left corner of the screen. • To resume recording, press PLAY/PAUSE. 3. Press the red RECORD button to zoom in or out before or during recording. 4. to stop recording. 14 Recording videos 1. Video recording indicator Elapsed time • While recording, the red recording light on the camcorder front turns on. 2.
Press PLAY/PAUSE to begin recording. Press + or - In Preview mode, press the red RECORD button to pause a recording. • A pause indicator II replaces the red at the top left corner of the screen. • To resume recording, press PLAY/PAUSE. 3. Press the red RECORD button to zoom in or out before or during recording. 4. to stop recording. 14 Recording videos 1. Video recording indicator Elapsed time • While recording, the red recording light on the camcorder front turns on. 2.

Owner/User Manual
Page 16
In Preview mode, press PHOTO to Preview mode. 15 Taking photos To take photos. • The resolution of the photos is 3.0 mega pixel which is extrapolated from 1 mega pixel sensor. 2. After taking photos, wait for few seconds timeout to return to take photos 1.
In Preview mode, press PHOTO to Preview mode. 15 Taking photos To take photos. • The resolution of the photos is 3.0 mega pixel which is extrapolated from 1 mega pixel sensor. 2. After taking photos, wait for few seconds timeout to return to take photos 1.

Owner/User Manual
Page 17
Press + or - Hold down or to fast rewind or forward the selected video during playback to enter Playback mode and start playback of files Elapsed playback time 2. Pause indicator Remaining playback time Press and hold PLAY/PAUSE for three seconds to resume playback. during playback. Press PLAY/PAUSE to pause playback. • Press PLAY/PAUSE again to play all recordings. 16 Fast forward indicator Elapsed playback time 4. Press PLAY/PAUSE to adjust volume (video only). 3. Playback mode Playing back recordings 1. Playback indicator Current file number/Total number of the...
Press + or - Hold down or to fast rewind or forward the selected video during playback to enter Playback mode and start playback of files Elapsed playback time 2. Pause indicator Remaining playback time Press and hold PLAY/PAUSE for three seconds to resume playback. during playback. Press PLAY/PAUSE to pause playback. • Press PLAY/PAUSE again to play all recordings. 16 Fast forward indicator Elapsed playback time 4. Press PLAY/PAUSE to adjust volume (video only). 3. Playback mode Playing back recordings 1. Playback indicator Current file number/Total number of the...

Owner/User Manual
Page 18
If no video is selected after playback has finished, Preview mode will resume after 2 minutes. • You may also press PHOTO to go to Preview mode after playback, or press the red RECORD button to return to cue the previous or next video. Type of file (Video/Photo) Current file number/Total number of files Duration of current file 6. To select another video, press or to Preview mode 17 5.
If no video is selected after playback has finished, Preview mode will resume after 2 minutes. • You may also press PHOTO to go to Preview mode after playback, or press the red RECORD button to return to cue the previous or next video. Type of file (Video/Photo) Current file number/Total number of files Duration of current file 6. To select another video, press or to Preview mode 17 5.