
User Guide
Page 1
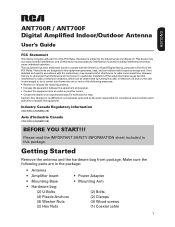
...NMB-3 (B) Avis d'Industrie Canada CAN ICES-3 (B)/NMB-3 (B) BEFORE YOU START!!! Please read the IMPORTANT SAFETY INFORMATION sheet included in the package: • Antenna • Amplifier Insert • Mounting Base • Hardware bag: (2) U-Bolts (4) Plastic Anchors (4) Washer Nuts (2) Hex Nuts • Power...equipment has been tested and found to comply with part 15 of the FCC Rules. ENGLISH ANT700R / ANT700F Digital Amplified Indoor/Outdoor Antenna User's Guide FCC Statement This device complies with the limits for compliance could void the user's authority ...
...NMB-3 (B) Avis d'Industrie Canada CAN ICES-3 (B)/NMB-3 (B) BEFORE YOU START!!! Please read the IMPORTANT SAFETY INFORMATION sheet included in the package: • Antenna • Amplifier Insert • Mounting Base • Hardware bag: (2) U-Bolts (4) Plastic Anchors (4) Washer Nuts (2) Hex Nuts • Power...equipment has been tested and found to comply with part 15 of the FCC Rules. ENGLISH ANT700R / ANT700F Digital Amplified Indoor/Outdoor Antenna User's Guide FCC Statement This device complies with the limits for compliance could void the user's authority ...
User Guide
Page 2
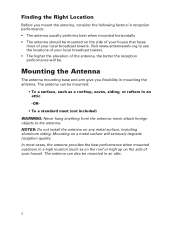
...the locations of your local broadcast towers. • The higher the elevation of the antenna, the better the reception performance will seriously degrade reception quality. Mounting on the side of your house). The antenna can be mounted: • To a surface, such as on the roof or ... surface will be mounted in mounting the antenna. Finding the Right Location Before you flexibility in an attic. 2 The antenna can also be . NOTES: Do not install the antenna on the side of your house that faces most cases, the antenna provides the best performance when mounted outdoors...
...the locations of your local broadcast towers. • The higher the elevation of the antenna, the better the reception performance will seriously degrade reception quality. Mounting on the side of your house). The antenna can be mounted: • To a surface, such as on the roof or ... surface will be mounted in mounting the antenna. Finding the Right Location Before you flexibility in an attic. 2 The antenna can also be . NOTES: Do not install the antenna on the side of your house that faces most cases, the antenna provides the best performance when mounted outdoors...
User Guide
Page 3
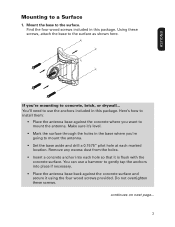
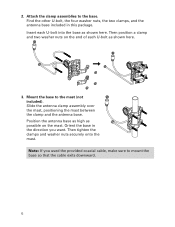
... anchors into each hole so that it 's level. • Mark the surface through the holes in the base where you 're mounting to mount the antenna. • Set the base aside and drill a 0.1575" pilot hole at each marked location. If you 're going to concrete, brick, or drywall... ...the anchors included in this package. continues on next page... 3 Do not overtighten these screws, attach the base to install them: • Place the antenna base against the concrete surface and secure it using the four wood screws provided. Make sure it is flush with the concrete surface. ENGLISH...
... anchors into each hole so that it 's level. • Mark the surface through the holes in the base where you 're mounting to mount the antenna. • Set the base aside and drill a 0.1575" pilot hole at each marked location. If you 're going to concrete, brick, or drywall... ...the anchors included in this package. continues on next page... 3 Do not overtighten these screws, attach the base to install them: • Place the antenna base against the concrete surface and secure it using the four wood screws provided. Make sure it is flush with the concrete surface. ENGLISH...
User Guide
Page 4
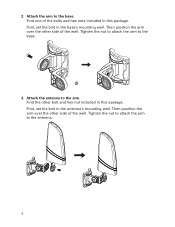
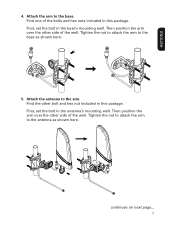
Tighten the nut to attach the arm to the arm. Then position the arm over the other side of the well. First, set the bolt in this package. Attach the antenna to the base. 3. Find one of the well. Find the other side of the bolts and hex nuts included in the antenna's mounting well. Attach the arm to the antenna. 4 First, set the bolt in this package. Tighten the nut to attach the arm to the base. Then position the arm over the other bolt and hex nut included in the base's mounting well. 2.
Tighten the nut to attach the arm to the arm. Then position the arm over the other side of the well. First, set the bolt in this package. Attach the antenna to the base. 3. Find one of the well. Find the other side of the bolts and hex nuts included in the antenna's mounting well. Attach the arm to the antenna. 4 First, set the bolt in this package. Tighten the nut to attach the arm to the base. Then position the arm over the other bolt and hex nut included in the base's mounting well. 2.
User Guide
Page 5
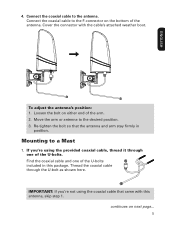
... the arm. 2. IMPORTANT: If you 're using the coaxial cable that the antenna and arm stay firmly in this antenna, skip step 1. To adjust the antenna's position: 1. Move the arm or antenna to the antenna. Thread the coaxial cable through one of the antenna. ENGLISH 4. Connect the coaxial cable to a Mast 1. Re-tighten the bolt...
... the arm. 2. IMPORTANT: If you 're using the coaxial cable that the antenna and arm stay firmly in this antenna, skip step 1. To adjust the antenna's position: 1. Move the arm or antenna to the antenna. Thread the coaxial cable through one of the antenna. ENGLISH 4. Connect the coaxial cable to a Mast 1. Re-tighten the bolt...
User Guide
Page 6
... included). Note: If you want. Then position a clamp and two washer nuts on the mast. Slide the antenna clamp assembly over the mast, positioning the mast between the clamp and the antenna base. Position the antenna base as high as possible on the end of each U-bolt into the base as shown here.... 3. Find the other U-bolt, the four washer nuts, the two clamps, and the antenna base included in the direction you used the provided coaxial cable, make sure to mount the base so that the cable exits downward. 6 2.
... included). Note: If you want. Then position a clamp and two washer nuts on the mast. Slide the antenna clamp assembly over the mast, positioning the mast between the clamp and the antenna base. Position the antenna base as high as possible on the end of each U-bolt into the base as shown here.... 3. Find the other U-bolt, the four washer nuts, the two clamps, and the antenna base included in the direction you used the provided coaxial cable, make sure to mount the base so that the cable exits downward. 6 2.
User Guide
Page 7
Find the other side of the well. Then position the arm over the other side of the bolts and hex nuts included in the antenna's mounting well. Tighten the nut to attach the arm to the arm. Find one of the well. First, set the bolt in this package. Attach the antenna to the antenna as shown here. 5. First, set the bolt in this package. Tighten the nut to attach the arm to the base. Then position the arm over the other bolt and hex nut included in the base's mounting well. Attach the arm to the base as shown here. continues on next page... 7 ENGLISH 4.
Find the other side of the well. Then position the arm over the other side of the bolts and hex nuts included in the antenna's mounting well. Tighten the nut to attach the arm to the arm. Find one of the well. First, set the bolt in this package. Attach the antenna to the antenna as shown here. 5. First, set the bolt in this package. Tighten the nut to attach the arm to the base. Then position the arm over the other bolt and hex nut included in the base's mounting well. Attach the arm to the base as shown here. continues on next page... 7 ENGLISH 4.

User Guide
Page 8
... be mounted either end of the arm. 2. Then cover the connector with this antenna), make sure to affix it horizontally, simply rotate the arm clockwise 90O. To mount it to the F-connector of the mounting base. 8 Connect the ... with the attached weather boot. Connect the coaxial cable to the outside of the antenna as shown here. Try different positions for best performance. 90° To adjust the antenna's position: 1. Re-tighten the bolt so that the antenna and arm stay firmly in position. 6. Loosen the bolt on either vertically or...
... be mounted either end of the arm. 2. Then cover the connector with this antenna), make sure to affix it horizontally, simply rotate the arm clockwise 90O. To mount it to the F-connector of the mounting base. 8 Connect the ... with the attached weather boot. Connect the coaxial cable to the outside of the antenna as shown here. Try different positions for best performance. 90° To adjust the antenna's position: 1. Re-tighten the bolt so that the antenna and arm stay firmly in position. 6. Loosen the bolt on either vertically or...

User Guide
Page 9
... instead of the hole. This will drip off in coaxial cable on the amplifier insert to Your TV Coaxial Cable Ampli er Insert ANTENNA TV/STB TV 1. Any moisture that it stays vertical or lays flat any local electronics or hardware store. 9 Water Damage Prevention: ... the inside portion of running down the coaxial cable and entering the house. DO NOT PUT THE SIGNAL SPLITTER BETWEEN THE AMPLIFIER INSERT AND THE ANTENNA. 3. Important: This power adapter should allow for some slack in so that accumulates on the supplied amplifier insert. 2. After all ...
... instead of the hole. This will drip off in coaxial cable on the amplifier insert to Your TV Coaxial Cable Ampli er Insert ANTENNA TV/STB TV 1. Any moisture that it stays vertical or lays flat any local electronics or hardware store. 9 Water Damage Prevention: ... the inside portion of running down the coaxial cable and entering the house. DO NOT PUT THE SIGNAL SPLITTER BETWEEN THE AMPLIFIER INSERT AND THE ANTENNA. 3. Important: This power adapter should allow for some slack in so that accumulates on the supplied amplifier insert. 2. After all ...


