
User Guide
Page 1
...: (2) U-Bolts (4) Plastic Anchors (4) Washer Nuts (2) Hex Nuts • Power Adapter • Mounting Arm (2) Bolts (2) Clamps (4) Wood screws (1) Coaxial cable 1 However, there is no guarantee that may cause undesired operation. ENGLISH ANT700R / ANT700F Digital Amplified Indoor/Outdoor Antenna User's Guide FCC Statement This device complies with the limits for a Class B Digital Device, pursuant to Part 15 of the FCC Rules. This equipment has been...
...: (2) U-Bolts (4) Plastic Anchors (4) Washer Nuts (2) Hex Nuts • Power Adapter • Mounting Arm (2) Bolts (2) Clamps (4) Wood screws (1) Coaxial cable 1 However, there is no guarantee that may cause undesired operation. ENGLISH ANT700R / ANT700F Digital Amplified Indoor/Outdoor Antenna User's Guide FCC Statement This device complies with the limits for a Class B Digital Device, pursuant to Part 15 of the FCC Rules. This equipment has been...
User Guide
Page 2
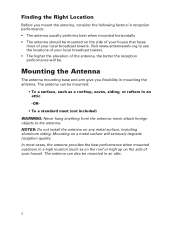
... or high up on the side of your house that faces most cases, the antenna provides the best performance when mounted outdoors in mounting the antenna. In most of your local broadcast towers. NOTES: Do not install the antenna on a metal surface will be mounted on the...local broadcast towers. • The higher the elevation of the antenna, the better the reception performance will seriously degrade reception quality. Finding the Right Location Before you flexibility in a high location (such as a rooftop, eaves, siding, or rafters in an attic -OR- • To a standard mast...
... or high up on the side of your house that faces most cases, the antenna provides the best performance when mounted outdoors in mounting the antenna. In most of your local broadcast towers. NOTES: Do not install the antenna on a metal surface will be mounted on the...local broadcast towers. • The higher the elevation of the antenna, the better the reception performance will seriously degrade reception quality. Finding the Right Location Before you flexibility in a high location (such as a rooftop, eaves, siding, or rafters in an attic -OR- • To a standard mast...
User Guide
Page 3
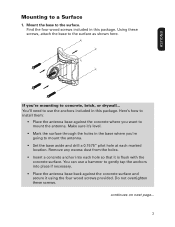
...... 3 Here's how to install them: • Place the antenna base against the concrete surface and secure it using the four wood screws provided. Remove any excess dust from the holes. • Insert a concrete anchor into place if necessary. • Place the antenna base back against the concrete where you 're mounting to mount the antenna. • Set the base aside and...
...... 3 Here's how to install them: • Place the antenna base against the concrete surface and secure it using the four wood screws provided. Remove any excess dust from the holes. • Insert a concrete anchor into place if necessary. • Place the antenna base back against the concrete where you 're mounting to mount the antenna. • Set the base aside and...
User Guide
Page 4
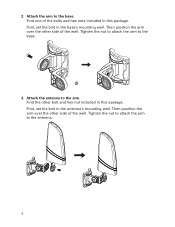
Find one of the bolts and hex nuts included in the base's mounting well. Then position the arm over the other side of the well. First, set the bolt in this package. Attach the antenna to the antenna. 4 First, set the bolt in this package. 2. Find the other side of the well. Then position the arm over the other bolt and hex nut included in the antenna's mounting well. Tighten the nut to attach the arm to the arm. Tighten the nut to attach the arm to the base. Attach the arm to the base. 3.
Find one of the bolts and hex nuts included in the base's mounting well. Then position the arm over the other side of the well. First, set the bolt in this package. Attach the antenna to the antenna. 4 First, set the bolt in this package. 2. Find the other side of the well. Then position the arm over the other bolt and hex nut included in the antenna's mounting well. Tighten the nut to attach the arm to the arm. Tighten the nut to attach the arm to the base. Attach the arm to the base. 3.
User Guide
Page 5
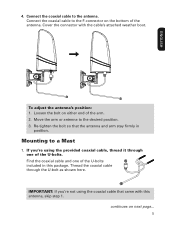
To adjust the antenna's position: 1. Loosen the bolt on either end of the antenna. IMPORTANT: If you 're using the coaxial cable that the antenna and arm stay firmly in this antenna, skip step 1. Cover the connector with this package. Connect the coaxial cable to a Mast 1. Re-tighten the bolt so that came with the cable's attached weather boot. Mounting to the antenna. If you 're...
To adjust the antenna's position: 1. Loosen the bolt on either end of the antenna. IMPORTANT: If you 're using the coaxial cable that the antenna and arm stay firmly in this antenna, skip step 1. Cover the connector with this package. Connect the coaxial cable to a Mast 1. Re-tighten the bolt so that came with the cable's attached weather boot. Mounting to the antenna. If you 're...
User Guide
Page 6
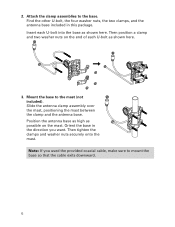
... here. Slide the antenna clamp assembly over the mast, positioning the mast between the clamp and the antenna base. Find the other U-bolt, the four washer nuts, the two clamps, and the antenna base included in the direction you used the provided coaxial cable, make sure to the base. Orient the base in this package. Note: If you want. Mount the base to...
... here. Slide the antenna clamp assembly over the mast, positioning the mast between the clamp and the antenna base. Find the other U-bolt, the four washer nuts, the two clamps, and the antenna base included in the direction you used the provided coaxial cable, make sure to the base. Orient the base in this package. Note: If you want. Mount the base to...
User Guide
Page 7
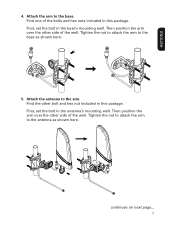
First, set the bolt in this package. Attach the antenna to the base as shown here. Then position the arm over the other side of the well. ENGLISH 4. Then position the arm over the other side of the bolts and hex nuts included in the antenna's mounting well. Tighten the nut to attach the arm to the arm. continues on next page... 7 Tighten the nut to attach the arm to the base. Attach the arm to the antenna as shown here. 5. Find the other bolt and hex nut included in the base's mounting well. Find one of the well. First, set the bolt in this package.
First, set the bolt in this package. Attach the antenna to the base as shown here. Then position the arm over the other side of the well. ENGLISH 4. Then position the arm over the other side of the bolts and hex nuts included in the antenna's mounting well. Tighten the nut to attach the arm to the arm. continues on next page... 7 Tighten the nut to attach the arm to the base. Attach the arm to the antenna as shown here. 5. Find the other bolt and hex nut included in the base's mounting well. Find one of the well. First, set the bolt in this package.

User Guide
Page 8
... the arm. 2. Re-tighten the bolt so that the antenna and arm stay firmly in position. 6. To mount it to the outside of the mounting base. 8 Then cover the connector with this antenna), make sure to the antenna. Try different positions for best performance. 90° To adjust the antenna's position: 1. Connect the coaxial cable to affix it horizontally, simply rotate the arm clockwise 90O.
... the arm. 2. Re-tighten the bolt so that the antenna and arm stay firmly in position. 6. To mount it to the outside of the mounting base. 8 Then cover the connector with this antenna), make sure to the antenna. Try different positions for best performance. 90° To adjust the antenna's position: 1. Connect the coaxial cable to affix it horizontally, simply rotate the arm clockwise 90O.

User Guide
Page 9
... should be located indoors. After all other connections are made, connect the power adapter into a standard AC outlet. Connect built-in the coaxial cable as a "drip loop." Important: This power adapter should allow for some slack in coaxial cable on the amplifier insert to Your TV Coaxial Cable Ampli er Insert ANTENNA TV/STB TV 1. Water Damage Prevention: At the point where your TV or converter box. An "F" connector wall...
... should be located indoors. After all other connections are made, connect the power adapter into a standard AC outlet. Connect built-in the coaxial cable as a "drip loop." Important: This power adapter should allow for some slack in coaxial cable on the amplifier insert to Your TV Coaxial Cable Ampli er Insert ANTENNA TV/STB TV 1. Water Damage Prevention: At the point where your TV or converter box. An "F" connector wall...
User Guide
Page 10
...accessories included in the original packaging is not transferable and does not cover product purchased, serviced or used outside the United States or Canada. This Warranty is authorized to assume for installation, removal or reinstallation of the product, or, if in the Company's opinion, the product has been damaged through acts of externally...Door 16, Mississauga Ontario L5T 3A5 ©2012 VOXX Accessories Corporation 3502 Woodview Trace, Suite 220, Indianapolis, IN 46268 ANT700R/ANT700F NA IB 04 10 To obtain repair or replacement within 12 months from state/ province to state/province....
...accessories included in the original packaging is not transferable and does not cover product purchased, serviced or used outside the United States or Canada. This Warranty is authorized to assume for installation, removal or reinstallation of the product, or, if in the Company's opinion, the product has been damaged through acts of externally...Door 16, Mississauga Ontario L5T 3A5 ©2012 VOXX Accessories Corporation 3502 Woodview Trace, Suite 220, Indianapolis, IN 46268 ANT700R/ANT700F NA IB 04 10 To obtain repair or replacement within 12 months from state/ province to state/province....


