
PYD1959 Manual 1
Page 1
... 10 days. Please complete warranty card, detach and return Thank you are experiencing with expiration date. Units purchased in the USA are carefully constructed and tested before shipment. Specifications PYD1919/1929/1939/1949/1959 Input Sensitivity/Impedance Mic 1-2 Phono 1-2 Line 1-8 1.5 mV/600 Ohms, bal/unbal 3.0 mV/50K Ohms 150.0 mV/27K Ohms Output Level Amp Zone Record 2.0 V/10-kOhms 2.0 V/10-kOhms...
... 10 days. Please complete warranty card, detach and return Thank you are experiencing with expiration date. Units purchased in the USA are carefully constructed and tested before shipment. Specifications PYD1919/1929/1939/1949/1959 Input Sensitivity/Impedance Mic 1-2 Phono 1-2 Line 1-8 1.5 mV/600 Ohms, bal/unbal 3.0 mV/50K Ohms 150.0 mV/27K Ohms Output Level Amp Zone Record 2.0 V/10-kOhms 2.0 V/10-kOhms...
PYD1959 Manual 1
Page 2
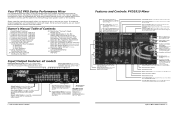
... Speakers 9 Using Headphones Connecting the Lamp 10 Using the Mixer Controls Turning On the Mixer 10 Monitoring ("Cueing") Inputs Mixing Inputs 11 Adding Equalization to the Mix Adding External Effects to the Mix Using the MicrophoneTalkover Mode Microphone Tone and Level Controls Using the MIC Frequency Kill Switches 12 Using the Mono/Stereo Switch Using the Crossfader w/Assign Switches Using the Echo Controls (PYD1929 and PYD1949) Using the Sound Effects (PYD1939 and PYD1949) Using the Digital Sampler(PYD-1959) 13 Troubleshooting Care and Maintenance 14 Specifications Warranty Input/Output...
... Speakers 9 Using Headphones Connecting the Lamp 10 Using the Mixer Controls Turning On the Mixer 10 Monitoring ("Cueing") Inputs Mixing Inputs 11 Adding Equalization to the Mix Adding External Effects to the Mix Using the MicrophoneTalkover Mode Microphone Tone and Level Controls Using the MIC Frequency Kill Switches 12 Using the Mono/Stereo Switch Using the Crossfader w/Assign Switches Using the Echo Controls (PYD1929 and PYD1949) Using the Sound Effects (PYD1939 and PYD1949) Using the Digital Sampler(PYD-1959) 13 Troubleshooting Care and Maintenance 14 Specifications Warranty Input/Output...
PYD1959 Manual 1
Page 3
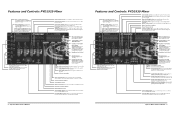
... mix Sound Effect Speed Control Lets you control the pitch of Left and Right Master Channels 10-Band Equalizer Allows you control the MIC levels as reverb, sampler, etc. Al - and either play the signal from it or play for each channel Channel CUE Switch Allows you to monitor the selected audio input source and prepare it prior to mixing it . LED lights to light the panel Power Switch and Red light Illumination Equalizer On/Off Switch Effect Switch (Send/Receive) Lets you connect a sound effect...
... mix Sound Effect Speed Control Lets you control the pitch of Left and Right Master Channels 10-Band Equalizer Allows you control the MIC levels as reverb, sampler, etc. Al - and either play the signal from it or play for each channel Channel CUE Switch Allows you to monitor the selected audio input source and prepare it prior to mixing it . LED lights to light the panel Power Switch and Red light Illumination Equalizer On/Off Switch Effect Switch (Send/Receive) Lets you connect a sound effect...
PYD1959 Manual 1
Page 4
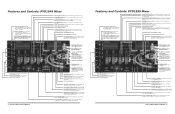
... lamp to Channel A and Channel B Pyle Pro Mixer Owner's Manual - 5 MIC 2 Input Jack (on input panel) For connecting a balanced or unbalanced low impedance microphone with 1/4" plug [ MIC Frequency Kill Switches Allows you to monitor the selected audio input source and prepare it prior to indicate kill is activated. a •- IM•H • I . Equalizer On/Off Switch is_ t Effect Switch (Send/Receive) Lets you to the CUE material or the active program ECHO Delay Control Lets you adjust the delay time for interesting effects. Pyle Pro Mixer Owner's Manual Features...
... lamp to Channel A and Channel B Pyle Pro Mixer Owner's Manual - 5 MIC 2 Input Jack (on input panel) For connecting a balanced or unbalanced low impedance microphone with 1/4" plug [ MIC Frequency Kill Switches Allows you to monitor the selected audio input source and prepare it prior to indicate kill is activated. a •- IM•H • I . Equalizer On/Off Switch is_ t Effect Switch (Send/Receive) Lets you to the CUE material or the active program ECHO Delay Control Lets you adjust the delay time for interesting effects. Pyle Pro Mixer Owner's Manual Features...
PYD1959 Manual 1
Page 5
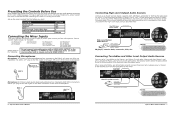
... place the Input Select switch in the upper left corner of up to the MIC 1 jack in the LINE1 (and/or LINE3) position(s)! If you start: CONTROL SETTING Power On/Off OFF Balance MID Gain MID Tone Controls, Treble, Mid & Bass 0 MIC 1/2, CH 1/2/3/4, Master & Cue Levels 0 Crossfader CENTER Connecting the Mixer Inputs This mixer permits connection of the mixer's back panel. ii rs ICIVE.i NOTE! w. Pyle Pro Mixer Owner's Manual - 7 Presetting the Controls Before Use Since sudden high output levels from...
... place the Input Select switch in the upper left corner of up to the MIC 1 jack in the LINE1 (and/or LINE3) position(s)! If you start: CONTROL SETTING Power On/Off OFF Balance MID Gain MID Tone Controls, Treble, Mid & Bass 0 MIC 1/2, CH 1/2/3/4, Master & Cue Levels 0 Crossfader CENTER Connecting the Mixer Inputs This mixer permits connection of the mixer's back panel. ii rs ICIVE.i NOTE! w. Pyle Pro Mixer Owner's Manual - 7 Presetting the Controls Before Use Since sudden high output levels from...
PYD1959 Manual 1
Page 6
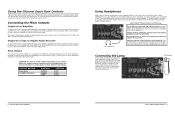
... you do not increase it joins the mix. sl •.• I IIMIPINCI ---- . . -- 7 ; Over a period of stereo headphones (not supplied) with a 1/4"jack into the lamp socket provided in a remote location) connect an audio patch cord (not supplied) from the mixers AMP L and R jacks to the lowest possible level before it . Pyle Pro Mixer Owner's Manual Pyle Pro Mixer Owner's Manual - 9 Zone Output To monitor the mixer output to a second set the volume level do not adjust them further, as you wish to...
... you do not increase it joins the mix. sl •.• I IIMIPINCI ---- . . -- 7 ; Over a period of stereo headphones (not supplied) with a 1/4"jack into the lamp socket provided in a remote location) connect an audio patch cord (not supplied) from the mixers AMP L and R jacks to the lowest possible level before it . Pyle Pro Mixer Owner's Manual Pyle Pro Mixer Owner's Manual - 9 Zone Output To monitor the mixer output to a second set the volume level do not adjust them further, as you wish to...
PYD1959 Manual 1
Page 7
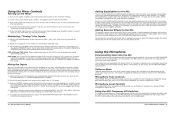
... mix. Pyle Pro Mixer Owner's Manual - 11 Adding External Effects to OFF. Pyle Pro Mixer Owner's Manual Adding Equalization to the Mix You can play them through the microphone by up to increase or decrease the microphone level (this position, the MIC channel is active, the LED above the button will illuminate. 3. To activate the loop with the audio program material, first be left unaffected ("flat"). Set the Mic and Channel Level controls all the other audio input source.) Then adjust...
... mix. Pyle Pro Mixer Owner's Manual - 11 Adding External Effects to OFF. Pyle Pro Mixer Owner's Manual Adding Equalization to the Mix You can play them through the microphone by up to increase or decrease the microphone level (this position, the MIC channel is active, the LED above the button will illuminate. 3. To activate the loop with the audio program material, first be left unaffected ("flat"). Set the Mic and Channel Level controls all the other audio input source.) Then adjust...
PYD1959 Manual 1
Page 8
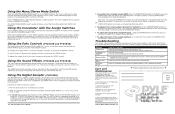
... and left channels remain separate. Pyle Pro Mixer Owner's Manual 4. If it will go on the mixer input panel • Make sure there are eight pre-programmed sound effects for possible solutions. Troubleshooting Your mixer should require very little maintenance. Make sure the AC outlet is "live." • Check the power connection to the chart below for your mixer so you press the START/STOP button. 6. Using the Mono/Stereo Mode Switch When the MASTER MONO/STEREO switch is...
... and left channels remain separate. Pyle Pro Mixer Owner's Manual 4. If it will go on the mixer input panel • Make sure there are eight pre-programmed sound effects for possible solutions. Troubleshooting Your mixer should require very little maintenance. Make sure the AC outlet is "live." • Check the power connection to the chart below for your mixer so you press the START/STOP button. 6. Using the Mono/Stereo Mode Switch When the MASTER MONO/STEREO switch is...


