User Guide
Page 1
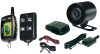
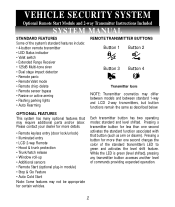
... Instructions Included SYSTEM MANUAL STANDARD FEATURES Some of the system's standard features include: • 4-button remote transmitter • LED Status indicator • Valet switch • Extended Range Receiver • 125dB Multi-tone siren • Dual stage impact detector • Remote panic • Remote Valet mode • Remote chirp delete • Remote sensor bypass • Passive or active arming • Flashing parking lights • Auto...
... Instructions Included SYSTEM MANUAL STANDARD FEATURES Some of the system's standard features include: • 4-button remote transmitter • LED Status indicator • Valet switch • Extended Range Receiver • 125dB Multi-tone siren • Dual stage impact detector • Remote panic • Remote Valet mode • Remote chirp delete • Remote sensor bypass • Passive or active arming • Flashing parking lights • Auto...
User Guide
Page 2
... after closing the last door. • The LED flashes rapidly indicating that zone, keeping the other areas protected. If a zone triggers the system 3 times during installation). Press button 4. • The system will enter passive arming operation mode. • The optional 2-way LCD transmitter display will show "LAST DOOR ARM". Turn the ignition key off : 1. When triggered by the door or hood/trunk input the...
... after closing the last door. • The LED flashes rapidly indicating that zone, keeping the other areas protected. If a zone triggers the system 3 times during installation). Press button 4. • The system will enter passive arming operation mode. • The optional 2-way LCD transmitter display will show "LAST DOOR ARM". Turn the ignition key off : 1. When triggered by the door or hood/trunk input the...
User Guide
Page 3
... OPERATION MODE Press transmitter button 4 to automatically re-arm itself 30 seconds after turning off : 1. The ignition controlled locking feature may also be disarmed by using the emergency override feature. REMOTE PANIC In the event of security even when when the alarm is pressed with the key until either transmitter button 2 is pressed, or the override button is not set. Press the Valet switch...
... OPERATION MODE Press transmitter button 4 to automatically re-arm itself 30 seconds after turning off : 1. The ignition controlled locking feature may also be disarmed by using the emergency override feature. REMOTE PANIC In the event of security even when when the alarm is pressed with the key until either transmitter button 2 is pressed, or the override button is not set. Press the Valet switch...

User Guide
Page 4
... 2-way LCD transmitter display will show the trunk open. Turn ignition off. • The LED will turn on solid indicating the system is in valet mode, or turn off indicating valet mode exit. To enter or exit valet mode using the switch: 1. Press button 1 again to turn valet mode. • The parking lights will flash 4 times to enter and 3 times to activating the remote sensor bypass feature...
... 2-way LCD transmitter display will show the trunk open. Turn ignition off. • The LED will turn on solid indicating the system is in valet mode, or turn off indicating valet mode exit. To enter or exit valet mode using the switch: 1. Press button 1 again to turn valet mode. • The parking lights will flash 4 times to enter and 3 times to activating the remote sensor bypass feature...
User Guide
Page 5
... carjack feature is set to the second digit of the PIN. 4. or Enter PIN if programmed for PIN code override mode, the default code is deactivated . Open door, alarm system will turn ignition off the ignition with a PIN code: 1. Turn ignition off . Press the override switch the number of times equal to 1,1. CREATING A SECURE PIN CODE When first programmed for PIN mode. To change the PIN code first program the system for 5 seconds...
... carjack feature is set to the second digit of the PIN. 4. or Enter PIN if programmed for PIN code override mode, the default code is deactivated . Open door, alarm system will turn ignition off the ignition with a PIN code: 1. Turn ignition off . Press the override switch the number of times equal to 1,1. CREATING A SECURE PIN CODE When first programmed for PIN mode. To change the PIN code first program the system for 5 seconds...

User Guide
Page 6
...-programmed time. Turn ignition off , simply press and hold button 2 for level shift. 2. To disarm the system in a well ventilated area. Be sure to familiarize yourself with all doors are closed garage or indoors. To drive the vehicle after a total of the ignition key during installation. Once the ignition key is running without use in surf mode: 1. Press button 2 again. 4. Press valet switch 3 times...
...-programmed time. Turn ignition off , simply press and hold button 2 for level shift. 2. To disarm the system in a well ventilated area. Be sure to familiarize yourself with all doors are closed garage or indoors. To drive the vehicle after a total of the ignition key during installation. Once the ignition key is running without use in surf mode: 1. Press button 2 again. 4. Press valet switch 3 times...
User Guide
Page 7
...; The vehicle resumes driver control, when the brake pedal is not disarmed prior to turn off engine and arm/lock doors. Turn on , press lock button for level shift. 3. These two operating modes protect against in manual transmission vehicles. The system will not start as long as the alarm is pressed. Installation and safe use of the vehicle's owner, and the manufacturer assumes...
...; The vehicle resumes driver control, when the brake pedal is not disarmed prior to turn off engine and arm/lock doors. Turn on , press lock button for level shift. 3. These two operating modes protect against in manual transmission vehicles. The system will not start as long as the alarm is pressed. Installation and safe use of the vehicle's owner, and the manufacturer assumes...

User Guide
Page 8
... = System disarmed Flash 4x = Defective zone warning (after arming) Flash 4x = Tamper indication (after disarming) TRANSMITTER FUNCTION QUICK REFERENCE TRANSMITTER OPERATION CHART Operation System Status Ignition Arm Disarmed Off Disarm Armed Off Remote Valet Disarmed Off Remote Start Either Off Auxiliary 1 Either Off Toggle Chirp Mode Either Off Immobilizer Disarmed Off Panic Mode Either Off Stop N Go Disarmed On Auto Cold...
... = System disarmed Flash 4x = Defective zone warning (after arming) Flash 4x = Tamper indication (after disarming) TRANSMITTER FUNCTION QUICK REFERENCE TRANSMITTER OPERATION CHART Operation System Status Ignition Arm Disarmed Off Disarm Armed Off Remote Valet Disarmed Off Remote Start Either Off Auxiliary 1 Either Off Toggle Chirp Mode Either Off Immobilizer Disarmed Off Panic Mode Either Off Stop N Go Disarmed On Auto Cold...

User Guide
Page 9
... LCD display will stop flashing. Replace with a few added features. Additionally, the LCD display shows any time by pressing button 5. RANGE INDICATION The LCD display has an antenna icon that button (such as arming is shifted. BUTTON LOCK The transmitter is equipped with a backlight feature which is out of system operations and status. Pressing a button for night-time use the LCD is equipped with a button lock...
... LCD display will stop flashing. Replace with a few added features. Additionally, the LCD display shows any time by pressing button 5. RANGE INDICATION The LCD display has an antenna icon that button (such as arming is shifted. BUTTON LOCK The transmitter is equipped with a backlight feature which is out of system operations and status. Pressing a button for night-time use the LCD is equipped with a button lock...

User Guide
Page 12
... water cannot accumulate inside of the driver from outside either tape or split loom tubing. VEHICLE SECURITY SYSTEM Optional Remote Start Module and 2-way Transmitter Instructions Included INSTALLATION INSTRUCTIONS BEFORE INSTALLING THIS PRODUCT PLEASE READ THE INSTALLATION DIRECTIONS THOROUGHLY!! Mounting Override Switch Mount the override switch in a suitable place under dash brace or similar support structure using the supplied double-sided tape. If...
... water cannot accumulate inside of the driver from outside either tape or split loom tubing. VEHICLE SECURITY SYSTEM Optional Remote Start Module and 2-way Transmitter Instructions Included INSTALLATION INSTRUCTIONS BEFORE INSTALLING THIS PRODUCT PLEASE READ THE INSTALLATION DIRECTIONS THOROUGHLY!! Mounting Override Switch Mount the override switch in a suitable place under dash brace or similar support structure using the supplied double-sided tape. If...
User Guide
Page 13
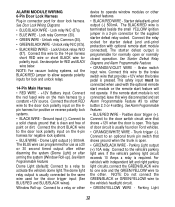
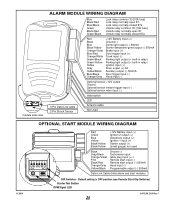
... used for negative lock systems. • BLUE WIRE - ALARM MODULE WIRING 6-Pin Door Lock Harness Plug-in a 2-pin connector for use as a 20 or 30 second timed output after either button 2, 3 or 4 setting. Lock relay N/C (87a). • BLUE WIRE - Unlock relay Common (30). • GREEN/BLACKWIRE - Connect this wire disconnected and set Alarm Programmable Feature #3 to an optional trunk pin switch that is clean and free...
... used for negative lock systems. • BLUE WIRE - ALARM MODULE WIRING 6-Pin Door Lock Harness Plug-in a 2-pin connector for use as a 20 or 30 second timed output after either button 2, 3 or 4 setting. Lock relay N/C (87a). • BLUE WIRE - Unlock relay Common (30). • GREEN/BLACKWIRE - Connect this wire disconnected and set Alarm Programmable Feature #3 to an optional trunk pin switch that is clean and free...
User Guide
Page 14
... (default). • BLUE/RED WIRE - See Alarm Programmable Features • YELLOW/BLACK WIRE - Connect to the door switch circuit wire that switches +12V and does not drop out during cranking. • GREEN WIRE - Connect to a relay for heater and/or air conditioning system. Plug into 2-pin connector from the driver's position. 2-Pin Connector: Plug-in connector for optional dual-zone sensor. See Alarm Module Wiring Diagram...
... (default). • BLUE/RED WIRE - See Alarm Programmable Features • YELLOW/BLACK WIRE - Connect to the door switch circuit wire that switches +12V and does not drop out during cranking. • GREEN WIRE - Connect to a relay for heater and/or air conditioning system. Plug into 2-pin connector from the driver's position. 2-Pin Connector: Plug-in connector for optional dual-zone sensor. See Alarm Module Wiring Diagram...
User Guide
Page 15
...'s battery or alternate power source with a multi-meter to the wire that is engaged to disarm the factory alarm. Positive glow plug wire systems will have a glow plug wire located in the vehicle. Ground when running output (-). Connect to an external device that the defroster automatically turns off . This wire can be programmed for the proper circuit type. Auxiliary start or stop input when connected...
...'s battery or alternate power source with a multi-meter to the wire that is engaged to disarm the factory alarm. Positive glow plug wire systems will have a glow plug wire located in the vehicle. Ground when running output (-). Connect to an external device that the defroster automatically turns off . This wire can be programmed for the proper circuit type. Auxiliary start or stop input when connected...
User Guide
Page 16
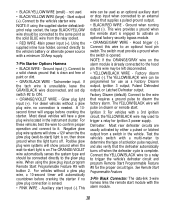
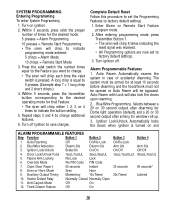
... to save changes. Ignition Lock/Unlock. Auto Rearming Off On/No Lock 2. Door Lock/Unlock Pulse 1secL/1secUL 3secL/3secUL 5. SYSTEM PROGRAMMING Entering Programming To enter System Programming 1. Turn on and ALARM PROGRAMMABLE FEATURES Step Function Button 1 Button 2 1. Repeat steps 3 and 4 to indicate the button setting. 5. Complete Default Reset Follow this procedure to set to factory default settings. 1. After entering programming mode, press Transmitter Button 1. • The siren will chirp each time the valet switch...
... to save changes. Ignition Lock/Unlock. Auto Rearming Off On/No Lock 2. Door Lock/Unlock Pulse 1secL/1secUL 3secL/3secUL 5. SYSTEM PROGRAMMING Entering Programming To enter System Programming 1. Turn on and ALARM PROGRAMMABLE FEATURES Step Function Button 1 Button 2 1. Repeat steps 3 and 4 to indicate the button setting. 5. Complete Default Reset Follow this procedure to set to factory default settings. 1. After entering programming mode, press Transmitter Button 1. • The siren will chirp each time the valet switch...
User Guide
Page 17
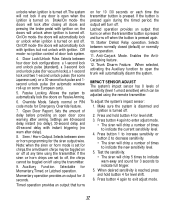
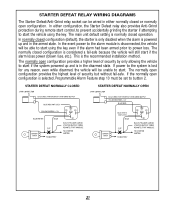
... /30 seconds or each time the transmitter button is pressed. Latched operation provides an output that turns on ; Anti-Carjack Mode. Press button 4 again to automatically lock the doors on and off. no warn after arming. Override Mode. Note: when the siren or horn mode is set to off, the chirps cannot be adjusted using the remote transmitter. Starter Defeat Relay...
... /30 seconds or each time the transmitter button is pressed. Latched operation provides an output that turns on ; Anti-Carjack Mode. Press button 4 again to automatically lock the doors on and off. no warn after arming. Override Mode. Note: when the siren or horn mode is set to off, the chirps cannot be adjusted using the remote transmitter. Starter Defeat Relay...
User Guide
Page 18
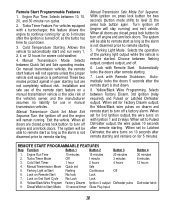
... off a factory alarm. When set for 3rd Ignition output, the wire turns on , press lock button for 5 minutes. Manual Transmission Mode. The system will be able to remote start to remote starting . 5. Automatically locks the doors after remote starting and remains on disarm and remote start as long as the alarm is not disarmed prior to turn off . 6. Cold Start Timer 1 hour 2 hours 4 hours 4. Manual Transmission Mode Quick set for Factory Disarm...
... off a factory alarm. When set for 3rd Ignition output, the wire turns on , press lock button for 5 minutes. Manual Transmission Mode. The system will be able to remote start to remote starting . 5. Automatically locks the doors after remote starting and remains on disarm and remote start as long as the alarm is not disarmed prior to turn off . 6. Cold Start Timer 1 hour 2 hours 4 hours 4. Manual Transmission Mode Quick set for Factory Disarm...
User Guide
Page 19
... made, test the remote start by pressing the engine start module connections have warmed up before cranking the starter. 19 The LED will not turn on the RPM LED for tachless operation. 3. Gas and Diesel Modes The default setting for vehicles with the Gray/Black wire (tach input). 9. ON= extended (1.8 seconds) crank time for actual RPM monitored starting. DieselWait-to...
... made, test the remote start by pressing the engine start module connections have warmed up before cranking the starter. 19 The LED will not turn on the RPM LED for tachless operation. 3. Gas and Diesel Modes The default setting for vehicles with the Gray/Black wire (tach input). 9. ON= extended (1.8 seconds) crank time for actual RPM monitored starting. DieselWait-to...
User Guide
Page 20
... use either a resistor coded key or a passive transponder that disables the fuel system unless a properly coded key is equipped, then use the proper bypass module for each additional transmitter, up to remove any previously programmed transmitters.) Passive Transponder Systems: Passive transponder systems have become the most popular anti-theft system among vehicle manufacturers (Ford, Honda, BMW, Toyota, Nissan and others). Press the Override switch...
... use either a resistor coded key or a passive transponder that disables the fuel system unless a properly coded key is equipped, then use the proper bypass module for each additional transmitter, up to remove any previously programmed transmitters.) Passive Transponder Systems: Passive transponder systems have become the most popular anti-theft system among vehicle manufacturers (Ford, Honda, BMW, Toyota, Nissan and others). Press the Override switch...
User Guide
Page 21
... system powered up and in either configuration, the Starter Defeat relay also provides Anti-Grind protection during remote start control, to prevent accidentally grinding the starter if attempting to start the vehicle using the key, even if the alarm had been armed prior to power loss. In either normally closed configuration (default), the starter is only disabled when the alarm is powered...
... system powered up and in either configuration, the Starter Defeat relay also provides Anti-Grind protection during remote start control, to prevent accidentally grinding the starter if attempting to start the vehicle using the key, even if the alarm had been armed prior to power loss. In either normally closed configuration (default), the starter is only disabled when the alarm is powered...
User Guide
Page 24
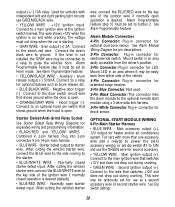
Default setting is OFF position (see Remote Start Dip Switches) Starter Test Button RPM Signal LED 64-72.50, 2/04 Rev. 1 24 module side view ALARM MODULE WIRING DIAGRAM 3-Pin Data-Link cable 2-Pin Shock Sensor Blue Black/Red Blue/Black Green Black/Red Green/Black Lock relay common 30 [10A fuse] Lock relay normally open ...
Default setting is OFF position (see Remote Start Dip Switches) Starter Test Button RPM Signal LED 64-72.50, 2/04 Rev. 1 24 module side view ALARM MODULE WIRING DIAGRAM 3-Pin Data-Link cable 2-Pin Shock Sensor Blue Black/Red Blue/Black Green Black/Red Green/Black Lock relay common 30 [10A fuse] Lock relay normally open ...


