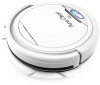
Instruction Manual
Page 2
TABLE OF CONTENTS SAFETY INSTRUCTIONS 3 * BATTERY AND RECHARGING INSTRUCTIONS 4 PRODUCT FEATURES 4 MAIN BODY AND ACCESSORIES 5 BATTERY INSTALLATION AND REMOVAL 6 RECHARGING BATTERY 7 GENERAL OPERATION 8 * STARTING OPERATION 8 SIDE BRUSH INSTALLATON 8 CLEANING AND MAINTENANCE 9 *CLEANING DUST BIN 9 *CLEANING INTAKE 12 TROUBLESHOOTING 13 2 www.PyleUSA.com
TABLE OF CONTENTS SAFETY INSTRUCTIONS 3 * BATTERY AND RECHARGING INSTRUCTIONS 4 PRODUCT FEATURES 4 MAIN BODY AND ACCESSORIES 5 BATTERY INSTALLATION AND REMOVAL 6 RECHARGING BATTERY 7 GENERAL OPERATION 8 * STARTING OPERATION 8 SIDE BRUSH INSTALLATON 8 CLEANING AND MAINTENANCE 9 *CLEANING DUST BIN 9 *CLEANING INTAKE 12 TROUBLESHOOTING 13 2 www.PyleUSA.com
Instruction Manual
Page 4
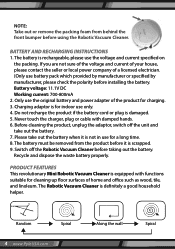
... the seller or local power company of home and o ce such as wood, tile, and linoleum. Do not recharge the product if the battery cord or plug is de nitely a good household helper. Never touch the charger, plug or cable with functions suitable for charging. 3. Before cleaning...is damaged. 5. NOTE: Take out or remove the packing foam from the product before taking out the battery. Random Spiral 4 www.PyleUSA.com Along the wall Spiral BATTERY AND RECHARGING INSTRUCTIONS 1. Battery voltage: 11.1V DC Working current: 700-800mA 2. Only use for indoor use the voltage and ...
... the seller or local power company of home and o ce such as wood, tile, and linoleum. Do not recharge the product if the battery cord or plug is de nitely a good household helper. Never touch the charger, plug or cable with functions suitable for charging. 3. Before cleaning...is damaged. 5. NOTE: Take out or remove the packing foam from the product before taking out the battery. Random Spiral 4 www.PyleUSA.com Along the wall Spiral BATTERY AND RECHARGING INSTRUCTIONS 1. Battery voltage: 11.1V DC Working current: 700-800mA 2. Only use for indoor use the voltage and ...

Instruction Manual
Page 5
MAIN BODY AND ACCESSORIES Main Body x 1 Rechargeable Battery x 1 Adapter x 1 Filter x 1 User Manual x 1 MAIN BODY AND ACCESSORIES Top Cover Side brush x 2 Bumper Inner Dustbin Switch ON/OFF www.PyleUSA.com 5
MAIN BODY AND ACCESSORIES Main Body x 1 Rechargeable Battery x 1 Adapter x 1 Filter x 1 User Manual x 1 MAIN BODY AND ACCESSORIES Top Cover Side brush x 2 Bumper Inner Dustbin Switch ON/OFF www.PyleUSA.com 5

Instruction Manual
Page 6
Open the battery cover. 3. Front Wheel Bumper Anti Drop Sensor Side Brush Vacuum Intake Wheel Battery House BATTERY INSTALLATION AND REMOVAL 1. Make sure the cover clips well Iocated in its position. 6 www.PyleUSA.com Insert the battery into the battery cabinet and close the cover. Before installing or removing the battery, the product must be disconnected from the power source. 2.
Open the battery cover. 3. Front Wheel Bumper Anti Drop Sensor Side Brush Vacuum Intake Wheel Battery House BATTERY INSTALLATION AND REMOVAL 1. Make sure the cover clips well Iocated in its position. 6 www.PyleUSA.com Insert the battery into the battery cabinet and close the cover. Before installing or removing the battery, the product must be disconnected from the power source. 2.
Instruction Manual
Page 7
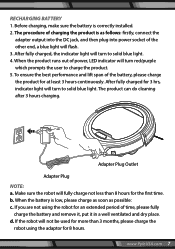
... light will not be used for more than 8 hours for at least 3 hours continuously. b. RECHARGING BATTERY 1. After fully charged for an extended period of time, please fully charge the battery and remove it, put it in a well ventilated and dry place. The procedure of power, LED indicator... the product runs out of charging the product is correctly installed. 2. d. Adapter Plug Outlet Adapter Plug NOTE: a. Before charging, make sure the battery is as possible: c. To ensure the best performance and lift span of the other end, a blue light will turn to solid blue light. When...
... light will not be used for more than 8 hours for at least 3 hours continuously. b. RECHARGING BATTERY 1. After fully charged for an extended period of time, please fully charge the battery and remove it, put it in a well ventilated and dry place. The procedure of power, LED indicator... the product runs out of charging the product is correctly installed. 2. d. Adapter Plug Outlet Adapter Plug NOTE: a. Before charging, make sure the battery is as possible: c. To ensure the best performance and lift span of the other end, a blue light will turn to solid blue light. When...
Instruction Manual
Page 13
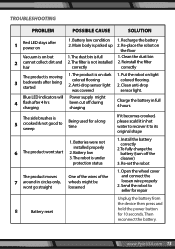
... started Blue LED indicators will ash after power on Vacuum is on the oor 1. Reinstall the lter correctly The product is not installed correctly 1. Batteries were not installed properly 2. The robot is under protection status 1. www.PyleUSA.com 13 Clean the dust bin 2. Send the robot to its... anti-drop sensor light. Re-set the robot The product moves around in hot water to recover it to seller for repair 8 Battery reset Unplug the battery from the device then press and hold the power button for a long time If it becomes crooked, please scald it in circles only...
... started Blue LED indicators will ash after power on Vacuum is on the oor 1. Reinstall the lter correctly The product is not installed correctly 1. Batteries were not installed properly 2. The robot is under protection status 1. www.PyleUSA.com 13 Clean the dust bin 2. Send the robot to its... anti-drop sensor light. Re-set the robot The product moves around in hot water to recover it to seller for repair 8 Battery reset Unplug the battery from the device then press and hold the power button for a long time If it becomes crooked, please scald it in circles only...
