Instruction Manual
Page 2
TABLE OF CONTENTS SAFETY INSTRUCTIONS 3 * BATTERY AND RECHARGING INSTRUCTIONS 4 PRODUCT FEATURES 4 MAIN BODY AND ACCESSORIES 5 BATTERY INSTALLATION AND REMOVAL 6 RECHARGING BATTERY 7 GENERAL OPERATION 8 * STARTING OPERATION 8 SIDE BRUSH INSTALLATON 8 CLEANING AND MAINTENANCE 9 *CLEANING DUST BIN 9 *CLEANING INTAKE 12 TROUBLESHOOTING 13 2 www.PyleUSA.com
TABLE OF CONTENTS SAFETY INSTRUCTIONS 3 * BATTERY AND RECHARGING INSTRUCTIONS 4 PRODUCT FEATURES 4 MAIN BODY AND ACCESSORIES 5 BATTERY INSTALLATION AND REMOVAL 6 RECHARGING BATTERY 7 GENERAL OPERATION 8 * STARTING OPERATION 8 SIDE BRUSH INSTALLATON 8 CLEANING AND MAINTENANCE 9 *CLEANING DUST BIN 9 *CLEANING INTAKE 12 TROUBLESHOOTING 13 2 www.PyleUSA.com

Instruction Manual
Page 3
...;F to clean up combustible or highly volatile liquids such as it works and topple down the table, chairs, or cabinet and cause property damage. 5. SAFETY INSTRUCTIONS Read the safety instructions before operating Mini Robotic Vacuum Cleaner and keep this manual handy for service information. 10. While the product is damaged by force, do not operate regardless the cause. Use this product in operation. 6. Proper...
...;F to clean up combustible or highly volatile liquids such as it works and topple down the table, chairs, or cabinet and cause property damage. 5. SAFETY INSTRUCTIONS Read the safety instructions before operating Mini Robotic Vacuum Cleaner and keep this manual handy for service information. 10. While the product is damaged by force, do not operate regardless the cause. Use this product in operation. 6. Proper...
Instruction Manual
Page 4
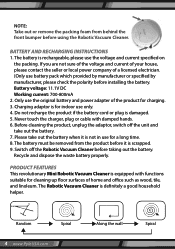
... Vacuum Cleaner before installing the battery. NOTE: Take out or remove the packing foam from the product before it is not in use for indoor use only. 4. Only use the voltage and current speci ed on the packing. PRODUCT FEATURES This revolutionary Mini Robotic Vacuum Cleaner is rechargeable, please use the original battery and power adapter of the product for cleaning up oor surfaces of a licensed electrician. (Only use battery...
... Vacuum Cleaner before installing the battery. NOTE: Take out or remove the packing foam from the product before it is not in use for indoor use only. 4. Only use the voltage and current speci ed on the packing. PRODUCT FEATURES This revolutionary Mini Robotic Vacuum Cleaner is rechargeable, please use the original battery and power adapter of the product for cleaning up oor surfaces of a licensed electrician. (Only use battery...

Instruction Manual
Page 5
MAIN BODY AND ACCESSORIES Main Body x 1 Rechargeable Battery x 1 Adapter x 1 Filter x 1 User Manual x 1 MAIN BODY AND ACCESSORIES Top Cover Side brush x 2 Bumper Inner Dustbin Switch ON/OFF www.PyleUSA.com 5
MAIN BODY AND ACCESSORIES Main Body x 1 Rechargeable Battery x 1 Adapter x 1 Filter x 1 User Manual x 1 MAIN BODY AND ACCESSORIES Top Cover Side brush x 2 Bumper Inner Dustbin Switch ON/OFF www.PyleUSA.com 5

Instruction Manual
Page 6
Make sure the cover clips well Iocated in its position. 6 www.PyleUSA.com Open the battery cover. 3. Before installing or removing the battery, the product must be disconnected from the power source. 2. Insert the battery into the battery cabinet and close the cover. Front Wheel Bumper Anti Drop Sensor Side Brush Vacuum Intake Wheel Battery House BATTERY INSTALLATION AND REMOVAL 1.
Make sure the cover clips well Iocated in its position. 6 www.PyleUSA.com Open the battery cover. 3. Before installing or removing the battery, the product must be disconnected from the power source. 2. Insert the battery into the battery cabinet and close the cover. Front Wheel Bumper Anti Drop Sensor Side Brush Vacuum Intake Wheel Battery House BATTERY INSTALLATION AND REMOVAL 1.
Instruction Manual
Page 7
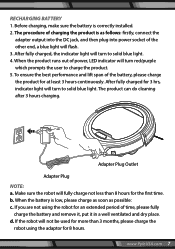
... light will turn red/purple which prompts the user to charge the product. 5. The product can do cleaning after 3 hours charging. b. To ensure the best performance and lift span of power, LED indicator will turn to solid blue light. After fully charged for at least 3 hours continuously. If the robot will fully charge not less than 3 months, please charge the robot using...
... light will turn red/purple which prompts the user to charge the product. 5. The product can do cleaning after 3 hours charging. b. To ensure the best performance and lift span of power, LED indicator will turn to solid blue light. After fully charged for at least 3 hours continuously. If the robot will fully charge not less than 3 months, please charge the robot using...
Instruction Manual
Page 8
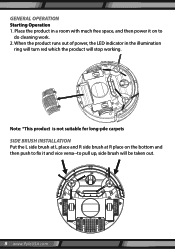
Place the product in the illumination ring will turn red which the product will be taken out. 8 www.PyleUSA.com GENERAL OPERATION Starting Operation 1. Note: *This product is not suitable for long-pile carpets SIDE BRUSH INSTALLATION Put the L side brush at L place and R side brush at R place on the bottom and then push to x it on to pull up, side brush will stop working. When the product runs out of power, the LED indicator in a room with much free space, and then power it and vice versa--to do cleaning work. 2.
Place the product in the illumination ring will turn red which the product will be taken out. 8 www.PyleUSA.com GENERAL OPERATION Starting Operation 1. Note: *This product is not suitable for long-pile carpets SIDE BRUSH INSTALLATION Put the L side brush at L place and R side brush at R place on the bottom and then push to x it on to pull up, side brush will stop working. When the product runs out of power, the LED indicator in a room with much free space, and then power it and vice versa--to do cleaning work. 2.

Instruction Manual
Page 9
CLEANING AND MAINTENANCE Cleaning Dust Bin 1. Put your nger into the dust bin groove and grip to take it out 2 www.PyleUSA.com 9 Open the upper cover by lifting the lid near the power on/o button 1 2.
CLEANING AND MAINTENANCE Cleaning Dust Bin 1. Put your nger into the dust bin groove and grip to take it out 2 www.PyleUSA.com 9 Open the upper cover by lifting the lid near the power on/o button 1 2.

Instruction Manual
Page 10
Empty the dirt in the dust bin. 3 4 5 10 www.PyleUSA.com Take out the inner lter. 5. Open the lid of dust bin. 4. 3.
Empty the dirt in the dust bin. 3 4 5 10 www.PyleUSA.com Take out the inner lter. 5. Open the lid of dust bin. 4. 3.

Instruction Manual
Page 11
NOTE: Before putting back the dust bin, make sure the PE pad (function as non-return valve) in washing machine, dish washing machine or other machine. 7. 6. Reinstall the lter and the dust bin lid once they get dried 9. Recheck the lter also before operating the product. Do not wash it in the dust bin is well located. Put back the dust bin into the cleaner. Periodically clean the lter with tap water. Operating the product without lter might cause malfunction. 7 6 9 8 www.PyleUSA.com 11 Rinse the dust bin with a soft bristle brush 8.
NOTE: Before putting back the dust bin, make sure the PE pad (function as non-return valve) in washing machine, dish washing machine or other machine. 7. 6. Reinstall the lter and the dust bin lid once they get dried 9. Recheck the lter also before operating the product. Do not wash it in the dust bin is well located. Put back the dust bin into the cleaner. Periodically clean the lter with tap water. Operating the product without lter might cause malfunction. 7 6 9 8 www.PyleUSA.com 11 Rinse the dust bin with a soft bristle brush 8.

Instruction Manual
Page 12
Cleanup the dirt and dust at the intake 10 12 www.PyleUSA.com Cleaning Intake After repeated use for some time, dirt and dust might accumulate around the intake of the product. Remove the external power source. 2. To ensure its best cleaning e ciency and constant air ow its should be cleaned periodically. 1.
Cleanup the dirt and dust at the intake 10 12 www.PyleUSA.com Cleaning Intake After repeated use for some time, dirt and dust might accumulate around the intake of the product. Remove the external power source. 2. To ensure its best cleaning e ciency and constant air ow its should be cleaned periodically. 1.
Instruction Manual
Page 13
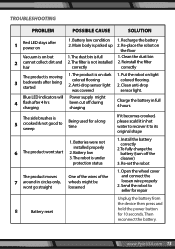
... The product is on Vacuum is not installed correctly 1. Install the battery correctly 2.To fully charge the battery (turn o the cleaner) 3. Re-place the robot on light colored ooring. 2. Battery low 3. Send the robot to seller for repair 8 Battery reset Unplug the battery from the device then press and hold the power button for a long time If it becomes crooked, please scald it to sweep Being used for...
... The product is on Vacuum is not installed correctly 1. Install the battery correctly 2.To fully charge the battery (turn o the cleaner) 3. Re-place the robot on light colored ooring. 2. Battery low 3. Send the robot to seller for repair 8 Battery reset Unplug the battery from the device then press and hold the power button for a long time If it becomes crooked, please scald it to sweep Being used for...

Instruction Manual
Page 14
Questions? Phone: (1) 718-535-1800 Email: support@pyleusa.com Issues? We are here to help!
Questions? Phone: (1) 718-535-1800 Email: support@pyleusa.com Issues? We are here to help!


