
User Guide
Page 2
... intended purpose only. 3. Always turn the switch to the "Off" position before filling with water, emptying, or cleaning. 6. Do not operate steamer without properly filling the water container. 15. As a safety feature, this product for at least 20 amperes should not be used by touching hot parts, hot water, or steam. 18. Never pull the power cord to remove it from the outlet...
... intended purpose only. 3. Always turn the switch to the "Off" position before filling with water, emptying, or cleaning. 6. Do not operate steamer without properly filling the water container. 15. As a safety feature, this product for at least 20 amperes should not be used by touching hot parts, hot water, or steam. 18. Never pull the power cord to remove it from the outlet...

User Guide
Page 3
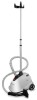
PRODUCT INFORMATIONS 1: Steam Nozzle 2: Steam Handle 3: Hanger/Nozzle Holder 4: Steam Hose 5: Telescopic Pole 6: Pole Insert Base 7: Water Fill Tank 8: Power Switch 9: Wheel 10: Power Cord 11: Unit Cover 12: Heating Indicate Light 13: Hose Base 14: Brush 15: Crease Clip
PRODUCT INFORMATIONS 1: Steam Nozzle 2: Steam Handle 3: Hanger/Nozzle Holder 4: Steam Hose 5: Telescopic Pole 6: Pole Insert Base 7: Water Fill Tank 8: Power Switch 9: Wheel 10: Power Cord 11: Unit Cover 12: Heating Indicate Light 13: Hose Base 14: Brush 15: Crease Clip
User Guide
Page 4
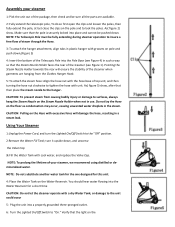
... the steamer operate with a dry Water Tank, or damage to the "Off" position. 2:Remove the Water Fill Tank; CAUTION: To prevent steam from the Clothes Hanger Hook. 5: To attach the steam hose: Align the hose nut with the hose base of steam through the Hose. 3: To attach the hanger attachment, align tabs in a steam leak. Using Your Steamer 1:Unplug the Power Cord, and turn it upside down . Assembly your steamer, we recommend using distilled or demineralized water. You...
... the steamer operate with a dry Water Tank, or damage to the "Off" position. 2:Remove the Water Fill Tank; CAUTION: To prevent steam from the Clothes Hanger Hook. 5: To attach the steam hose: Align the hose nut with the hose base of steam through the Hose. 3: To attach the hanger attachment, align tabs in a steam leak. Using Your Steamer 1:Unplug the Power Cord, and turn it upside down . Assembly your steamer, we recommend using distilled or demineralized water. You...
User Guide
Page 5
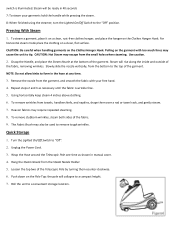
... when handling garments on a clean, flat surface. Remove the nozzle from the Steam Nozzle Holder. 5. Unplug the Power Cord. 3. Hang the Steam Nozzle from the garment, and smooth the fabric with too much force may escape from the small holes when steaming. switch is wrinkle free. 5. Use caution. 2. Using horizontally keep steam 4 inches above clothing. 6. Heavier fabrics may also be ready in manual cover. 4. Steam will be used...
... when handling garments on a clean, flat surface. Remove the nozzle from the Steam Nozzle Holder. 5. Unplug the Power Cord. 3. Hang the Steam Nozzle from the garment, and smooth the fabric with too much force may escape from the small holes when steaming. switch is wrinkle free. 5. Use caution. 2. Using horizontally keep steam 4 inches above clothing. 6. Heavier fabrics may also be ready in manual cover. 4. Steam will be used...
User Guide
Page 6
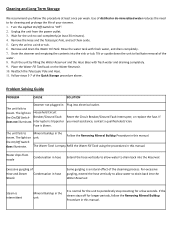
..., and set them aside. 5. Remove and drain the Water Fill Tank. The light on the On/Off Switch does illuminate. Interrupter is tripped or Fuse is empty. The unit fails to "Off". 2. Refill the Water Fill Tank using the procedures in this manual. Cleaning and Long Term Storage We recommend you need to steam. Turn the Lighted On/Off Switch to steam. Drain the steamer and...
..., and set them aside. 5. Remove and drain the Water Fill Tank. The light on the On/Off Switch does illuminate. Interrupter is tripped or Fuse is empty. The unit fails to "Off". 2. Refill the Water Fill Tank using the procedures in this manual. Cleaning and Long Term Storage We recommend you need to steam. Turn the Lighted On/Off Switch to steam. Drain the steamer and...
User Guide
Page 7
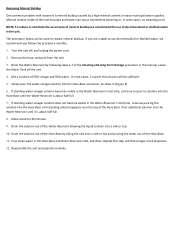
... until it is about half full. 8. Leave the Water Tank off , and unplug the power cord. 2. Pour clean water in (Figure 6) 6. Reassemble the unit and operate normally. Repeat this solution will be used to drain into the Water Reservoir until the vinegar smell dissipates. 12. Removing Mineral Buildup One common problem with steamers is mineral buildup caused by a high mineral content in...
... until it is about half full. 8. Leave the Water Tank off , and unplug the power cord. 2. Pour clean water in (Figure 6) 6. Reassemble the unit and operate normally. Repeat this solution will be used to drain into the Water Reservoir until the vinegar smell dissipates. 12. Removing Mineral Buildup One common problem with steamers is mineral buildup caused by a high mineral content in...
User Guide
Page 8
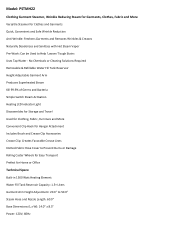
... or Cleaning Solutions Required Removable & Refillable Water Fill Tank Reservoir Height Adjustable Garment Arm Produces Superheated Steam Kill 99.9% of Germs and Bacteria Simple Switch Steam Activation Heating LED Indicator Light Disassembles for Storage and Travel Used for Clothing, Fabric, Furniture and More Convenient Clip Hook for Hangar Attachment Includes Brush and Crease Clip Accessories Crease Clip: Creates Favorable Crease Lines Knitted-Fabric Hose Cover to Prevent...
... or Cleaning Solutions Required Removable & Refillable Water Fill Tank Reservoir Height Adjustable Garment Arm Produces Superheated Steam Kill 99.9% of Germs and Bacteria Simple Switch Steam Activation Heating LED Indicator Light Disassembles for Storage and Travel Used for Clothing, Fabric, Furniture and More Convenient Clip Hook for Hangar Attachment Includes Brush and Crease Clip Accessories Crease Clip: Creates Favorable Crease Lines Knitted-Fabric Hose Cover to Prevent...


