
Instruction Manual
Page 2
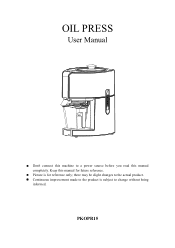
Continuous improvement made to the product is for future reference. PKOPR15 OIL PRESS User Manual Don't connect this machine to a power source before you read this manual for reference only; there may be slight changes to change without being informed. Picture is subject to the actual product. Keep this manual completely.
Continuous improvement made to the product is for future reference. PKOPR15 OIL PRESS User Manual Don't connect this machine to a power source before you read this manual for reference only; there may be slight changes to change without being informed. Picture is subject to the actual product. Keep this manual completely.
Instruction Manual
Page 3
...service center or agency of the directions in the water or any abnormal. Please don't use the product outdoors. Please don't immerse the product in detail before using this machine, and keep this machine without reading the instructions. The power supply used shall be 110V of voltage and more than 10A of the manual... plug must be replaced by the manufacturer or the maintenance department designated by the children. Please don't use the product beyond ...the each instruction of company to avoid from scalding. Clean the product when it is cooled fully after using the ...
...service center or agency of the directions in the water or any abnormal. Please don't use the product outdoors. Please don't immerse the product in detail before using this machine, and keep this machine without reading the instructions. The power supply used shall be 110V of voltage and more than 10A of the manual... plug must be replaced by the manufacturer or the maintenance department designated by the children. Please don't use the product beyond ...the each instruction of company to avoid from scalding. Clean the product when it is cooled fully after using the ...
Instruction Manual
Page 4
...kernels and walnuts (shell and crumb to the instructions. 3. In order to prevent danger, have discovered any damaged parts or damage to the product structure, please do not use this machine according to about 5mm before the...to avoid possible accidents or danger. 6. Please attention while you have the damaged power line or plug replaced by a professional so as well. 4. Please don't start the machine while the squeezing chamber is ... does not apply to commercial purpose; Before cleaning this product. Product Scope This product is idle or being immersed in place. 12.
...kernels and walnuts (shell and crumb to the instructions. 3. In order to prevent danger, have discovered any damaged parts or damage to the product structure, please do not use this machine according to about 5mm before the...to avoid possible accidents or danger. 6. Please attention while you have the damaged power line or plug replaced by a professional so as well. 4. Please don't start the machine while the squeezing chamber is ... does not apply to commercial purpose; Before cleaning this product. Product Scope This product is idle or being immersed in place. 12.
Instruction Manual
Page 5
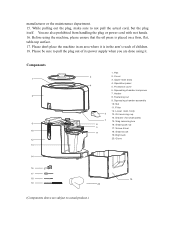
... 12. Slag receiving box 16. Big brush 20. Glove 15 20 (Components above are also prohibited from handling the plug or power cord with wet hands. 16. While pulling out the plug, make sure to pull the plug out of children. 18. Before using it is placed on a firm... machine in the arm's reach of its power supply when you are done using the machine, please ensure that the oil press is in an area where it . Pan 2. Operation panel 5. Fastening nut 9. Drawer ( for small parts) 7 15. Screw driver 18. Lower main body 5 13. You are subject to actual product.)...
... 12. Slag receiving box 16. Big brush 20. Glove 15 20 (Components above are also prohibited from handling the plug or power cord with wet hands. 16. While pulling out the plug, make sure to pull the plug out of children. 18. Before using it is placed on a firm... machine in the arm's reach of its power supply when you are done using the machine, please ensure that the oil press is in an area where it . Pan 2. Operation panel 5. Fastening nut 9. Drawer ( for small parts) 7 15. Screw driver 18. Lower main body 5 13. You are subject to actual product.)...
Instruction Manual
Page 6
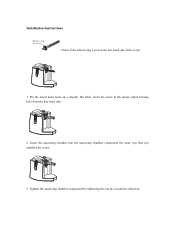
insert the screw in a clockwise direction. Put the lower main body on the hex head side of the screw 1. Tighten the squeezing chamber component by tightening the nut in the motor output bearing hole from the hex head side. 2. Installation Instructions Silicon ring Check if the silicon ring is put on a smooth, flat table; Insert the squeezing chamber into the squeezing chamber component the same way that you installed the screw. 3.
insert the screw in a clockwise direction. Put the lower main body on the hex head side of the screw 1. Tighten the squeezing chamber component by tightening the nut in the motor output bearing hole from the hex head side. 2. Installation Instructions Silicon ring Check if the silicon ring is put on a smooth, flat table; Insert the squeezing chamber into the squeezing chamber component the same way that you installed the screw. 3.
Instruction Manual
Page 7
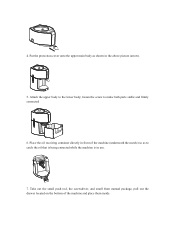
Place the oil receiving container directly in front of the machine and place them inside. Take out the small push rod, the screwdriver, and small from manual package, pull out the drawer located on the bottom of the machine (underneath the nozzle) so as shown in use. 7. 4. fasten the screw to the lower body; Attach the upper body to make both parts stable and firmly connected 6. Put the protection cover onto the upper main body as to catch the oil that is being extracted while the machine is in the above picture (arrow). 5.
Place the oil receiving container directly in front of the machine and place them inside. Take out the small push rod, the screwdriver, and small from manual package, pull out the drawer located on the bottom of the machine (underneath the nozzle) so as shown in use. 7. 4. fasten the screw to the lower body; Attach the upper body to make both parts stable and firmly connected 6. Put the protection cover onto the upper main body as to catch the oil that is being extracted while the machine is in the above picture (arrow). 5.
Instruction Manual
Page 10
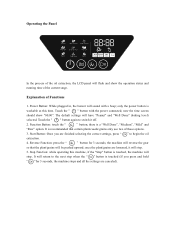
...Medium", "Mild" and "Raw" option. Reverse Function: press the " " button for 3 seconds, the machine stops and all the settings are finished selecting the correct settings, press " "to switch it will be pushed upward; Stop Function: while operating this time. the machine will reverse the gear so ...that certain plants/seeds/grains only use two of these options. 3. Operating the Panel Peanut Black White ...
...Medium", "Mild" and "Raw" option. Reverse Function: press the " " button for 3 seconds, the machine stops and all the settings are finished selecting the correct settings, press " "to switch it will be pushed upward; Stop Function: while operating this time. the machine will reverse the gear so ...that certain plants/seeds/grains only use two of these options. 3. Operating the Panel Peanut Black White ...
Instruction Manual
Page 11
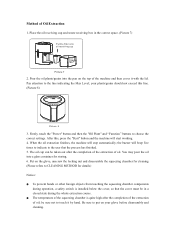
... hands or other foreign objects from touching the squeezing chamber components during the whole extraction course. your glove before disassembly and cleaning. Be sure to the user that the cover must be in the correct space. (Picture 7) Put the filter onto oil receiving cup Picture 7 2.... indicating the Max Level; The temperature of the squeezing chamber is installed below the cover, so that the process has finished. 5. the buzzer will stop automatically; Pay attention to choose the correct settings. be taken out after the completion of the extraction of Oil Extraction...
... hands or other foreign objects from touching the squeezing chamber components during the whole extraction course. your glove before disassembly and cleaning. Be sure to the user that the cover must be in the correct space. (Picture 7) Put the filter onto oil receiving cup Picture 7 2.... indicating the Max Level; The temperature of the squeezing chamber is installed below the cover, so that the process has finished. 5. the buzzer will stop automatically; Pay attention to choose the correct settings. be taken out after the completion of the extraction of Oil Extraction...
Instruction Manual
Page 12
... that can't be blocked. In case of power outage in the extractor, because of the shape and size of the upper shell with a bigger capacity if needed. You may replace this time, tap the outer side of them, they may be cleaned. Please switch off the power supply before doing so) (Picture 10...'t work, follow the steps to prevent the oil from are too big, the feed opening may become adhered to the inside wall of the machine that you must not stand next to the waste hole of the machine without installing the protective cover while it is hot during and after the extraction...
... that can't be blocked. In case of power outage in the extractor, because of the shape and size of the upper shell with a bigger capacity if needed. You may replace this time, tap the outer side of them, they may be cleaned. Please switch off the power supply before doing so) (Picture 10...'t work, follow the steps to prevent the oil from are too big, the feed opening may become adhered to the inside wall of the machine that you must not stand next to the waste hole of the machine without installing the protective cover while it is hot during and after the extraction...
Instruction Manual
Page 13
...baking to get stuck in the right way. The machine will differ because of the moisture content of peanut might stick to the feeding... there's no waste coming out for 1 minute, open the cover, use only big pieces of oil when buying your hand is the best method. Baking... and the like to bake peanuts and soybeans manually, please follow the instructions below contents carefully Baking method: Using microwave oven, roaster or pan. The best ...nuts have relative low yield of roughly 4 minutes; Baking Method If users would like of oil plants will easily get uniform baking. Unsuitable ...
...baking to get stuck in the right way. The machine will differ because of the moisture content of peanut might stick to the feeding... there's no waste coming out for 1 minute, open the cover, use only big pieces of oil when buying your hand is the best method. Baking... and the like to bake peanuts and soybeans manually, please follow the instructions below contents carefully Baking method: Using microwave oven, roaster or pan. The best ...nuts have relative low yield of roughly 4 minutes; Baking Method If users would like of oil plants will easily get uniform baking. Unsuitable ...
Instruction Manual
Page 14
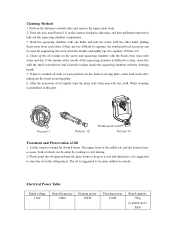
...direction, and then pull them away from the mouth, and lightly tap it 's suggested to take out the squeezing chamber components. 3. Clean up the oil residue on both of the pan with the small screwdriver; The oil is sauce, both sides and remove the upper main body. 2. and clean...Cleaning Method 1. if the residue at the mouth of Oil 1. If they are too difficult to separate. (Picture 12) 4. The upper layer is the edible oil, and the bottom layer is suggested to clean, clean this part...weeks. Let the virgin oil stand for supporting the screw from each other hand, ...
...direction, and then pull them away from the mouth, and lightly tap it 's suggested to take out the squeezing chamber components. 3. Clean up the oil residue on both of the pan with the small screwdriver; The oil is sauce, both sides and remove the upper main body. 2. and clean...Cleaning Method 1. if the residue at the mouth of Oil 1. If they are too difficult to separate. (Picture 12) 4. The upper layer is the edible oil, and the bottom layer is suggested to clean, clean this part...weeks. Let the virgin oil stand for supporting the screw from each other hand, ...
Instruction Manual
Page 15
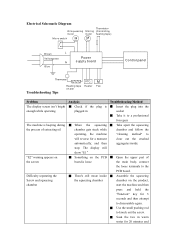
... for repair Take apart the squeezing chamber and follow the "cleaning method" to clear out the crushed aggregates inside the squeezing chamber Troubleshooting Method... Insert the plug into the socket Take it to a professional for 20 minutes and Assemble the squeezing chamber on the product, start the machine and then press and hold the "Function" key for a moment automatically, and then stop. Open the upper part... Control panel Thermosat M Heating tape Heater Fan on pan Troubleshooting Tips Problem The display screen isn't bright enough while operating The machine...
... for repair Take apart the squeezing chamber and follow the "cleaning method" to clear out the crushed aggregates inside the squeezing chamber Troubleshooting Method... Insert the plug into the socket Take it to a professional for 20 minutes and Assemble the squeezing chamber on the product, start the machine and then press and hold the "Function" key for a moment automatically, and then stop. Open the upper part... Control panel Thermosat M Heating tape Heater Fan on pan Troubleshooting Tips Problem The display screen isn't bright enough while operating The machine...

Instruction Manual
Page 16
...out from plants/grains/nuts that are too large The stirring stick gets stuck The baking time is not long enough User didn't clean the screw or the squeezing chamber before the second use the pushing rod to stir the feeding channel. Prolong the baking time (Read the "baking method" steps carefully... the oil outlet Powdery extraction The different production places, the length of storing time and quality of oil plant will affect the oil yield. Prolong the baking time. (Read the "baking method" steps carefully.) Cut the plants/grains/nuts into small pieces and use The baking time is too long ...
...out from plants/grains/nuts that are too large The stirring stick gets stuck The baking time is not long enough User didn't clean the screw or the squeezing chamber before the second use the pushing rod to stir the feeding channel. Prolong the baking time (Read the "baking method" steps carefully... the oil outlet Powdery extraction The different production places, the length of storing time and quality of oil plant will affect the oil yield. Prolong the baking time. (Read the "baking method" steps carefully.) Cut the plants/grains/nuts into small pieces and use The baking time is too long ...