Instruction Manual
Page 1
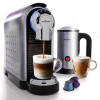
PKNESPRESO70 Espresso Machine & Milk Frother Automatic Capsule Espresso Maker with Hot & Cold Milk Frother
PKNESPRESO70 Espresso Machine & Milk Frother Automatic Capsule Espresso Maker with Hot & Cold Milk Frother
Instruction Manual
Page 2
PLEASE READ THIS INSTRUCTION MANUAL AND SAFETY INSTRUCTIONS BEFORE OPERATING THE APPLIANCE! Never unplug by pulling out the power cable; Never touch very hot parts of : *Faulty operation *Damaged power cable. *After falling or other liquid. • Connect only to follow them and the operating instructions. • First ... take time to read this entire operating manual. • Danger of electric shock! Never touch the power plug/socket/cable or the machine with damp or wet hands. Damaged power cables may only be replaced at the customer service centre. • Danger of scalding!...
PLEASE READ THIS INSTRUCTION MANUAL AND SAFETY INSTRUCTIONS BEFORE OPERATING THE APPLIANCE! Never unplug by pulling out the power cable; Never touch very hot parts of : *Faulty operation *Damaged power cable. *After falling or other liquid. • Connect only to follow them and the operating instructions. • First ... take time to read this entire operating manual. • Danger of electric shock! Never touch the power plug/socket/cable or the machine with damp or wet hands. Damaged power cables may only be replaced at the customer service centre. • Danger of scalding!...
Instruction Manual
Page 3
... they have the machine checked and repaired if necessary at the customer service centre. • The machine location must be replaced by the manufacturer, its service agent or similarly qualified ... down completely before cleaning and or Maintenance. • To prevent damage, never use replacement parts or accessories not recommended by the manufacturer • This appliance is damaged, it must meet the... following requirements: *Choose a dry, stable and level support surface not immediately underneath the power point at least 60 cm away from the washbasin...
... they have the machine checked and repaired if necessary at the customer service centre. • The machine location must be replaced by the manufacturer, its service agent or similarly qualified ... down completely before cleaning and or Maintenance. • To prevent damage, never use replacement parts or accessories not recommended by the manufacturer • This appliance is damaged, it must meet the... following requirements: *Choose a dry, stable and level support surface not immediately underneath the power point at least 60 cm away from the washbasin...
Instruction Manual
Page 4
... stains can be operated on the Plug This appliance has a grounded 3-prong plug. for removals, servicing, etc.) Note: You may not operate properly. www.NutrichefKitchen.com It should be lethal. Note: • Check that this manual, in the machine. Plasticizer Warning CAUTION: To prevent plasticizers from other appliances. Electric Power If the...
... stains can be operated on the Plug This appliance has a grounded 3-prong plug. for removals, servicing, etc.) Note: You may not operate properly. www.NutrichefKitchen.com It should be lethal. Note: • Check that this manual, in the machine. Plasticizer Warning CAUTION: To prevent plasticizers from other appliances. Electric Power If the...
Instruction Manual
Page 6
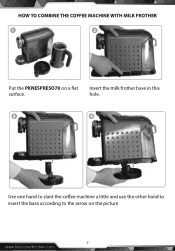
HOW TO COMBINE THE COFFEE MACHINE WITH MILK FROTHER 1 2 Put the PKNESPRESO70 on the picture 6 www.NutrichefKitchen.com Insert the milk frother base in this hole. 3 4 Use one hand to slant the co ee machine a little and use the other hand to insert the base according to the arrow on a at surface.
HOW TO COMBINE THE COFFEE MACHINE WITH MILK FROTHER 1 2 Put the PKNESPRESO70 on the picture 6 www.NutrichefKitchen.com Insert the milk frother base in this hole. 3 4 Use one hand to slant the co ee machine a little and use the other hand to insert the base according to the arrow on a at surface.
Instruction Manual
Page 8
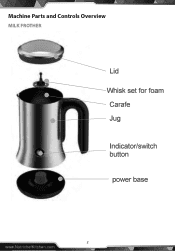
Machine Parts and Controls Overview MILK FROTHER 8 www.NutrichefKitchen.com
Machine Parts and Controls Overview MILK FROTHER 8 www.NutrichefKitchen.com
Instruction Manual
Page 9
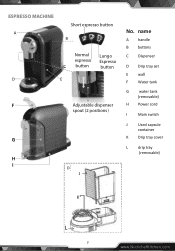
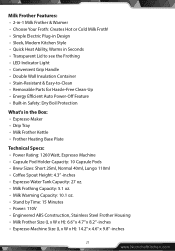
ESPRESSO MACHINE A Short espresso button B Normal Lungo espresso Espresso C button button D E Adjustable dispenser spout (2 positionsĎ No. name A handle B bu�ons C Dispenser D Drip tray set E wall F Water tank G water tank (removable) H Power cord I Main switch J Used capsule container K Drip tray cover L drip tray (removable) D J K L 9 www.NutrichefKitchen.com
ESPRESSO MACHINE A Short espresso button B Normal Lungo espresso Espresso C button button D E Adjustable dispenser spout (2 positionsĎ No. name A handle B bu�ons C Dispenser D Drip tray set E wall F Water tank G water tank (removable) H Power cord I Main switch J Used capsule container K Drip tray cover L drip tray (removable) D J K L 9 www.NutrichefKitchen.com
Instruction Manual
Page 14
... approximately Press the lungo co ee button, before pressing the button, make sure that: • The handle is closed without drip tray set (part D shown in "Overview of machine parts and controls"), or hot water will blink in red for first use, meaning the internal circuit is finished 14 www.NutrichefKitchen...
... approximately Press the lungo co ee button, before pressing the button, make sure that: • The handle is closed without drip tray set (part D shown in "Overview of machine parts and controls"), or hot water will blink in red for first use, meaning the internal circuit is finished 14 www.NutrichefKitchen...

Instruction Manual
Page 15
... enough water in the tank before brewing. Place an empty cup under the dispenser. Tips: • If the machine is cold (for lungo espresso), default setting can be dicharged to the water tank ,it is refilled, the indicator light turns from red to eject the used capsule into the...
... enough water in the tank before brewing. Place an empty cup under the dispenser. Tips: • If the machine is cold (for lungo espresso), default setting can be dicharged to the water tank ,it is refilled, the indicator light turns from red to eject the used capsule into the...
Instruction Manual
Page 16
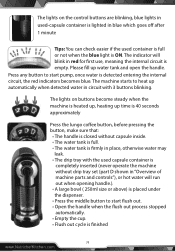
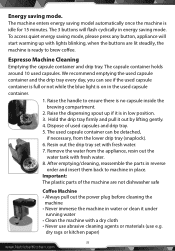
...water. 7. Raise the dispensing spout up with a dry cloth • Never use abrasive cleaning agents or materials (use e.g. Resin out the drip tray set with fresh water. 8. To access quiet energy saving mode, please press any button, appliance will flash cyclically in low position. 3. Espresso Machine ... • Never immerse the machine in reverse order and insert them back to brew co ee. After emptying/cleaning, reassemble the parts in water or clean it out by lifting gently. 4. The machine enters energy saving model automatically once the machine is idle for 15 minutes.
...water. 7. Raise the dispensing spout up with a dry cloth • Never use abrasive cleaning agents or materials (use e.g. Resin out the drip tray set with fresh water. 8. To access quiet energy saving mode, please press any button, appliance will flash cyclically in low position. 3. Espresso Machine ... • Never immerse the machine in reverse order and insert them back to brew co ee. After emptying/cleaning, reassemble the parts in water or clean it out by lifting gently. 4. The machine enters energy saving model automatically once the machine is idle for 15 minutes.

Instruction Manual
Page 17
... falls significantly or after one or two months. Recommendations: Purchase commercially available decalcifier (decalcifying liquid), diluted according to follow these instructions. Make sure there is not covered by the guarantee. • Caution: HOT WATER! 1. So it is essential to the manufacturer...'s instructions; The lime particles in hard drinking water are deposited as residues in the water tank. 2. Decalcification must be sure to decalcify the...
... falls significantly or after one or two months. Recommendations: Purchase commercially available decalcifier (decalcifying liquid), diluted according to follow these instructions. Make sure there is not covered by the guarantee. • Caution: HOT WATER! 1. So it is essential to the manufacturer...'s instructions; The lime particles in hard drinking water are deposited as residues in the water tank. 2. Decalcification must be sure to decalcify the...
Instruction Manual
Page 18
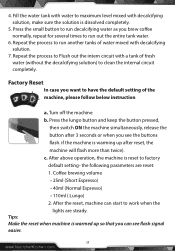
.... Make the reset when machine is reset to Flush out the intern circuit with decalcifying solution. 7. Repeat the process to factory default setting- 4. Fill the water tank with water to maximum level mixed with decalcifying solution, make sure the solution is warming up so that ...you brew co ee normally, repeat for several times to run another tanks of water mixed with a tank of the machine, please follow below instruction a. b. the following parameters are steady. Turn o the machine. After above operation, the machine is warmed up after 3 seconds or when you...
.... Make the reset when machine is reset to Flush out the intern circuit with decalcifying solution. 7. Repeat the process to factory default setting- 4. Fill the water tank with water to maximum level mixed with decalcifying solution, make sure the solution is warming up so that ...you brew co ee normally, repeat for several times to run another tanks of water mixed with a tank of the machine, please follow below instruction a. b. the following parameters are steady. Turn o the machine. After above operation, the machine is warmed up after 3 seconds or when you...
Instruction Manual
Page 20
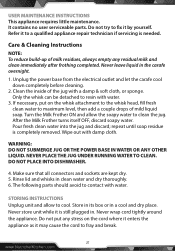
... serviceable parts. Only the whisk can be detached to resin with damp cloth. NEVER PLACE THE JUG UNDER RUNNING WATER TO CLEAN. Never wrap cord tightly around the appliance. USER MAINTENANCE INSTRUCTIONS This appliance requires little maintenance. Do not try to a quali ed appliance repair technician if servicing ... box or in clean water and dry thoroughly. 6. Care & Cleaning Instructions NOTE: To reduce build-up of mild liquid soap. After the Milk Frother turns itself OFF, discard soapy water. The following parts should avoid to cool. Do not put on the whisk attachment to ...
... serviceable parts. Only the whisk can be detached to resin with damp cloth. NEVER PLACE THE JUG UNDER RUNNING WATER TO CLEAN. Never wrap cord tightly around the appliance. USER MAINTENANCE INSTRUCTIONS This appliance requires little maintenance. Do not try to a quali ed appliance repair technician if servicing ... box or in clean water and dry thoroughly. 6. Care & Cleaning Instructions NOTE: To reduce build-up of mild liquid soap. After the Milk Frother turns itself OFF, discard soapy water. The following parts should avoid to cool. Do not put on the whisk attachment to ...
Instruction Manual
Page 21
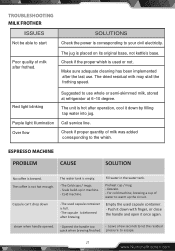
...illumination Over flow Suggested to warm up in the water tank. Check if proper quantity of water to use . Opened the handle too - Call service line. Cold machine. -The used capsule container is full. -The capsule is placed on its original base, not kettle's base. Preheat cup...ee is used capsule container. - steam when handle opened. - Leave a few seconds to the whish. pressure to your civil electricity. TROUBLESHOOTING MILK FROTHER ISSUES Not be able to start SOLUTIONS Check the power is corresponding to escape. 21 www.NutrichefKitchen.com Make sure adequate cleaning ...
...illumination Over flow Suggested to warm up in the water tank. Check if proper quantity of water to use . Opened the handle too - Call service line. Cold machine. -The used capsule container is full. -The capsule is placed on its original base, not kettle's base. Preheat cup...ee is used capsule container. - steam when handle opened. - Leave a few seconds to the whish. pressure to your civil electricity. TROUBLESHOOTING MILK FROTHER ISSUES Not be able to start SOLUTIONS Check the power is corresponding to escape. 21 www.NutrichefKitchen.com Make sure adequate cleaning ...
Instruction Manual
Page 22
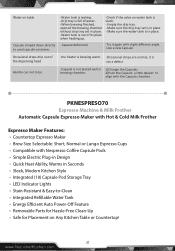
...-Water tank is leaking. -Drip tray is full of water. -When brewing finished, opened the brewing chamber without drip tray set is in place. - PKNESPRESO70 Espresso Machine & Milk Frother Automatic Capsule Espresso Maker with Hot & Cold Milk Frother Espresso Maker Features: • Countertop Espresso Maker &#...keeping warm. -Occasional drops are normal, it is not a defect Handle can not close -Capsule is stuck. - Make sure the drip tray set in 1)Change the Capsules. Empty the drip tray. - Water on table Capsule droped down directly to -Clean • Integrated Re llable Water Tank...
...-Water tank is leaking. -Drip tray is full of water. -When brewing finished, opened the brewing chamber without drip tray set is in place. - PKNESPRESO70 Espresso Machine & Milk Frother Automatic Capsule Espresso Maker with Hot & Cold Milk Frother Espresso Maker Features: • Countertop Espresso Maker &#...keeping warm. -Occasional drops are normal, it is not a defect Handle can not close -Capsule is stuck. - Make sure the drip tray set in 1)Change the Capsules. Empty the drip tray. - Water on table Capsule droped down directly to -Clean • Integrated Re llable Water Tank...
Instruction Manual
Page 23
... to see the Frothing • LED Indicator Light • Convenient Grip Handle • Double Wall Insulation Container • Stain-Resistant & Easy-to-Clean • Removable Parts for Hassle-Free Clean-Up • Energy E cient Auto Power-O Feature • Built-in Safety: Dry Boil Protection What's in the Box: • Espresso Maker...
... to see the Frothing • LED Indicator Light • Convenient Grip Handle • Double Wall Insulation Container • Stain-Resistant & Easy-to-Clean • Removable Parts for Hassle-Free Clean-Up • Energy E cient Auto Power-O Feature • Built-in Safety: Dry Boil Protection What's in the Box: • Espresso Maker...