
Instruction Manual
Page 2
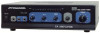
..., or a variety of other installations. It contains a range of trouble-free service from this manual throughly before you attempt to ensure safe usage. PA105/PA205 4 12 3 5 6 8 4 12 3 5 7 8 1 INTRODUCTION Your New PYRAMID PA105/PA205 PA AMPLIFIER gives you the power and versatility you can be used for amplifying music or vocal program material. Please read this product. FEATURES AND CONTROLS FRONT PANEL - Installed properly, you need in a professional...
..., or a variety of other installations. It contains a range of trouble-free service from this manual throughly before you attempt to ensure safe usage. PA105/PA205 4 12 3 5 6 8 4 12 3 5 7 8 1 INTRODUCTION Your New PYRAMID PA105/PA205 PA AMPLIFIER gives you the power and versatility you can be used for amplifying music or vocal program material. Please read this product. FEATURES AND CONTROLS FRONT PANEL - Installed properly, you need in a professional...
Instruction Manual
Page 3
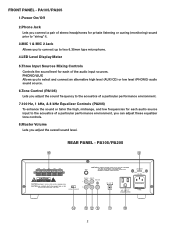
... adjust these equalizer tone controls. 8.Master Volume Lets you to connect up to two 6.35mm type microphone. 4.LED Level Display Meter 5.Three Input Sources Mixing Controls Controls the sound level for each audio source input to the acoustics of a particular performance environment. 7.100 Hz, 1 kHz, & 8 kHz Equalizer Controls (PA205) To enhance the sound or tailor the high, midrange, and low frequencies for each of stereo headphones for private listening or cueing (monitoring) sound prior to "airing" it. 3.MIC 1 & MIC 2 Jack...
... adjust these equalizer tone controls. 8.Master Volume Lets you to connect up to two 6.35mm type microphone. 4.LED Level Display Meter 5.Three Input Sources Mixing Controls Controls the sound level for each audio source input to the acoustics of a particular performance environment. 7.100 Hz, 1 kHz, & 8 kHz Equalizer Controls (PA205) To enhance the sound or tailor the high, midrange, and low frequencies for each of stereo headphones for private listening or cueing (monitoring) sound prior to "airing" it. 3.MIC 1 & MIC 2 Jack...

Instruction Manual
Page 4
...) Compact Disc (CD) player Cassette, Reel-to the amplifiers. You can connect a low level audio input source, such as a CD player, tape deck, or tuner, to the CD/AUX jack. 13.PHONO Input Jack You can also switch the input voltage to ground any high level sound source, such as a magnetic cartridge turntable to the L PHONO and R PHONO jacks. 14.PHONO and AUX/CD Input Selector Lets you select the input source you want to connect to the amplifier. 15.MIX BUS Jack Allows you easily connect speaker wires directly...
...) Compact Disc (CD) player Cassette, Reel-to the amplifiers. You can connect a low level audio input source, such as a CD player, tape deck, or tuner, to the CD/AUX jack. 13.PHONO Input Jack You can also switch the input voltage to ground any high level sound source, such as a magnetic cartridge turntable to the L PHONO and R PHONO jacks. 14.PHONO and AUX/CD Input Selector Lets you select the input source you want to connect to the amplifier. 15.MIX BUS Jack Allows you easily connect speaker wires directly...
Instruction Manual
Page 5
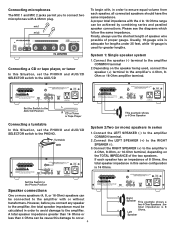
mic1 mic2 Connecting a CD or tape player, or tuner In this Situation, set the PHONO and AUX/CD SELECTOR switch to the PHONO. Usually, 18-gauge wire is adequate for greater lengths. If each speaker has an impedance of 8 Ohms, the total speaker impedance in order to ensure equal volume from each speaker, all connected speakers should have the same impedance. Please see the diagrams which follow the same impedance. A total speaker impedance greater than 16...
mic1 mic2 Connecting a CD or tape player, or tuner In this Situation, set the PHONO and AUX/CD SELECTOR switch to the PHONO. Usually, 18-gauge wire is adequate for greater lengths. If each speaker has an impedance of 8 Ohms, the total speaker impedance in order to ensure equal volume from each speaker, all connected speakers should have the same impedance. Please see the diagrams which follow the same impedance. A total speaker impedance greater than 16...
Instruction Manual
Page 6
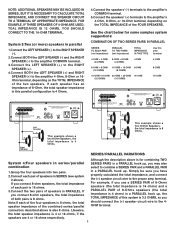
... should connect the (+) speaker circuit wire to the amplifier 4-Ohm, 8-Ohm or 16Ohm terminal, depending on the TOTAL IMPEDANCE of the two speakers. If each pair of 8-Ohms speakers (the total impedance is 4 ohms) in SERIES (see system 2 above is also 8 ohms. Likewise, the total speaker impedance is 16 ohms) and a PARALLEL PAIR of speakers in a PARALLEL hook up . For example, if you use a SERIES PAIR of 8-Ohms speakers (the total impedance...
... should connect the (+) speaker circuit wire to the amplifier 4-Ohm, 8-Ohm or 16Ohm terminal, depending on the TOTAL IMPEDANCE of the two speakers. If each pair of 8-Ohms speakers (the total impedance is 4 ohms) in SERIES (see system 2 above is also 8 ohms. Likewise, the total speaker impedance is 16 ohms) and a PARALLEL PAIR of speakers in a PARALLEL hook up . For example, if you use a SERIES PAIR of 8-Ohms speakers (the total impedance...

Instruction Manual
Page 7
... to monitor sound sources, connect a pair of low impedance stereo headphones _ (not supplied) with transformers 1.Locate the input taps on the secondary side. Follow these secondary taps are outputs, and are rated in Ohms 4, 8 or 16. In this COMBINING TWO amp PAIRS IN PARALLEL terminal 8-OHM + 8-OHM 8-OHM + 8-OHM (16 OHMS) (4 OHMS) 3.2 OHMS 4-OHM NOTE:Before connecting the speakers, please be varied depending on the impedances Always start with the volume control set the POWER System 5: Connecting speakers...
... to monitor sound sources, connect a pair of low impedance stereo headphones _ (not supplied) with transformers 1.Locate the input taps on the secondary side. Follow these secondary taps are outputs, and are rated in Ohms 4, 8 or 16. In this COMBINING TWO amp PAIRS IN PARALLEL terminal 8-OHM + 8-OHM 8-OHM + 8-OHM (16 OHMS) (4 OHMS) 3.2 OHMS 4-OHM NOTE:Before connecting the speakers, please be varied depending on the impedances Always start with the volume control set the POWER System 5: Connecting speakers...

Instruction Manual
Page 8
... turn the amplifier on the back of the meter's range. Turning the amplifier on 1.Turn on the audio input source equipment which is connected to the amplifier INPUT jack. 2.Set all volume levels (MASTER, MIC 1, MIC 2, and PHONO/AUX) to their minimum level settings. 3.Press the power switch to adjust the output level so that 6 feet. IF YOU ARE NOT SURE OF IT, PLEASE CHECK WITH YOUR VEHICLE'S DEALER. Using the MASTER volume control The MASTER volume control increases or decreases output level gain. This lets you use a cable...
... turn the amplifier on the back of the meter's range. Turning the amplifier on 1.Turn on the audio input source equipment which is connected to the amplifier INPUT jack. 2.Set all volume levels (MASTER, MIC 1, MIC 2, and PHONO/AUX) to their minimum level settings. 3.Press the power switch to adjust the output level so that 6 feet. IF YOU ARE NOT SURE OF IT, PLEASE CHECK WITH YOUR VEHICLE'S DEALER. Using the MASTER volume control The MASTER volume control increases or decreases output level gain. This lets you use a cable...


