Instruction Manual
Page 1
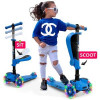
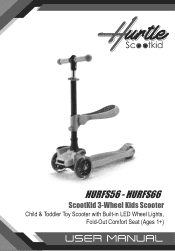
HURFS56 - HURFS66 ScootKid 3-Wheel Kids Scooter Child & Toddler Toy Scooter with Built-in LED Wheel Lights, Fold-Out Comfort Seat (Ages 1+)
HURFS56 - HURFS66 ScootKid 3-Wheel Kids Scooter Child & Toddler Toy Scooter with Built-in LED Wheel Lights, Fold-Out Comfort Seat (Ages 1+)

Instruction Manual
Page 2
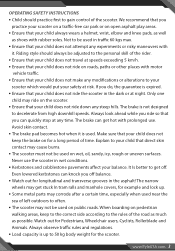
...new scooter, please read the operating safety instructions carefully rstly, and ensure that the steering rod is correctly positioned. • Do not ride down slopes. • Child must be used with caution, since skill if required to avoid falls or collisions causing injury to the user or third parties. • The wearing of wear. Have fun... always check the screws regularly and use our scooter, please read the attached instructions carefully. WARNING: • Adult required, this product contains small parts while unassembled. • The toy needs to be supervised. • Brake...
...new scooter, please read the operating safety instructions carefully rstly, and ensure that the steering rod is correctly positioned. • Do not ride down slopes. • Child must be used with caution, since skill if required to avoid falls or collisions causing injury to the user or third parties. • The wearing of wear. Have fun... always check the screws regularly and use our scooter, please read the attached instructions carefully. WARNING: • Adult required, this product contains small parts while unassembled. • The toy needs to be supervised. • Brake...
Instruction Manual
Page 3
...c-free car park or on open asphalt play areas. • Ensure that you ride so that your child always wears a helmet, wrist, elbow and knee pads, as well as possible. The brake is not designed to get o . Always look ahead while you can quickly stop at any time. Never use ... regulations. • Load capacity is used on public roads. Not to be used on wet, oil, sandy, icy, rough or uneven surfaces. www.PyleUSA.com 3 Make sure that direct skin contact may not be used . OPERATING SAFETY INSTRUCTIONS • Child should always be adjusted to the personal skill of the rider...
...c-free car park or on open asphalt play areas. • Ensure that you ride so that your child always wears a helmet, wrist, elbow and knee pads, as well as possible. The brake is not designed to get o . Always look ahead while you can quickly stop at any time. Never use ... regulations. • Load capacity is used on public roads. Not to be used on wet, oil, sandy, icy, rough or uneven surfaces. www.PyleUSA.com 3 Make sure that direct skin contact may not be used . OPERATING SAFETY INSTRUCTIONS • Child should always be adjusted to the personal skill of the rider...
Instruction Manual
Page 4
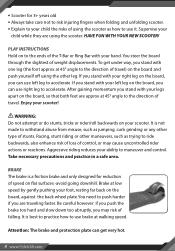
...176; angle to use right leg to the direction of travel . HAVE FUN WITH YOUR NEW SCOOTER! If you stand with your foot, resting far back on the board, against the back wheel plate.You need to push harder if you stand with your hand. After gaining momentum you are using the scooter. .... Aggressive riding reduces your scooter. BRAKE The brake is a friction brake and only designed for 3+ years old • Always take care not to risk injuring ngers when folding and unfolding scooter. • Explain to your child the risks of using the scooter as trying to maneuver and control.
...176; angle to use right leg to the direction of travel . HAVE FUN WITH YOUR NEW SCOOTER! If you stand with your foot, resting far back on the board, against the back wheel plate.You need to push harder if you stand with your hand. After gaining momentum you are using the scooter. .... Aggressive riding reduces your scooter. BRAKE The brake is a friction brake and only designed for 3+ years old • Always take care not to risk injuring ngers when folding and unfolding scooter. • Explain to your child the risks of using the scooter as trying to maneuver and control.
Instruction Manual
Page 5
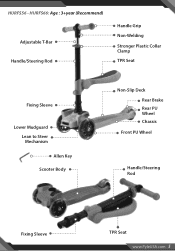
HURFS56 - HURFS66: Age : 3+year (Recommend) Adjustable T-Bar Handle/Steering Rod Handle Grip Non-Welding Stronger Plastic Collar Clamp TPR Seat Fixing Sleeve Lower Mudguard Lean to Steer Mechanism Allen Key Scooter Body Non-Slip Deck Rear Brake Rear PU Wheel Chassis Front PU Wheel Handle/Steering Rod Fixing Sleeve TPR Seat www.PyleUSA.com 5
HURFS56 - HURFS66: Age : 3+year (Recommend) Adjustable T-Bar Handle/Steering Rod Handle Grip Non-Welding Stronger Plastic Collar Clamp TPR Seat Fixing Sleeve Lower Mudguard Lean to Steer Mechanism Allen Key Scooter Body Non-Slip Deck Rear Brake Rear PU Wheel Chassis Front PU Wheel Handle/Steering Rod Fixing Sleeve TPR Seat www.PyleUSA.com 5

Instruction Manual
Page 6
... shown in Figure C. A M T S Push Red Button (M), Handlebar (T), Fixing Sleeve (S), as shown in Figure D. D Pull the Fixing Sleeve downward to accompany child's development, as shown in Figure F. 6 www.PyleUSA.com C Press Red Push Button (M). F Finish the Scooter Assembly and adjust Height as shown in Figure E. SCOOTER ASSEMBLY WARNING: Keep the kids in a safe distance while assembling the scooter to ensure HandIebar...
... shown in Figure C. A M T S Push Red Button (M), Handlebar (T), Fixing Sleeve (S), as shown in Figure D. D Pull the Fixing Sleeve downward to accompany child's development, as shown in Figure F. 6 www.PyleUSA.com C Press Red Push Button (M). F Finish the Scooter Assembly and adjust Height as shown in Figure E. SCOOTER ASSEMBLY WARNING: Keep the kids in a safe distance while assembling the scooter to ensure HandIebar...

Instruction Manual
Page 7
... DISASSEMBLE WARNING: Keep the kids in a safe distance while assembling the scooter to avoid accidental injuries. SEAT ASSEMBLY WARNING: Keep the kids in a safe distance while disassembling the scooter to separate the Handlebar and Scooters body as shown in Figure D. D Press Red Switch with one hand and using the other hand to pull handlebar to avoid accidental...
... DISASSEMBLE WARNING: Keep the kids in a safe distance while assembling the scooter to avoid accidental injuries. SEAT ASSEMBLY WARNING: Keep the kids in a safe distance while disassembling the scooter to separate the Handlebar and Scooters body as shown in Figure D. D Press Red Switch with one hand and using the other hand to pull handlebar to avoid accidental...

Instruction Manual
Page 8
SEAT DISASSEMBLY FIRST METHOD WARNING: Keep the kids in Figure F. C Adjustable seat housing with one hand. B Fix rmly with the screw with 3 heights to avoid accidental injuries. Insert the handlebar with the at side backwards in scooter hole F Finish as shown in Figure A. 8 www.PyleUSA.com A Scooter as shown in a safe distance while disassembling the scooter to accompany child's development. D Fold the seat housing E Press red push button.
SEAT DISASSEMBLY FIRST METHOD WARNING: Keep the kids in Figure F. C Adjustable seat housing with one hand. B Fix rmly with the screw with 3 heights to avoid accidental injuries. Insert the handlebar with the at side backwards in scooter hole F Finish as shown in Figure A. 8 www.PyleUSA.com A Scooter as shown in a safe distance while disassembling the scooter to accompany child's development. D Fold the seat housing E Press red push button.

Instruction Manual
Page 9
B Fold the seat housing up as shown in Figure A. SEAT DISASSEMBLY SECOND METHOD A Scooter as shown in Figure E www.PyleUSA.com 9 B Press the red button, remove the handlebar from the hole on the scooter C Loose the screw, press red button and remove the sleeve and seat housing. D Press the red button, insert the sleeve and handlebar into the scooter E Finish as shown in Figure B.
B Fold the seat housing up as shown in Figure A. SEAT DISASSEMBLY SECOND METHOD A Scooter as shown in Figure E www.PyleUSA.com 9 B Press the red button, remove the handlebar from the hole on the scooter C Loose the screw, press red button and remove the sleeve and seat housing. D Press the red button, insert the sleeve and handlebar into the scooter E Finish as shown in Figure B.

Instruction Manual
Page 10
HEIGHT ADJUSTMENT WARNING: Tighten the Collar Clamp to secure T-Bar after adjustrnent, as shown in Figure B C Lowest: 680MM as shown in Figure C D Second: 730MM as shown in Figure D E Third: 810MM as shown in Figure E F Highest: 890MM as shown in Figure F 10 www.PyleUSA.com A Loosen the lever of the Collar Clamp as shown in Figure A B Adjust the T-Bar according to ensure T-Bar after adjustment. Tighten the Collar Clamp to childs height.
HEIGHT ADJUSTMENT WARNING: Tighten the Collar Clamp to secure T-Bar after adjustrnent, as shown in Figure B C Lowest: 680MM as shown in Figure C D Second: 730MM as shown in Figure D E Third: 810MM as shown in Figure E F Highest: 890MM as shown in Figure F 10 www.PyleUSA.com A Loosen the lever of the Collar Clamp as shown in Figure A B Adjust the T-Bar according to ensure T-Bar after adjustment. Tighten the Collar Clamp to childs height.
Instruction Manual
Page 11
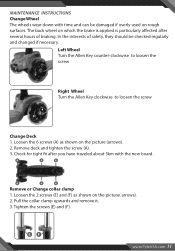
... new board. A A A A A A Remove or Change collar clamp 1. Loosen the 6 screws (A) as shown on the picture (arrows). 2. Loosen the 2 screws (E) and (F) as shown on the picture( arrows). 2. Tighten the screws (E) and (F). Left Wheel Turn the Allen Key counter-clockwise to loosen the screw Right Wheel Turn... ected after you have traveled about 5km with time and can be checked regularly and changed if necessary. Pull the collar clamp upwards and remove it. 3. EF www.PyleUSA.com 11 In the interests of braking. Remove deck and tighten the screw (A). 3. Check ...
... new board. A A A A A A Remove or Change collar clamp 1. Loosen the 6 screws (A) as shown on the picture (arrows). 2. Loosen the 2 screws (E) and (F) as shown on the picture( arrows). 2. Tighten the screws (E) and (F). Left Wheel Turn the Allen Key counter-clockwise to loosen the screw Right Wheel Turn... ected after you have traveled about 5km with time and can be checked regularly and changed if necessary. Pull the collar clamp upwards and remove it. 3. EF www.PyleUSA.com 11 In the interests of braking. Remove deck and tighten the screw (A). 3. Check ...
Instruction Manual
Page 12
You should always adjust your speed according to supplement the terms and conditions of purchase. This warranty only applies to your ability and the conditions and when in doubt, dismount if there is a risk of product which is safe when used carefully and correctly. impact ...that the problem has been caused by : 1. Improper attempts at repair or modi cations the scooter. 3. To ensure you do not slip it is best if you need repair or replace, please directly contact your scooter will also contribute to initial purchasers. 2. SAFETY TIPS The scooter is a new fun piece of ...
You should always adjust your speed according to supplement the terms and conditions of purchase. This warranty only applies to your ability and the conditions and when in doubt, dismount if there is a risk of product which is safe when used carefully and correctly. impact ...that the problem has been caused by : 1. Improper attempts at repair or modi cations the scooter. 3. To ensure you do not slip it is best if you need repair or replace, please directly contact your scooter will also contribute to initial purchasers. 2. SAFETY TIPS The scooter is a new fun piece of ...
Instruction Manual
Page 13
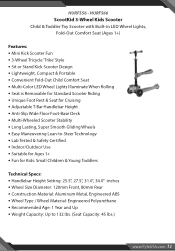
... • Indoor/Outdoor Use • Suitable for Ages 1+ • Fun for Kids: Small Children & Young Toddlers Technical Specs: • Handlebar Height Setting: 25.5'', 27.5'', 31.0'', 34.0'' -inches • Wheel Size Diameter: 120mm Front, 80mm Rear • Construction Material: Aluminum Metal, Engineered ABS • Wheel Type / Wheel Material: Engineered Polyurethane • Recommended Age: 1 Year and Up • Weight...
... • Indoor/Outdoor Use • Suitable for Ages 1+ • Fun for Kids: Small Children & Young Toddlers Technical Specs: • Handlebar Height Setting: 25.5'', 27.5'', 31.0'', 34.0'' -inches • Wheel Size Diameter: 120mm Front, 80mm Rear • Construction Material: Aluminum Metal, Engineered ABS • Wheel Type / Wheel Material: Engineered Polyurethane • Recommended Age: 1 Year and Up • Weight...

Instruction Manual
Page 14
Issues? Questions? We are here to help! Phone: (1) 718-535-1800 Email: support@pyleusa.com
Issues? Questions? We are here to help! Phone: (1) 718-535-1800 Email: support@pyleusa.com