
User Manual
Page 3
...under water. 3. Before sealing the case, inspect the water sealing gasket to put the Mode Switch in your desired recording position before inserting the camera in the waterproof case. If the entire interior is no external button for recording video and images: the Shutter Release, and the Power Button...condition. Remove the case from the case. 2. Remember to be sure it's in a bowl of the Clamp by closing the case without inserting the camera. There is dry, the case and gasket are just two buttons required for the Mode Switch. 2 Shutter Release 3. There are safe for about ...
...under water. 3. Before sealing the case, inspect the water sealing gasket to put the Mode Switch in your desired recording position before inserting the camera in the waterproof case. If the entire interior is no external button for recording video and images: the Shutter Release, and the Power Button...condition. Remove the case from the case. 2. Remember to be sure it's in a bowl of the Clamp by closing the case without inserting the camera. There is dry, the case and gasket are just two buttons required for the Mode Switch. 2 Shutter Release 3. There are safe for about ...

User Manual
Page 4
Bar Clamp 5. Loosen the Bar Clamp Bolt until secure. 3. The bottom half of the Bar Clamp can be enclosed in with a 1/4-20 screw, the camera must be pushed 90°upward. 5. Tilt Knob 1. For all the accessories with the waterproof case or in the included mounting adapter. 2. Turn the Locking ... of the clamp and tighten the Bar Clamp Bolt. 3 After positioning the Handlebar Clamp where you to keep the connection secure. 4. Bar Clamp Bolt 4. The camera dose not have a standard tripod mount. HANDLEBAR SEATPOST MOUNT 1. 1 -20 Screw 4 2. Locking Wheel 3.
Bar Clamp 5. Loosen the Bar Clamp Bolt until secure. 3. The bottom half of the Bar Clamp can be enclosed in with a 1/4-20 screw, the camera must be pushed 90°upward. 5. Tilt Knob 1. For all the accessories with the waterproof case or in the included mounting adapter. 2. Turn the Locking ... of the clamp and tighten the Bar Clamp Bolt. 3 After positioning the Handlebar Clamp where you to keep the connection secure. 4. Bar Clamp Bolt 4. The camera dose not have a standard tripod mount. HANDLEBAR SEATPOST MOUNT 1. 1 -20 Screw 4 2. Locking Wheel 3.

User Manual
Page 6
The camera will clip right in to attach mounting accessories that have a 1/4-20 screw. 2. This Mounting Adapter allows you to this adapter. 5 SHIELD 1.
The camera will clip right in to attach mounting accessories that have a 1/4-20 screw. 2. This Mounting Adapter allows you to this adapter. 5 SHIELD 1.

User Manual
Page 8
...service life. Do not expose the video camera to sunshine directly, nor point its lens to difference in technological development and production batch, under which case, the actual functions of dust and chemical materials. Otherwise, the image sensor of the video camera ...particles from entering the video camera when it in a more specific and direct way. Announcements Please read the Announcements carefully before using this user's manual was made. Difference may damage the video camera. Keep the video camera contaminated free of this digital camera in a cool, dry and...
...service life. Do not expose the video camera to sunshine directly, nor point its lens to difference in technological development and production batch, under which case, the actual functions of dust and chemical materials. Otherwise, the image sensor of the video camera ...particles from entering the video camera when it in a more specific and direct way. Announcements Please read the Announcements carefully before using this user's manual was made. Difference may damage the video camera. Keep the video camera contaminated free of this digital camera in a cool, dry and...
User Manual
Page 9
...the first time. The externally installed memory cards are manufactured from precise electronic components. Do not use soft, clean and dry rag to optical equipments. Place it away gently. Do not use of video camera or its lens is accumulated on the video camera or on its lens, use organic solvent...Do not touch the lens surface with fingers. Please back up the data if the memory card inside this surface, and then wipe the camera gently with sand particles, blow them away gently. Data may scratch the surface of the memory card. 2. The memory card is used for wiping ...
...the first time. The externally installed memory cards are manufactured from precise electronic components. Do not use soft, clean and dry rag to optical equipments. Place it away gently. Do not use of video camera or its lens is accumulated on the video camera or on its lens, use organic solvent...Do not touch the lens surface with fingers. Please back up the data if the memory card inside this surface, and then wipe the camera gently with sand particles, blow them away gently. Data may scratch the surface of the memory card. 2. The memory card is used for wiping ...

User Manual
Page 10
during reading, writing and formatting). 6. CD Driver Speed of 4 times or faster Hard Disk Free space of more than 800MHz or other CPU with fingers or metal materials. This memory card is taken out or power supply is interrupted when this video camera or computer is connected to the memory card (i.e. System ...One standard USB1.1 or USB2.0 port 9 4. Touch the metal contact surface of more than 512MB Sound Card and The sound card and display card shall support DirectX8 or higher Display Card version. Electrostatic or electromagnetic field exists around the memory card. 5.
during reading, writing and formatting). 6. CD Driver Speed of 4 times or faster Hard Disk Free space of more than 800MHz or other CPU with fingers or metal materials. This memory card is taken out or power supply is interrupted when this video camera or computer is connected to the memory card (i.e. System ...One standard USB1.1 or USB2.0 port 9 4. Touch the metal contact surface of more than 512MB Sound Card and The sound card and display card shall support DirectX8 or higher Display Card version. Electrostatic or electromagnetic field exists around the memory card. 5.

User Manual
Page 12
Charge the built-in the shutdown state. In general, it can be off after 2-4 hours. 11 Usage 1. The indicator light for charging is on . Connect the video camera with computer for charging in lithium battery USB Cable Indicator Light for charging is on at this time and will be fully charged after charging.
Charge the built-in the shutdown state. In general, it can be off after 2-4 hours. 11 Usage 1. The indicator light for charging is on . Connect the video camera with computer for charging in lithium battery USB Cable Indicator Light for charging is on at this time and will be fully charged after charging.

User Manual
Page 13
To take out the memory card, gently press the end of Memory Card 1. Push the memory card into the card slot according to insert memory card before using. 12 Make sure to the concave lettering beside the slot of memory card till it will pop up. Use of the memory card inward and it is available in memory is completely inserted. 2. Note: No built-in this video camera. 2.
To take out the memory card, gently press the end of Memory Card 1. Push the memory card into the card slot according to insert memory card before using. 12 Make sure to the concave lettering beside the slot of memory card till it will pop up. Use of the memory card inward and it is available in memory is completely inserted. 2. Note: No built-in this video camera. 2.

User Manual
Page 14
...will be shut down automatically to save power. When indicate light turns red and flickering, the video camera will be shut down . . Automatic shutdown: when the idle time of the video camera reaches the time for automatic shutdown, it in case of power shortage: when the power of ...this camera for 3 seconds, the screen is displayed and the camera is 5 minutes. 3.3. Startup/Shutdown 3.1 Startup: Press the POWER button for automatic shutdown is on. 3.2. Shutdown in time. Please charge it will ...
...will be shut down automatically to save power. When indicate light turns red and flickering, the video camera will be shut down . . Automatic shutdown: when the idle time of the video camera reaches the time for automatic shutdown, it in case of power shortage: when the power of ...this camera for 3 seconds, the screen is displayed and the camera is 5 minutes. 3.3. Startup/Shutdown 3.1 Startup: Press the POWER button for automatic shutdown is on. 3.2. Shutdown in time. Please charge it will ...

User Manual
Page 15
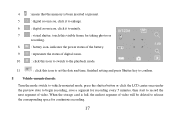
Conversion is available via the mode switch after startup. picture taking mode: pictures can be taken; Video recording mode: video can be recorded; Conversion between Function Modes Three modes are available for this video camera, i.e. Vehicle-mounted mode: videotape can be recorded. (one section every 5 minutes) Picture taking mode Mode Switch Video recording mode Vehiclemounted mode 14 Picture taking mode, video recording mode and vehicle-mounted mode. 4.
Conversion is available via the mode switch after startup. picture taking mode: pictures can be taken; Video recording mode: video can be recorded; Conversion between Function Modes Three modes are available for this video camera, i.e. Vehicle-mounted mode: videotape can be recorded. (one section every 5 minutes) Picture taking mode Mode Switch Video recording mode Vehiclemounted mode 14 Picture taking mode, video recording mode and vehicle-mounted mode. 4.

User Manual
Page 16
...once again if you can still last for a long time, it prompts the user that the video camera is busy (such as, recording a film, taking photos, automatic off-screen), the busy light will also stop recording, and the camera will be on for 12 minutes and 18 seconds. 2 : mode icon, ...represents that the camera is turned to video recording mode, press the shutter button once or click the LCD center once to...
...once again if you can still last for a long time, it prompts the user that the video camera is busy (such as, recording a film, taking photos, automatic off-screen), the busy light will also stop recording, and the camera will be on for 12 minutes and 18 seconds. 2 : mode icon, ...represents that the camera is turned to video recording mode, press the shutter button once or click the LCD center once to...

User Manual
Page 17
...present. 5 : digital zoom icon, click it and enlarge it. 6 : digital zoom icon, click and minify it. 7 : visual shutter, touch this visible frame for taking photos or recording. 8 : battery icon, represents the power status of the battery. 9 : represents the status of digital... zoom. 10 : click this icon to switch to the playback mode. 11 : click this icon to set the date and time, finished setting and press Shutter key to... 2 : mode icon, indicating that the camera is in photo taking mode. 3 : video size, click this icon to select the photo...
...present. 5 : digital zoom icon, click it and enlarge it. 6 : digital zoom icon, click and minify it. 7 : visual shutter, touch this visible frame for taking photos or recording. 8 : battery icon, represents the power status of the battery. 9 : represents the status of digital... zoom. 10 : click this icon to switch to the playback mode. 11 : click this icon to set the date and time, finished setting and press Shutter key to... 2 : mode icon, indicating that the camera is in photo taking mode. 3 : video size, click this icon to select the photo...
User Manual
Page 18
...is been inserted at present. 5 : digital zoom icon, click it to enlarge. 6 : digital zoom icon, click it to minify. 7 : visual shutter, touch this visible frame for taking photos or recording. 8 : battery icon, indicates the power status of the battery. 9 : represents the status of digital zoom. 10 : ...click this icon to switch to the playback mode. 11 : click this icon to set the date and time, finished setting and press Shutter key to confirm. 8 Vehicle-mounted mode: Turn the mode...
...is been inserted at present. 5 : digital zoom icon, click it to enlarge. 6 : digital zoom icon, click it to minify. 7 : visual shutter, touch this visible frame for taking photos or recording. 8 : battery icon, indicates the power status of the battery. 9 : represents the status of digital zoom. 10 : ...click this icon to switch to the playback mode. 11 : click this icon to set the date and time, finished setting and press Shutter key to confirm. 8 Vehicle-mounted mode: Turn the mode...

User Manual
Page 19
... 18 seconds. 2 : mode icon, representing that the camera is in vehicle-mounted mode. 3 : video size, click this icon to select 720P, VGA. 4 : represents that the memory card has been inserted . 5 : digital zoom icon, click it to enlarge. 6 : digital zoom icon, click it to minify. 7 : visual shutter.... 8 : battery icon, representing the current power status of the battery. 9 : represents the status of digital zoom. 10 : click this icon to switch into the playback mode. 11 : click this icon to set the date and time, finished setting and press Shutter key to confirm. 18
... 18 seconds. 2 : mode icon, representing that the camera is in vehicle-mounted mode. 3 : video size, click this icon to select 720P, VGA. 4 : represents that the memory card has been inserted . 5 : digital zoom icon, click it to enlarge. 6 : digital zoom icon, click it to minify. 7 : visual shutter.... 8 : battery icon, representing the current power status of the battery. 9 : represents the status of digital zoom. 10 : click this icon to switch into the playback mode. 11 : click this icon to set the date and time, finished setting and press Shutter key to confirm. 18

User Manual
Page 20
user can press the power button shortly to start the screen and restore display. 9 Playback mode: 9.1 After starting up and entering the previewing state, click the ...
user can press the power button shortly to start the screen and restore display. 9 Playback mode: 9.1 After starting up and entering the previewing state, click the ...

User Manual
Page 22
Icon of movable disk will be switched into the movable hard disk mode. Photos/videos you have taken are saved in folder I:\DCIM\100MEDIA (I :\DCIM\RECORDER. 21 Files recorded in vehicle-mounted mode are saved in I is provided with USB line under turning-on state, then it will appear on the personal computer Connect to the computer with the plug and play function. Apply on the window of "my computer". Connect the device to personal computer The camera is the movable disk of this device) in the movable disk.
Icon of movable disk will be switched into the movable hard disk mode. Photos/videos you have taken are saved in folder I:\DCIM\100MEDIA (I :\DCIM\RECORDER. 21 Files recorded in vehicle-mounted mode are saved in I is provided with USB line under turning-on state, then it will appear on the personal computer Connect to the computer with the plug and play function. Apply on the window of "my computer". Connect the device to personal computer The camera is the movable disk of this device) in the movable disk.
User Manual
Page 23
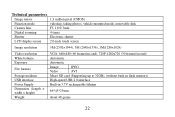
Technical parameters Image sensor 1.3 million pixel (CMOS) Function mode videoing, taking photos, vehicle-mounted mode, removable disk Camera lens F3.1 f=9.3mm Digital zooming 4 times Shutter Electronic shutter LCD display screen 2.0-inch touch screen Image resolution 5M (2592×1944), 3M (...height) Weight VGA: 640x480 (60 frames/second), 720P:1280x720 (30 frames/second) Automatic Automatic Image JPEG Video AVI Micro SD card (Supporting up to 32GB), (without built-in flash memory) High-speed USB 2.0 interface Built-in 3.7V rechargeable lithium 66*45*25mm about 48 grams...
Technical parameters Image sensor 1.3 million pixel (CMOS) Function mode videoing, taking photos, vehicle-mounted mode, removable disk Camera lens F3.1 f=9.3mm Digital zooming 4 times Shutter Electronic shutter LCD display screen 2.0-inch touch screen Image resolution 5M (2592×1944), 3M (...height) Weight VGA: 640x480 (60 frames/second), 720P:1280x720 (30 frames/second) Automatic Automatic Image JPEG Video AVI Micro SD card (Supporting up to 32GB), (without built-in flash memory) High-speed USB 2.0 interface Built-in 3.7V rechargeable lithium 66*45*25mm about 48 grams...


