PVNT7U Manual 1
Page 1
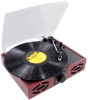
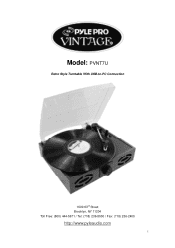
Model: PVNT7U Retro Style Turntable With USB-to-PC Connection 1600 63rd Street Brooklyn, NY 11204 Toll Free: (800) 444-5671 / Tel: (718) 236-8000 / Fax: (718) 236-2400 http://www.pyleaudio.com 1
Model: PVNT7U Retro Style Turntable With USB-to-PC Connection 1600 63rd Street Brooklyn, NY 11204 Toll Free: (800) 444-5671 / Tel: (718) 236-8000 / Fax: (718) 236-2400 http://www.pyleaudio.com 1
PVNT7U Manual 1
Page 2
...electric shock. 15. Servicing-Do not attempt to repair this product during a lighting storm, or when it from battery power, or other hazards. This product should be adhered to your home, consult your product dealer or local power company. Object and ...instruction manual. 12. such as they may cause hazards. 7. Power-Cord protection-Power-supply cords should be moved with care to qualified 2 Retain Instructions-Safety and operating instructions should be properly secured so that they may touch dangerous voltage points or short-out parts that could result in installation...
...electric shock. 15. Servicing-Do not attempt to repair this product during a lighting storm, or when it from battery power, or other hazards. This product should be adhered to your home, consult your product dealer or local power company. Object and ...instruction manual. 12. such as they may cause hazards. 7. Power-Cord protection-Power-supply cords should be moved with care to qualified 2 Retain Instructions-Safety and operating instructions should be properly secured so that they may touch dangerous voltage points or short-out parts that could result in installation...
PVNT7U Manual 1
Page 3
...power cord from the wall outlet, be sure to unplug the unit if you have followed the manual for service and/or repair. 18. Incorrect use it for a long period of important operating and maintenance(servicing)instructions in hazardous radiation exposure. 3. The exclamation point inside . Replacement parts-If a part...to use of controls, adjustments and performance other than those specified herein may result in The literature that the product is damaged. Damage requiring service-Unplug this appliance to determine that may indicate a need for troubleshooting. Wall of ...
...power cord from the wall outlet, be sure to unplug the unit if you have followed the manual for service and/or repair. 18. Incorrect use it for a long period of important operating and maintenance(servicing)instructions in hazardous radiation exposure. 3. The exclamation point inside . Replacement parts-If a part...to use of controls, adjustments and performance other than those specified herein may result in The literature that the product is damaged. Damage requiring service-Unplug this appliance to determine that may indicate a need for troubleshooting. Wall of ...
PVNT7U Manual 1
Page 4
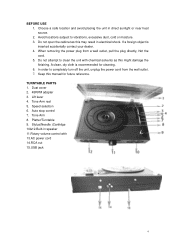
... damage the finishing. In order to completely turn off the unit, unplug the power cord from a wall outlet, pull the plug directly, Not the cord. 5. Dust cover 2. 45RPM adapter 3. Auto stop control 7. BEFORE USE 1. A clean, dry...speaker 11.Rotary volume control with chemical solvents as this manual for cleaning. 6. Keep this may result in electrical shock. Lift lever 4. TURNTABLE PARTS 1. Tone Arm rest 5. Do not attempt to vibrations, excessive dust, cold or moisture. 3. Stylus(Needle )Cartridge 10&12.Built-in direct sunlight or near heat source. 2. When removing the power...
... damage the finishing. In order to completely turn off the unit, unplug the power cord from a wall outlet, pull the plug directly, Not the cord. 5. Dust cover 2. 45RPM adapter 3. Auto stop control 7. BEFORE USE 1. A clean, dry...speaker 11.Rotary volume control with chemical solvents as this manual for cleaning. 6. Keep this may result in electrical shock. Lift lever 4. TURNTABLE PARTS 1. Tone Arm rest 5. Do not attempt to vibrations, excessive dust, cold or moisture. 3. Stylus(Needle )Cartridge 10&12.Built-in direct sunlight or near heat source. 2. When removing the power...
PVNT7U Manual 1
Page 5
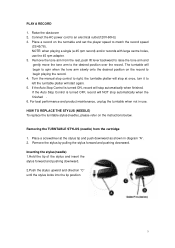
... 5 Connect the AC power cord to match the record speed (33/45/78). HOW TO REPLACE THE STYLUS (NEEDLE) To replace the turntable stylus(needle), please refer on the record to the desired position over the record. Raise the dustcover 2. Place a record on the turntable and set the player speed to an electrical outlet(120V-60Hz) 3. The turntable will start again. 5. Turn the manual stop control to right, the...
... 5 Connect the AC power cord to match the record speed (33/45/78). HOW TO REPLACE THE STYLUS (NEEDLE) To replace the turntable stylus(needle), please refer on the record to the desired position over the record. Raise the dustcover 2. Place a record on the turntable and set the player speed to an electrical outlet(120V-60Hz) 3. The turntable will start again. 5. Turn the manual stop control to right, the...
PVNT7U Manual 1
Page 6
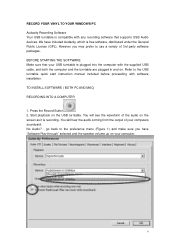
... Public License (GPL), However you may prefer to the USB turntable quick start instruction manual included before proceeding with any recording software that your computer. 6 You will hear the audio coming from the output of 3rd party software packages. No Audio? - We have "Software Play through" selected and the speaker volume up on the screen as it is...
... Public License (GPL), However you may prefer to the USB turntable quick start instruction manual included before proceeding with any recording software that your computer. 6 You will hear the audio coming from the output of 3rd party software packages. No Audio? - We have "Software Play through" selected and the speaker volume up on the screen as it is...

PVNT7U Manual 1
Page 7
... "Effect" menu and choose the desired effect. Figure 1: Select USB Audio Device from Preferences 3. SAVE YOUR FILE NOW by selecting "Edit", then "Select...", then click "All". Select your entire recording by clicking on a Macintosh to record. 4. Figure 3: Figure 3: Select All 2. Press Stop 5. ...Select the destination and file name for the project and click 'Save'. 6. You have completed the recording process. (See Figure 2) Figure 2: Recording Sample Adjusting Your Audio Level (Optional) 1. There are various types of effects which are described further in the software's ...
... "Effect" menu and choose the desired effect. Figure 1: Select USB Audio Device from Preferences 3. SAVE YOUR FILE NOW by selecting "Edit", then "Select...", then click "All". Select your entire recording by clicking on a Macintosh to record. 4. Figure 3: Figure 3: Select All 2. Press Stop 5. ...Select the destination and file name for the project and click 'Save'. 6. You have completed the recording process. (See Figure 2) Figure 2: Recording Sample Adjusting Your Audio Level (Optional) 1. There are various types of effects which are described further in the software's ...

PVNT7U Manual 1
Page 8
section as well as on the recording. (See Figure 5) Figure 4: Effect Drop Down List Figure 5: Normalize Cleaning Your Audio (Optional) 1. Drag the cursor over a portion of a track where there is no music and only noise. (See Figure 6) 2. Select "Noise Removal" from the "Effect" drop down menu to have the correct volume on the web (See Figure 4). We recommend using the beginning or the end of the audio track which contains noise. Normalize should be used to bring up the "Noise 8 b.
section as well as on the recording. (See Figure 5) Figure 4: Effect Drop Down List Figure 5: Normalize Cleaning Your Audio (Optional) 1. Drag the cursor over a portion of a track where there is no music and only noise. (See Figure 6) 2. Select "Noise Removal" from the "Effect" drop down menu to have the correct volume on the web (See Figure 4). We recommend using the beginning or the end of the audio track which contains noise. Normalize should be used to bring up the "Noise 8 b.

PVNT7U Manual 1
Page 9
Repeat Step 2 to clean up the entire recording, use "Select All" under the "Edit Menu" (See Figure 3) 5. Note: you wish to bring up the "Noise Removal" Window. 6. Cleaning Your Audio (Optional) 1. If you ... like to filter by moving the slider in Track Figure 7: Noise Removal Window 9 Adjust the amount of audio you wish to bring up the entire recording, use "Select All" under the "Edit Menu" (See Figure 3) 5. If you would like to clean up the "Noise Removal" window. (See Figure 7) 3. Click "Get Noise...
Repeat Step 2 to clean up the entire recording, use "Select All" under the "Edit Menu" (See Figure 3) 5. Note: you wish to bring up the "Noise Removal" Window. 6. Cleaning Your Audio (Optional) 1. If you ... like to filter by moving the slider in Track Figure 7: Noise Removal Window 9 Adjust the amount of audio you wish to bring up the entire recording, use "Select All" under the "Edit Menu" (See Figure 3) 5. If you would like to clean up the "Noise Removal" window. (See Figure 7) 3. Click "Get Noise...

PVNT7U Manual 1
Page 10
... the centre or at each side. 2. Never apply harsh chemicals or solvents to any part of mild detergent to -front'motion only. 4. Gently wipe the dust cover and turntable housing with your fingers; avoid bumping the needle against the turntable platter or record edge. 3. Do not touch the needle tip with a soft cloth. TIPS FOR BETTER...
... the centre or at each side. 2. Never apply harsh chemicals or solvents to any part of mild detergent to -front'motion only. 4. Gently wipe the dust cover and turntable housing with your fingers; avoid bumping the needle against the turntable platter or record edge. 3. Do not touch the needle tip with a soft cloth. TIPS FOR BETTER...


