
English Manual
Page 1
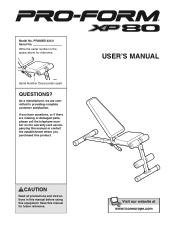
As a manufacturer, we are missing or damaged parts, please call the telephone number on the warranty card accompanying this manual or contact the establishment where you purchased this product. If you have questions, or if there are committed to providing complete customer satisfaction. Serial Number Decal (under seat) QUESTIONS? Model No. Write the serial number in this manual before using this manual for reference. Save this equipment. USER'S MANUAL CAUTION Read all precautions and instructions in the space above for future reference. PFANBE1425.0 Serial No.
As a manufacturer, we are missing or damaged parts, please call the telephone number on the warranty card accompanying this manual or contact the establishment where you purchased this product. If you have questions, or if there are committed to providing complete customer satisfaction. Serial Number Decal (under seat) QUESTIONS? Model No. Write the serial number in this manual before using this manual for reference. Save this equipment. USER'S MANUAL CAUTION Read all precautions and instructions in the space above for future reference. PFANBE1425.0 Serial No.

English Manual
Page 2
... PRECAUTIONS 3 BEFORE YOU BEGIN 4 PART IDENTIFICATION CHART 5 ASSEMBLY 6 ADJUSTMENTS 8 EXERCISE GUIDELINES 9 PART LIST/EXPLODED DRAWING 11 ORDERING REPLACEMENT PARTS Back Cover WARNING DECAL PLACEMENT The decal shown here has been placed on the warranty card accompanying this manual and order a free replacement decal. White Text/Clear Background PROFORM is missing, call the telephone number on the weight bench. If a decal is a registered trademark of ICON IP, Inc. 2 Black Text/Clear...
... PRECAUTIONS 3 BEFORE YOU BEGIN 4 PART IDENTIFICATION CHART 5 ASSEMBLY 6 ADJUSTMENTS 8 EXERCISE GUIDELINES 9 PART LIST/EXPLODED DRAWING 11 ORDERING REPLACEMENT PARTS Back Cover WARNING DECAL PLACEMENT The decal shown here has been placed on the warranty card accompanying this manual and order a free replacement decal. White Text/Clear Background PROFORM is missing, call the telephone number on the weight bench. If a decal is a registered trademark of ICON IP, Inc. 2 Black Text/Clear...
English Manual
Page 3
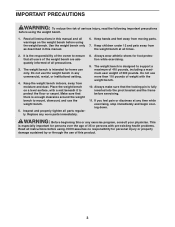
... using the weight bench. Always make sure that the locking pin is designed to protect the floor or carpet. WARNING: Before beginning this manual and all warnings on a level surface, with a mat beneath it to support a maximum of 410 pounds, including a maximum user weight of all users of the weight bench are adequately informed of 300 pounds. Do not use the weight bench in any exercise program...
... using the weight bench. Always make sure that the locking pin is designed to protect the floor or carpet. WARNING: Before beginning this manual and all warnings on a level surface, with a mat beneath it to support a maximum of 410 pounds, including a maximum user weight of all users of the weight bench are adequately informed of 300 pounds. Do not use the weight bench in any exercise program...
English Manual
Page 4
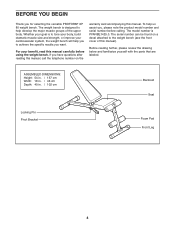
... versatile PROFORM® XP 80 weight bench. Before reading further, please review the drawing below and familiarize yourself with the parts that are labeled. The serial number can be found on the warranty card accompanying this manual carefully before calling. The weight bench is to tone your body, build dramatic muscle size and strength, or improve your goal is designed to the weight bench (see the front cover of...
... versatile PROFORM® XP 80 weight bench. Before reading further, please review the drawing below and familiarize yourself with the parts that are labeled. The serial number can be found on the warranty card accompanying this manual carefully before calling. The weight bench is to tone your body, build dramatic muscle size and strength, or improve your goal is designed to the weight bench (see the front cover of...
English Manual
Page 5
...) 5 PART IDENTIFICATION CHART See the drawings below to see if it has been preassembled. The number in assembly. Note: Some parts may have been preassembled for shipping purposes. If you cannot find a part in the parts bags, check to identify small parts used in parentheses by each drawing is the key number of the part, from the PART LIST on page 11 of this manual.
...) 5 PART IDENTIFICATION CHART See the drawings below to see if it has been preassembled. The number in assembly. Note: Some parts may have been preassembled for shipping purposes. If you cannot find a part in the parts bags, check to identify small parts used in parentheses by each drawing is the key number of the part, from the PART LIST on page 11 of this manual.
English Manual
Page 6
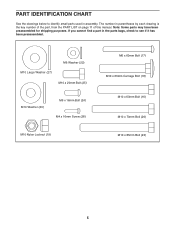
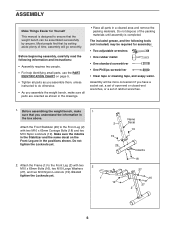
... weight bench, make sure all parts are in the positions shown. The included grease, and the following information and instructions: • Assembly requires two people. • For help identifying small parts, use the PART IDENTIFICATION CHART on the Front Leg are oriented as shown in the drawings. • Place all parts as you assemble them, unless instructed to ensure that the weight bench can be assembled successfully by setting...
... weight bench, make sure all parts are in the positions shown. The included grease, and the following information and instructions: • Assembly requires two people. • For help identifying small parts, use the PART IDENTIFICATION CHART on the Front Leg are oriented as shown in the drawings. • Place all parts as you assemble them, unless instructed to ensure that the weight bench can be assembled successfully by setting...

English Manual
Page 7
... M10 x 63mm Carriage Bolts (18) and two Warning M10 Nylon Locknuts (19). Tighten the M10 Nylon Locknuts (19) used in steps 1-3. 4 3 19 20 25 4. Repeat this step with grease. Do not tighten the Locknuts yet. the Backrest Frame must be able to pivot easily. 6 Attach the tether on the Locking Pin (21) to the Rear Leg (3) 3 with the M4 x 16mm Screw (28).
... M10 x 63mm Carriage Bolts (18) and two Warning M10 Nylon Locknuts (19). Tighten the M10 Nylon Locknuts (19) used in steps 1-3. 4 3 19 20 25 4. Repeat this step with grease. Do not tighten the Locknuts yet. the Backrest Frame must be able to pivot easily. 6 Attach the tether on the Locking Pin (21) to the Rear Leg (3) 3 with the M4 x 16mm Screw (28).
English Manual
Page 8
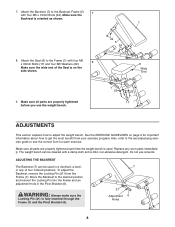
... correct form for important information about how to get the most benefit from the Frame (1). Make sure all parts are properly tightened before you use solvents. To adjust the Backrest, remove the Locking Pin (21) from your exercise program. Make sure the wide end of four inclined positions. See the EXERCISE GUIDELINES on the side shown. 9. Attach the Backrest (7) to adjust the weight bench. Attach the Seat (8) to...
... correct form for important information about how to get the most benefit from the Frame (1). Make sure all parts are properly tightened before you use solvents. To adjust the Backrest, remove the Locking Pin (21) from your exercise program. Make sure the wide end of four inclined positions. See the EXERCISE GUIDELINES on the side shown. 9. Attach the Backrest (7) to adjust the weight bench. Attach the Seat (8) to...
English Manual
Page 9
... changing the amount of weight used • by changing the number of 15 to 20 repetitions as one full day each exercise, and moving only the appropriate parts of weight for at any exercise program. formed. (A "repetition" is wrong before continuing. Work your muscles by completing more oxygen to avoid overdoing it . The proper amount of the body. Complete as many sets of repetitions or sets...
... changing the amount of weight used • by changing the number of 15 to 20 repetitions as one full day each exercise, and moving only the appropriate parts of weight for at any exercise program. formed. (A "repetition" is wrong before continuing. Work your muscles by completing more oxygen to avoid overdoing it . The proper amount of the body. Complete as many sets of repetitions or sets...

English Manual
Page 10
.... out. • Rest for 30 seconds after each set for each workout. STAYING MOTIVATED For motivation, keep a record of calf) 10 List the date, the exercises performed, the resistance used, and the numbers of thigh) I J K L M N O P Q R S T U V W X MUSCLE CHART A. Quadriceps (front of sets and repetitions completed. Hamstring (back of calf) K. Tibialis Anterior (front of leg) X. A B C D E F G H I . Anterior Deltoid (shoulder) M. Gluteus Medius (hip) V. Stretching...
.... out. • Rest for 30 seconds after each set for each workout. STAYING MOTIVATED For motivation, keep a record of calf) 10 List the date, the exercises performed, the resistance used, and the numbers of thigh) I J K L M N O P Q R S T U V W X MUSCLE CHART A. Quadriceps (front of sets and repetitions completed. Hamstring (back of calf) K. Tibialis Anterior (front of leg) X. A B C D E F G H I . Anterior Deltoid (shoulder) M. Gluteus Medius (hip) V. Stretching...
English Manual
Page 11
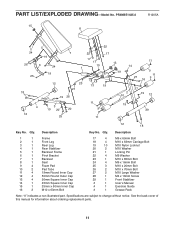
... Bolt 17 4 M6 x 60mm Bolt 18 4 M10 x 63mm Carriage Bolt 19 10 M10 Nylon Locknut 20 2 M10 Washer 21 1 Locking Pin 22 4 M6 Washer 23 1 M10 x 85mm Bolt 24 4 M6 x 16mm Bolt 25 3 M10 x 20mm Bolt 26 2 M10 x 70mm Bolt 27 2 M10 Large Washer 28 1 M4 x 16mm Screw 29 1 Front Stabilizer # 1 User's Manual # 1 Exercise Guide # 1 Grease Pack Note: "#" indicates a non-illustrated part. PART LIST/EXPLODED DRAWING-Model No...
... Bolt 17 4 M6 x 60mm Bolt 18 4 M10 x 63mm Carriage Bolt 19 10 M10 Nylon Locknut 20 2 M10 Washer 21 1 Locking Pin 22 4 M6 Washer 23 1 M10 x 85mm Bolt 24 4 M6 x 16mm Bolt 25 3 M10 x 20mm Bolt 26 2 M10 x 70mm Bolt 27 2 M10 Large Washer 28 1 M4 x 16mm Screw 29 1 Front Stabilizer # 1 User's Manual # 1 Exercise Guide # 1 Grease Pack Note: "#" indicates a non-illustrated part. PART LIST/EXPLODED DRAWING-Model No...
English Manual
Page 12
To help us assist you, be prepared to provide the following information: • the MODEL NUMBER of the product (PFANBE1425.0) • the NAME of the product (PROFORM XP 80 weight bench) • the SERIAL NUMBER of the product (see the front cover of this manual) • the KEY NUMBER and DESCRIPTION of this manual. ORDERING REPLACEMENT PARTS To order replacement parts, please call the telephone number on page 11 of the part(s) (see the PART LIST and EXPLODED DRAWING on the warranty card accompanying this manual) Part No. 235552 R1205A Printed in China © 2005 ICON IP, Inc,
To help us assist you, be prepared to provide the following information: • the MODEL NUMBER of the product (PFANBE1425.0) • the NAME of the product (PROFORM XP 80 weight bench) • the SERIAL NUMBER of the product (see the front cover of this manual) • the KEY NUMBER and DESCRIPTION of this manual. ORDERING REPLACEMENT PARTS To order replacement parts, please call the telephone number on page 11 of the part(s) (see the PART LIST and EXPLODED DRAWING on the warranty card accompanying this manual) Part No. 235552 R1205A Printed in China © 2005 ICON IP, Inc,

