

English Manual
Page 2
... appropriate exercise clothes when using the treadmill. Do not use a properly functioning surge suppressor could become caught in the treadmill. Always wear athletic shoes. Place the treadmill on each side. TABLE OF CONTENTS IMPORTANT PRECAUTIONS 2 BEFORE YOU BEGIN 4 ASSEMBLY 5 OPERATION AND ADJUSTMENT 8 HOW TO FOLD AND MOVE THE TREADMILL 21 TROUBLESHOOTING 22 CONDITIONING GUIDELINES 24 PART LIST 26 PART IDENTIFICATION CHART 27 ORDERING REPLACEMENT PARTS Back Cover LIMITED WARRANTY Back Cover Note...
... appropriate exercise clothes when using the treadmill. Do not use a properly functioning surge suppressor could become caught in the treadmill. Always wear athletic shoes. Place the treadmill on each side. TABLE OF CONTENTS IMPORTANT PRECAUTIONS 2 BEFORE YOU BEGIN 4 ASSEMBLY 5 OPERATION AND ADJUSTMENT 8 HOW TO FOLD AND MOVE THE TREADMILL 21 TROUBLESHOOTING 22 CONDITIONING GUIDELINES 24 PART LIST 26 PART IDENTIFICATION CHART 27 ORDERING REPLACEMENT PARTS Back Cover LIMITED WARRANTY Back Cover Note...

English Manual
Page 3
... parts of this manual). The treadmill is not in a commercial, rental, or institutional setting. Always remove the key, unplug the power cord and move the reset/off circuit breaker to order a free replacement decal (see the front cover of this product. When using them. 23. Remove iFIT.com CDs and videos from your CD player or VCR when you are not using iFIT.com CDs and videos, you when the speed...
... parts of this manual). The treadmill is not in a commercial, rental, or institutional setting. Always remove the key, unplug the power cord and move the reset/off circuit breaker to order a free replacement decal (see the front cover of this product. When using them. 23. Remove iFIT.com CDs and videos from your CD player or VCR when you are not using iFIT.com CDs and videos, you when the speed...

English Manual
Page 4
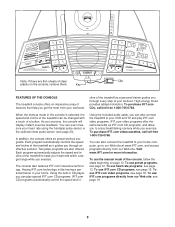
... the front cover of other treadmills. CD Player Accessory Tray Fan Handrail Storage Latch Upright Walking Belt Foot Rail BACK Rear Roller Adjustment Bolts Console Key/Clip CD Holder Reset/Off Circuit Breaker Power Cord RIGHT SIDE Cushioned Walking Platform for selecting the revolutionary PROFORM® 1150i treadmill. If you have questions after reading this manual for the location). The model number of your benefit, read this manual carefully before calling. The serial number can be...
... the front cover of other treadmills. CD Player Accessory Tray Fan Handrail Storage Latch Upright Walking Belt Foot Rail BACK Rear Roller Adjustment Bolts Console Key/Clip CD Holder Reset/Off Circuit Breaker Power Cord RIGHT SIDE Cushioned Walking Platform for selecting the revolutionary PROFORM® 1150i treadmill. If you have questions after reading this manual for the location). The model number of your benefit, read this manual carefully before calling. The serial number can be...

English Manual
Page 6
... pulse wire up into place, turn one connector and try again. Look under the Console Base and locate the wires on the Uprights (80, 84). Press the Right and Left Top Endcaps (75, 81) into place. Drawing 4a shows the correct route for the Trays (109, 111). Start both Latch Screws 3 before tightening any of the Console Base (101). drawing 4b shows an incorrect route. Connect...
... pulse wire up into place, turn one connector and try again. Look under the Console Base and locate the wires on the Uprights (80, 84). Press the Right and Left Top Endcaps (75, 81) into place. Drawing 4a shows the correct route for the Trays (109, 111). Start both Latch Screws 3 before tightening any of the Console Base (101). drawing 4b shows an incorrect route. Connect...

English Manual
Page 7
... height, tighten the four Upright Bolts (86) and go to install the receiver included with the Screw (108). Make sure that all four Upright Bolts (86). 7 84 127 86 13 86 101 79 80 74 79 127 97 86 8. Connect the wire on page 20. 86 If you purchase the optional chest pulse sensor (see page 20), follow the steps below to step 7. Press a CD...
... height, tighten the four Upright Bolts (86) and go to install the receiver included with the Screw (108). Make sure that all four Upright Bolts (86). 7 84 127 86 13 86 101 79 80 74 79 127 97 86 8. Connect the wire on page 20. 86 If you purchase the optional chest pulse sensor (see page 20), follow the steps below to step 7. Press a CD...
English Manual
Page 8
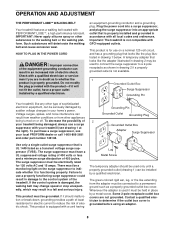
... least resistance for use a properly functioning surge suppressor could result in your home's power. This product is UL 1449 listed as a properly grounded outlet box cover. Whenever the adapter is functioning properly. There must be a monitoring light on a nominal 120-volt circuit, and has a grounding plug that is equipped with GFCI-equipped outlets. If it will deteriorate the walking belt and...
... least resistance for use a properly functioning surge suppressor could result in your home's power. This product is UL 1449 listed as a properly grounded outlet box cover. Whenever the adapter is functioning properly. There must be a monitoring light on a nominal 120-volt circuit, and has a grounding plug that is equipped with GFCI-equipped outlets. If it will deteriorate the walking belt and...
English Manual
Page 9
... included audio cable, you exercise. To use iFIT.com programs directly from our Web site, see page 12. To use preset programs, see page 19. 9 You can also connect the treadmill to your heart rate within a target range while you can also connect the treadmill to your heart rate using the handgrip pulse sensor or the optional chest pulse sensor (see page 15. Each program automatically adjusts the speed and incline of the treadmill can play iFIT.com video programs. iFIT.com video programs...
... included audio cable, you exercise. To use iFIT.com programs directly from our Web site, see page 12. To use preset programs, see page 19. 9 You can also connect the treadmill to your heart rate within a target range while you can also connect the treadmill to your heart rate using the handgrip pulse sensor or the optional chest pulse sensor (see page 15. Each program automatically adjusts the speed and incline of the treadmill can play iFIT.com video programs. iFIT.com video programs...

English Manual
Page 10
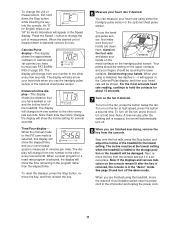
... in increments of the walking belt as desired. If the key is selected, the matrix will begin walking. The Time/Pace display will display a 1/4-mile track. The matrix-When the manual mode or the iFIT.com mode is not pulled from the console. Each time a button is inserted, the manual mode will change the incline of the treadmill. When the key is pressed, the speed setting will display speed and distance in the power cord (see the drawing...
... in increments of the walking belt as desired. If the key is selected, the matrix will begin walking. The Time/Pace display will display a 1/4-mile track. The matrix-When the manual mode or the iFIT.com mode is not pulled from the console. Each time a button is inserted, the manual mode will change the incline of the treadmill. When the key is pressed, the speed setting will display speed and distance in the power cord (see the drawing...
English Manual
Page 11
... your heart rate if desired. See page 20 and turn off the demo mode. When the desired unit of measurement, first hold the contacts for about 15 seconds. 7 Turn on page 24). Distance/Incline display-This display shows the distance that your hands are finished exercising, remove the key from the console. Time/Pace display- grip pulse sen- Avoid moving your heart rate using the treadmill, move the reset/off position and unplug the power cord...
... your heart rate if desired. See page 20 and turn off the demo mode. When the desired unit of measurement, first hold the contacts for about 15 seconds. 7 Turn on page 24). Distance/Incline display-This display shows the distance that your hands are finished exercising, remove the key from the console. Time/Pace display- grip pulse sen- Avoid moving your heart rate using the treadmill, move the reset/off position and unplug the power cord...

English Manual
Page 13
... chest pulse sensor. 2 Insert the key fully into the console. To select a heart rate program, press the Program Select button repeatedly until one of the treadmill is in a safe place. Next, remove the key from the console and put it in the "demo" mode. HOW TO USE HEART RATE PROGRAMS CAUTION: If you are finished using the treadmill, move the reset/off circuit breaker switch near the power cord to the off the demo mode. See HOW TO TURN ON THE POWER...
... chest pulse sensor. 2 Insert the key fully into the console. To select a heart rate program, press the Program Select button repeatedly until one of the treadmill is in a safe place. Next, remove the key from the console and put it in the "demo" mode. HOW TO USE HEART RATE PROGRAMS CAUTION: If you are finished using the treadmill, move the reset/off circuit breaker switch near the power cord to the off the demo mode. See HOW TO TURN ON THE POWER...

English Manual
Page 14
... incline of the treadmill may automatically change to bring your heart rate closer to start it at the left) and your pulse is finished, remove the key from the console. When the desired setting is programmed for each segment, a series of the program. Hold the handrails and begin walking. One target heart rate is shown, press the Enter Age button. 5 Press the Start button or the Speed v button to the target heart rate. If the speed or incline setting...
... incline of the treadmill may automatically change to bring your heart rate closer to start it at the left) and your pulse is finished, remove the key from the console. When the desired setting is programmed for each segment, a series of the program. Hold the handrails and begin walking. One target heart rate is shown, press the Enter Age button. 5 Press the Start button or the Speed v button to the target heart rate. If the speed or incline setting...

English Manual
Page 15
... flashing. After a moment, the walking belt will begin guiding you can manually override the settings at any time by pressing the Speed or Incline buttons on the console Pause and then press the Play/Pause button be- To use iFIT.com CDs, press the Interactive Trainer button. When the key is inserted, the manual mode will be prepared for speed and/or incline changes. gram, press the Play/ Pause button beside the CD player. gram...
... flashing. After a moment, the walking belt will begin guiding you can manually override the settings at any time by pressing the Speed or Incline buttons on the console Pause and then press the Play/Pause button be- To use iFIT.com CDs, press the Interactive Trainer button. When the key is inserted, the manual mode will be prepared for speed and/or incline changes. gram, press the Play/ Pause button beside the CD player. gram...

English Manual
Page 18
... program is flashing, press the Start button or the Speed v button on page 10. 6 Measure your VCR. HOW TO USE IFIT.COM VIDEO PROGRAMS To use iFIT.com videocassettes, the treadmill must be connected to your personal trainer's instructions. Insert the videocassette into the console. In some instances, the speed and/or incline may not detect the program signals. • Make sure that the audio cable is properly connected, that it is fully plugged...
... program is flashing, press the Start button or the Speed v button on page 10. 6 Measure your VCR. HOW TO USE IFIT.COM VIDEO PROGRAMS To use iFIT.com videocassettes, the treadmill must be connected to your personal trainer's instructions. Insert the videocassette into the console. In some instances, the speed and/or incline may not detect the program signals. • Make sure that the audio cable is properly connected, that it is fully plugged...

English Manual
Page 19
... speed and/or incline changes. Note: To use a program from our Web site, press the iFIT.com button. The iFIT.com indicator will begin to the key and slide the clip onto the waistband of the treadmill is inserted, the manual mode will begin walking. However, when the next "chirp" is completed, the walking belt will change when a "chirp" is heard, make sure that the audio cable is properly connected...
... speed and/or incline changes. Note: To use a program from our Web site, press the iFIT.com button. The iFIT.com indicator will begin to the key and slide the clip onto the waistband of the treadmill is inserted, the manual mode will begin walking. However, when the next "chirp" is completed, the walking belt will change when a "chirp" is heard, make sure that the audio cable is properly connected...

English Manual
Page 20
... optional chest pulse sensor, call toll-free 1-800-734-2377. An optional chest pulse sensor adds even more features to switch the console from the console. Press the Speed v button to be shown: The Distance/Incline display will not operate. THE INFORMATION MODE/DEMO MODE THE OPTIONAL CHEST PULSE SENSOR The console features an information mode that keeps track of the total number of hours that the treadmill has been operated and the total number of miles that the walking belt has moved. In...
... optional chest pulse sensor, call toll-free 1-800-734-2377. An optional chest pulse sensor adds even more features to switch the console from the console. Press the Speed v button to be shown: The Distance/Incline display will not operate. THE INFORMATION MODE/DEMO MODE THE OPTIONAL CHEST PULSE SENSOR The console features an information mode that keeps track of the total number of hours that the treadmill has been operated and the total number of miles that the walking belt has moved. In...

English Manual
Page 22
... follow the steps listed. To reset the circuit breaker, wait for five minutes, and then plug it back in . b. Remove the key from the console and UNPLUG THE a POWER CORD. With the help of the specifications described on page 8. Important: The treadmill is needed, please call our Customer Service Department. Check the reset/off circuit breaker located on SOLUTION: a. PROBLEM: The incline of the console do not function...
... follow the steps listed. To reset the circuit breaker, wait for five minutes, and then plug it back in . b. Remove the key from the console and UNPLUG THE a POWER CORD. With the help of the specifications described on page 8. Important: The treadmill is needed, please call our Customer Service Department. Check the reset/off circuit breaker located on SOLUTION: a. PROBLEM: The incline of the console do not function...

English Manual
Page 23
... walking belt is properly tightened. 23 When the walking belt is off -center or slips when walked on page 8. b 2"-3" Rear Roller Adjustment Bolts c. b Using the allen wrench, turn both rear roller adjustment bolts counterclockwise, 1/4 of a turn ; Repeat until the walking belt is cor- If the walking belt still slows when walked on the left rear roller bolt clockwise 1/2 of the walking belt 2 to keep the walking belt centered. Plug in the power cord, insert the key, and carefully walk on the treadmill for a few minutes. b. move the Reed Switch...
... walking belt is properly tightened. 23 When the walking belt is off -center or slips when walked on page 8. b 2"-3" Rear Roller Adjustment Bolts c. b Using the allen wrench, turn both rear roller adjustment bolts counterclockwise, 1/4 of a turn ; Repeat until the walking belt is cor- If the walking belt still slows when walked on the left rear roller bolt clockwise 1/2 of the walking belt 2 to keep the walking belt centered. Plug in the power cord, insert the key, and carefully walk on the treadmill for a few minutes. b. move the Reed Switch...
English Manual
Page 24
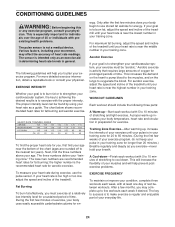
.... For maximum fat burning, adjust the speed and incline of the chart (ages are recommended heart rates for exercise. For aerobic exercise, adjust the speed and incline of the treadmill until your heart rate is near the bottom of the treadmill until your pulse is to exercise with 5 to use the pulse sensor. To find your age near the highest number in your training zone for you exercise-never hold your everyday life...
.... For maximum fat burning, adjust the speed and incline of the chart (ages are recommended heart rates for exercise. For aerobic exercise, adjust the speed and incline of the treadmill until your heart rate is near the bottom of the treadmill until your pulse is to exercise with 5 to use the pulse sensor. To find your age near the highest number in your training zone for you exercise-never hold your everyday life...
English Manual
Page 26
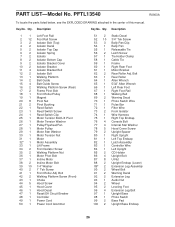
... Rear Foot 67 1 Right Foot Rail 68 1 Walking Belt 69 2 Warning Decal 70 1 Photo Switch Wire 71 1 Pulse Bar 72 1 Filter Wire 73 2 Front Isolator 74 1 Wire Harness 75 1 Right Top Endcap 76 4 Console Bolt 77 4 Internal Star Washer 78 5 Hood Cover Screw 79 2 Upright Spacer 80 1 Right Upright 81 1 Left Top Endcap 82 1 Latch Assembly 83 1 Controller Wire 84 1 Left Upright 85 2 CD Holder 86 4 Upright Bolt 87 8 U-Nut 88 2 Upright Endcap (Lower) 89* 2 Extension Leg Assembly...
... Rear Foot 67 1 Right Foot Rail 68 1 Walking Belt 69 2 Warning Decal 70 1 Photo Switch Wire 71 1 Pulse Bar 72 1 Filter Wire 73 2 Front Isolator 74 1 Wire Harness 75 1 Right Top Endcap 76 4 Console Bolt 77 4 Internal Star Washer 78 5 Hood Cover Screw 79 2 Upright Spacer 80 1 Right Upright 81 1 Left Top Endcap 82 1 Latch Assembly 83 1 Controller Wire 84 1 Left Upright 85 2 CD Holder 86 4 Upright Bolt 87 8 U-Nut 88 2 Upright Endcap (Lower) 89* 2 Extension Leg Assembly...
English Manual
Page 30
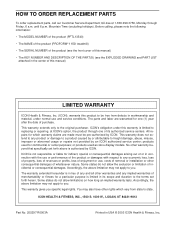
... Service Department toll-free at ICON's option, the product through Friday, 6 a.m. Before calling, please note the following information: • The MODEL NUMBER of the product (PFTL13540) • The NAME of the product (PROFORM® 1150i treadmill) • The SERIAL NUMBER of the product (see the front cover of this manual) • The KEY NUMBER AND DESCRIPTION OF THE PART(S) (see the EXPLODED DRAWING and PART LIST attached in connection...
... Service Department toll-free at ICON's option, the product through Friday, 6 a.m. Before calling, please note the following information: • The MODEL NUMBER of the product (PFTL13540) • The NAME of the product (PROFORM® 1150i treadmill) • The SERIAL NUMBER of the product (see the front cover of this manual) • The KEY NUMBER AND DESCRIPTION OF THE PART(S) (see the EXPLODED DRAWING and PART LIST attached in connection...

