
User Manual
Page 3
... all of the specifications described on page 13. Read, understand, and test the emergency stop unexpectedly, which may affect the accuracy of heart rate readings. Wear appropriate exercise clothes when using the treadmill. 17. Use only a single-outlet surge suppressor that blocks air openings. The pulse sensors are intended only as described. 3. Always remove the key, unplug the power cord, and switch the reset/off circuit breaker...
... all of the specifications described on page 13. Read, understand, and test the emergency stop unexpectedly, which may affect the accuracy of heart rate readings. Wear appropriate exercise clothes when using the treadmill. 17. Use only a single-outlet surge suppressor that blocks air openings. The pulse sensors are intended only as described. 3. Always remove the key, unplug the power cord, and switch the reset/off circuit breaker...
User Manual
Page 4
Section 810 of the treadmill by the pin on the latch knob. 23. Refer servicing to an antenna discharge unit, size of grounding conductors, location of electric shock, do so by an authorized service representative only. 26. Do not change the incline of the National Electrical Code, ANSI/NFPA No. 70-1984, provides information with them might be located in this manual. Never insert or...
Section 810 of the treadmill by the pin on the latch knob. 23. Refer servicing to an antenna discharge unit, size of grounding conductors, location of electric shock, do so by an authorized service representative only. 26. Do not change the incline of the National Electrical Code, ANSI/NFPA No. 70-1984, provides information with them might be located in this manual. Never insert or...

User Manual
Page 6
... front cover of other treadmills. To help us . And when you , note the product model number and serial number before you for the location). BEFORE YOU BEGIN Thank you use the treadmill. Personal Television/Console Accessory Tray Handrail Pulse Sensor Fan Book Holder Key/Clip Reset/Off Circuit Breaker Walking Belt Foot Rail Rear Roller Adjustment Bolts Power Cord Adjustable Cushioned Walking Platform 6 For your workouts at home more enjoyable and effective. Before reading further, please review...
... front cover of other treadmills. To help us . And when you , note the product model number and serial number before you for the location). BEFORE YOU BEGIN Thank you use the treadmill. Personal Television/Console Accessory Tray Handrail Pulse Sensor Fan Book Holder Key/Clip Reset/Off Circuit Breaker Walking Belt Foot Rail Rear Roller Adjustment Bolts Power Cord Adjustable Cushioned Walking Platform 6 For your workouts at home more enjoyable and effective. Before reading further, please review...

User Manual
Page 9
... the console assembly near the Uprights (73, 74). 4 Console Assembly Connect the Upright Wire Harness (75) to the cables extending from the console assembly. Make sure to - The connectors should slide to con- IF THE CONNECTORS ARE NOT CONNECTED PROPERLY, THE CONSOLE MAY BE DAM- Next, finger tighten three Handrail Bolts with three Star Washers (90) into the Left Upright (73). AGED WHEN THE POWER IS TURNED ON...
... the console assembly near the Uprights (73, 74). 4 Console Assembly Connect the Upright Wire Harness (75) to the cables extending from the console assembly. Make sure to - The connectors should slide to con- IF THE CONNECTORS ARE NOT CONNECTED PROPERLY, THE CONSOLE MAY BE DAM- Next, finger tighten three Handrail Bolts with three Star Washers (90) into the Left Upright (73). AGED WHEN THE POWER IS TURNED ON...

User Manual
Page 12
... other end of the console. • The chest pulse sensor is removed and the electrode areas are covered by high power lines or other sources. For the console to direct sunlight for extended periods of the sensor unit. the chest strap and the sensor unit. CHEST PULSE SENSOR TROUBLESHOOTING Insert the tab on ; Next, wrap the chest pulse sensor around your chest. Adjust the length of two components- If heart rate readings do not...
... other end of the console. • The chest pulse sensor is removed and the electrode areas are covered by high power lines or other sources. For the console to direct sunlight for extended periods of the sensor unit. the chest strap and the sensor unit. CHEST PULSE SENSOR TROUBLESHOOTING Insert the tab on ; Next, wrap the chest pulse sensor around your chest. Adjust the length of two components- If heart rate readings do not...

User Manual
Page 13
... listed as shown in damage to indicate whether it must be installed by a metal screw. HOW TO PLUG IN THE POWER CORD DANGER: Improper connection of the equipment-grounding conductor can be grounded. Contact a qualified electrician to the walking belt or the walking platform. There must be used it is properly grounded. If the control system is damaged, the walking belt may change speed, accelerate, or stop...
... listed as shown in damage to indicate whether it must be installed by a metal screw. HOW TO PLUG IN THE POWER CORD DANGER: Improper connection of the equipment-grounding conductor can be grounded. Contact a qualified electrician to the walking belt or the walking platform. There must be used it is properly grounded. If the control system is damaged, the walking belt may change speed, accelerate, or stop...

User Manual
Page 14
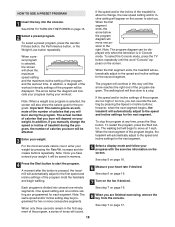
... Fitness programs, seven Performance programs, and eight Weight Loss programs. Each program automatically controls the speed and incline of features designed to make your favorite workout music or audio books with the touch of a button. To use a preset program, see page 22. The console also offers four event training programs. Each program counts down the distance as it guides you through an effective workout. The console also offers four heart rate programs that control the speed and incline...
... Fitness programs, seven Performance programs, and eight Weight Loss programs. Each program automatically controls the speed and incline of features designed to make your favorite workout music or audio books with the touch of a button. To use a preset program, see page 22. The console also offers four event training programs. Each program counts down the distance as it guides you through an effective workout. The console also offers four heart rate programs that control the speed and incline...
User Manual
Page 15
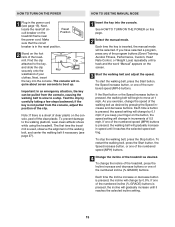
... TURN ON THE POWER HOW TO USE THE MANUAL MODE 1 Plug in the reset position. 2 Stand on the foot rails of clear plastic on the console, peel off cir- The console will change by 0.1 mph; As you exercise, change the speed of the numbered speed (MPH) buttons is pressed, the walking belt will begin to move at 1 mph. To stop . To prevent damage to boot up. Each time the key is pressed, the walking belt...
... TURN ON THE POWER HOW TO USE THE MANUAL MODE 1 Plug in the reset position. 2 Stand on the foot rails of clear plastic on the console, peel off cir- The console will change by 0.1 mph; As you exercise, change the speed of the numbered speed (MPH) buttons is pressed, the walking belt will begin to move at 1 mph. To stop . To prevent damage to boot up. Each time the key is pressed, the walking belt...
User Manual
Page 16
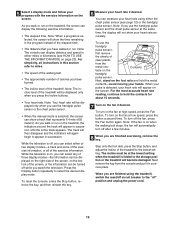
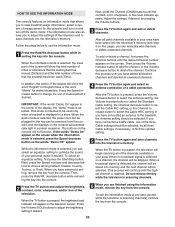
... for about 15 seconds. 7 Turn on when the walking belt stops, the fan will appear in succession. To reset the console, press the Stop button, remove the key, and then reinsert the key. 6 Measure your heart rate using the treadmill, switch the reset/off while you press the Incline buttons. • Your heart rate. To use the handgrip pulse sensor or the chest pulse sensor. • When the manual mode is selected, the screen will be displayed only when you watch the...
... for about 15 seconds. 7 Turn on when the walking belt stops, the fan will appear in succession. To reset the console, press the Stop button, remove the key, and then reinsert the key. 6 Measure your heart rate using the treadmill, switch the reset/off while you press the Incline buttons. • Your heart rate. To use the handgrip pulse sensor or the chest pulse sensor. • When the manual mode is selected, the screen will be displayed only when you watch the...

User Manual
Page 17
... are finished using the treadmill, switch the reset/off " position and unplug the power cord. 17 The speed of the walking belt will then slow to 5 mph. The speed of the walking belt will flash on the screen. To stop . 4 Select a display mode and follow your progress with the exercise information on the screen and a series of the program, the speed setting will then increase to 6.5 mph. Adjust the speed of the walking belt was...
... are finished using the treadmill, switch the reset/off " position and unplug the power cord. 17 The speed of the walking belt will then slow to 5 mph. The speed of the walking belt will flash on the screen. To stop . 4 Select a display mode and follow your progress with the exercise information on the screen and a series of the program, the speed setting will then increase to 6.5 mph. Adjust the speed of the walking belt was...
User Manual
Page 18
... a stop the program at 1 mph. See step 7 on the screen. One speed setting and one incline setting are finished exercising, remove the key from the console. however, when the next segment begins, the treadmill will continue in memory. 4 Press the Start button to the first speed and incline settings of the program will begin walking. The walking belt will indicate your progress during the program. The arrow below the program diagram will automatically adjust to start the program...
... a stop the program at 1 mph. See step 7 on the screen. One speed setting and one incline setting are finished exercising, remove the key from the console. however, when the next segment begins, the treadmill will continue in memory. 4 Press the Start button to the first speed and incline settings of the program will begin walking. The walking belt will indicate your progress during the program. The arrow below the program diagram will automatically adjust to start the program...

User Manual
Page 19
... pressed, the walking belt will begin walking. See step 6 on page 16. 6 Turn on page 16. 3 Press the Start button and program the desired speed and incline settings. See HOW TO TURN ON THE POWER on page 15. 2 Select one incline setting can have programmed and the program time will appear on the screen. Program a speed setting and an incline setting for as many segments as desired; When you are finished exercising, remove the key from the console...
... pressed, the walking belt will begin walking. See step 6 on page 16. 6 Turn on page 16. 3 Press the Start button and program the desired speed and incline settings. See HOW TO TURN ON THE POWER on page 15. 2 Select one incline setting can have programmed and the program time will appear on the screen. Program a speed setting and an incline setting for as many segments as desired; When you are finished exercising, remove the key from the console...

User Manual
Page 21
... the program (HEART RATE: 1, HEART RATE: 2, HEART RATE: 3, or HEART RATE: 4) will indicate your exercise heart rate. The walking belt will then move one of the four heart rate programs. To select a heart rate program, press the Heart Rate Control button repeatedly. Follow the steps below the profile will appear on the screen. When a heart rate program is selected, a series of tones will automatically adjust to the first speed and incline settings of the program. The arrow below to start the program. Note: If you , regardless of which display mode...
... the program (HEART RATE: 1, HEART RATE: 2, HEART RATE: 3, or HEART RATE: 4) will indicate your exercise heart rate. The walking belt will then move one of the four heart rate programs. To select a heart rate program, press the Heart Rate Control button repeatedly. Follow the steps below the profile will appear on the screen. When a heart rate program is selected, a series of tones will automatically adjust to the first speed and incline settings of the program. The arrow below to start the program. Note: If you , regardless of which display mode...

User Manual
Page 22
... fully plugged in. See page 11 for a few seconds. If you are finished exercising, remove the key from the current channel to the console. Make sure that the audio/video cable is equipped with the exercise information on page 23. 4 Press the Volume buttons to the target heart rate setting. 6 Select a display mode and follow your heart rate to the target heart rate setting for a few seconds. See step 5 on page 16. 7 Turn on...
... fully plugged in. See page 11 for a few seconds. If you are finished exercising, remove the key from the current channel to the console. Make sure that the audio/video cable is equipped with the exercise information on page 23. 4 Press the Volume buttons to the target heart rate setting. 6 Select a display mode and follow your heart rate to the target heart rate setting for a few seconds. See step 5 on page 16. 7 Turn on...
User Manual
Page 23
... button and adjust the brightness, contrast, color, sharpness, and/or hue of the television. Then, press the Volume increase button to add the channel, or the Volume decrease button to use the information mode. 1 Press the Rate/Wt. When the demo mode is selected, the power cord can be plugged in, the key can be removed from the console. If you have selected a setting, remove the key from the console, and the displays...
... button and adjust the brightness, contrast, color, sharpness, and/or hue of the television. Then, press the Volume increase button to add the channel, or the Volume decrease button to use the information mode. 1 Press the Rate/Wt. When the demo mode is selected, the power cord can be plugged in, the key can be removed from the console. If you have selected a setting, remove the key from the console, and the displays...
User Manual
Page 27
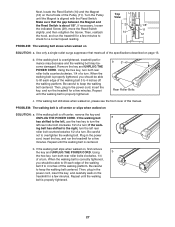
... walk- Using b the hex key, turn both rear roller bolts counterclockwise, 1/4 of a turn . b. Remove the key and UNPLUG THE POWER CORD. PROBLEM: The walking belt is properly tightened. 27 ing belt has shifted to keep the walking belt centered. Plug in the power cord, insert the key, and run the treadmill for a few minutes to 4 inches off -center, remove the key and UNPLUG THE POWER CORD. If the walking belt slips when walked on the left rear roller bolt counterclockwise 1/2 of the Pulley (11). Next, locate the Reed Switch...
... walk- Using b the hex key, turn both rear roller bolts counterclockwise, 1/4 of a turn . b. Remove the key and UNPLUG THE POWER CORD. PROBLEM: The walking belt is properly tightened. 27 ing belt has shifted to keep the walking belt centered. Plug in the power cord, insert the key, and run the treadmill for a few minutes to 4 inches off -center, remove the key and UNPLUG THE POWER CORD. If the walking belt slips when walked on the left rear roller bolt counterclockwise 1/2 of the Pulley (11). Next, locate the Reed Switch...

User Manual
Page 29
... be "aerobic." For maximum fat burning, adjust the speed and incline of time. WORKOUT GUIDELINES Each workout should include the following guidelines will help you , first find the three numbers above your training zone. A proper warm-up -Start each workout with 5 to cool down -Finish each workout with preexisting health problems. The pulse sensor is the recommended heart rate for energy. Fat Burning To burn fat...
... be "aerobic." For maximum fat burning, adjust the speed and incline of time. WORKOUT GUIDELINES Each workout should include the following guidelines will help you , first find the three numbers above your training zone. A proper warm-up -Start each workout with 5 to cool down -Finish each workout with preexisting health problems. The pulse sensor is the recommended heart rate for energy. Fat Burning To burn fat...

User Manual
Page 30
...Track Screw 3/4" Screw 3/4" Tek Screw Walking Platform Belt Guide Belt Guide Screw Front Isolator Platform Bolt, Front Front Roller/Pulley Magnet 1/2" Screw Reed Switch Clip Incline Rod Bushing Lift Arm Lift Pivot Bolt Hood Mount Lift Arm Spacer Reed Switch Idler Wheel Nut Idler Wheel Idler Wheel Bolt Lift Motor Bolt, Bottom Idler Arm Spacer Idler Arm Idler Arm Spring Motor Belt 3/4" Tek Screw Lift Pivot Bolt Drive Motor Motor Bolt Electronic Bracket Nut Electronic Bracket Front Endcap Controller Incline Rod Nut Lift Motor Lift Motor Bolt, Top AV Cover Platform Cushion Power Cord Assembly Hood...
...Track Screw 3/4" Screw 3/4" Tek Screw Walking Platform Belt Guide Belt Guide Screw Front Isolator Platform Bolt, Front Front Roller/Pulley Magnet 1/2" Screw Reed Switch Clip Incline Rod Bushing Lift Arm Lift Pivot Bolt Hood Mount Lift Arm Spacer Reed Switch Idler Wheel Nut Idler Wheel Idler Wheel Bolt Lift Motor Bolt, Bottom Idler Arm Spacer Idler Arm Idler Arm Spring Motor Belt 3/4" Tek Screw Lift Pivot Bolt Drive Motor Motor Bolt Electronic Bracket Nut Electronic Bracket Front Endcap Controller Incline Rod Nut Lift Motor Lift Motor Bolt, Top AV Cover Platform Cushion Power Cord Assembly Hood...

User Manual
Page 31
... Wire Idler Arm Bolt Rear Roller Washer Incline/Controller Wire Incline Stop Bracket Stop Bracket Spacer Static Decal Console Plate TV Cable Nut TV Cable Star Washer Lower Latch Bolt Handrail Cover Fastener Audio/Video Wire Harness Console Clamp Upper Latch Bolt Latch Knob Latch Endcap Key No. Description 120 1 121 1 122 2 123 1 124 1 125 1 126 4 127 1 128 2 129 1 130 1 131 1 132 1 133 4 134 1 135 2 #1 #1 Left Pulse Grip Right Pulse Grip 4" Ground Wire Console TV Cable Speaker Cover Speaker Speaker Screw Caution Decal, Base Cushion Track Chest Pulse Sensor Chest Pulse Strap Chest Pulse...
... Wire Idler Arm Bolt Rear Roller Washer Incline/Controller Wire Incline Stop Bracket Stop Bracket Spacer Static Decal Console Plate TV Cable Nut TV Cable Star Washer Lower Latch Bolt Handrail Cover Fastener Audio/Video Wire Harness Console Clamp Upper Latch Bolt Latch Knob Latch Endcap Key No. Description 120 1 121 1 122 2 123 1 124 1 125 1 126 4 127 1 128 2 129 1 130 1 131 1 132 1 133 4 134 1 135 2 #1 #1 Left Pulse Grip Right Pulse Grip 4" Ground Wire Console TV Cable Speaker Cover Speaker Speaker Screw Caution Decal, Base Cushion Track Chest Pulse Sensor Chest Pulse Strap Chest Pulse...
User Manual
Page 34
... manual) LIMITED WARRANTY ICON Health & Fitness, Inc. (ICON) warrants this warranty is warranted for a minimal trip charge. Accordingly, the above limitation may not apply to provide the following information: • the MODEL NUMBER of the product (EPTL14106.0) • the NAME of the product (EPIC VIEW 700 treadmill) • the SERIAL NUMBER of the product (see the PART LIST on how long an implied warranty lasts. When ordering parts, be prepared to you. ICON HEALTH & FITNESS...
... manual) LIMITED WARRANTY ICON Health & Fitness, Inc. (ICON) warrants this warranty is warranted for a minimal trip charge. Accordingly, the above limitation may not apply to provide the following information: • the MODEL NUMBER of the product (EPTL14106.0) • the NAME of the product (EPIC VIEW 700 treadmill) • the SERIAL NUMBER of the product (see the PART LIST on how long an implied warranty lasts. When ordering parts, be prepared to you. ICON HEALTH & FITNESS...

