

Uk Manual
Page 1
..., Beeston Leeds, LS11 8JG, UK CAUTION Read all precautions and instructions in the space above for future reference. USER'S MANUAL As a manufacturer, we are missing parts, please contact us at the numbers or addresses listed below: Call: 08457 089 009 Outside UK: 0 (44) 113 3877133 Fax: 0 (44) 113 3877125 E-mail: csuk...
..., Beeston Leeds, LS11 8JG, UK CAUTION Read all precautions and instructions in the space above for future reference. USER'S MANUAL As a manufacturer, we are missing parts, please contact us at the numbers or addresses listed below: Call: 08457 089 009 Outside UK: 0 (44) 113 3877133 Fax: 0 (44) 113 3877125 E-mail: csuk...
Uk Manual
Page 2
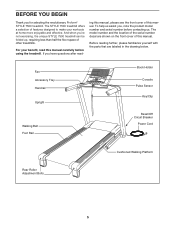
...YOU BEGIN 5 ASSEMBLY 6 OPERATION AND ADJUSTMENT 12 HOW TO FOLD AND MOVE THE TREADMILL 24 TROUBLESHOOTING 26 EXERCISE GUIDELINES 29 PART LIST 30 EXPLODED DRAWING 32 ORDERING REPLACEMENT PARTS Back Cover RECYCLING INFORMATION Back Cover WARNING DECAL PLACEMENT The decals shown here have ...been applied in the location shown. PROFORM is missing or illegible, call the telephone number ...
...YOU BEGIN 5 ASSEMBLY 6 OPERATION AND ADJUSTMENT 12 HOW TO FOLD AND MOVE THE TREADMILL 24 TROUBLESHOOTING 26 EXERCISE GUIDELINES 29 PART LIST 30 EXPLODED DRAWING 32 ORDERING REPLACEMENT PARTS Back Cover RECYCLING INFORMATION Back Cover WARNING DECAL PLACEMENT The decals shown here have ...been applied in the location shown. PROFORM is missing or illegible, call the telephone number ...

Uk Manual
Page 4
...treadmill in a commercial, rental, or institutional setting. vice representative. 20. less instructed to do so by an authorized service representative only. 25. When folding or moving the treadmill..., make sure that the storage latch is properly assembled. (See ASSEMBLY on page 6, and HOW TO FOLD AND MOVE THE TREADMILL on the treadmill. 23. This treadmill...lbs. (20 kg) to raise, lower, or move the treadmill until it is fully closed. 22. Always unplug the power...use , before cleaning the treadmill, and before performing the mainte- SAVE THESE INSTRUCTIONS 4 Do not attempt ...
...treadmill in a commercial, rental, or institutional setting. vice representative. 20. less instructed to do so by an authorized service representative only. 25. When folding or moving the treadmill..., make sure that the storage latch is properly assembled. (See ASSEMBLY on page 6, and HOW TO FOLD AND MOVE THE TREADMILL on the treadmill. 23. This treadmill...lbs. (20 kg) to raise, lower, or move the treadmill until it is fully closed. 22. Always unplug the power...use , before cleaning the treadmill, and before performing the mainte- SAVE THESE INSTRUCTIONS 4 Do not attempt ...
Uk Manual
Page 5
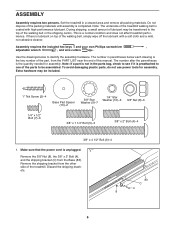
Before reading further, please familiarize yourself with the parts that are shown on the front cover of this manual. The model number and the location of the serial number decal are labeled in the ... manual, please see the front cover of this manual carefully before contacting us. And when you for selecting the revolutionary Proform® STYLE 7500 treadmill. BEFORE YOU BEGIN Thank you 're not exercising, the unique STYLE 7500 treadmill can be folded up, requiring less than half the floor space of features designed to make your benefit, read...
Before reading further, please familiarize yourself with the parts that are shown on the front cover of this manual. The model number and the location of the serial number decal are labeled in the ... manual, please see the front cover of this manual carefully before contacting us. And when you for selecting the revolutionary Proform® STYLE 7500 treadmill. BEFORE YOU BEGIN Thank you 're not exercising, the unique STYLE 7500 treadmill can be folded up, requiring less than half the floor space of features designed to make your benefit, read...
Uk Manual
Page 6
...near the end of the walking belt, simply wipe off the lubricant with high-performance lubricant. To avoid damaging plastic parts, do not use power tools for assembly. Set the treadmill in a cleared area and remove all packing materials. If there is coated with a soft cloth and a mild,... non-abrasive cleaner. Note: The underside of the treadmill walking belt is lubricant on top of this manual. Assembly requires the included hex keys and your own Phillips screwdriver , adjustable wrench , and wire...
...near the end of the walking belt, simply wipe off the lubricant with high-performance lubricant. To avoid damaging plastic parts, do not use power tools for assembly. Set the treadmill in a cleared area and remove all packing materials. If there is coated with a soft cloth and a mild,... non-abrasive cleaner. Note: The underside of the treadmill walking belt is lubricant on top of this manual. Assembly requires the included hex keys and your own Phillips screwdriver , adjustable wrench , and wire...
Uk Manual
Page 11
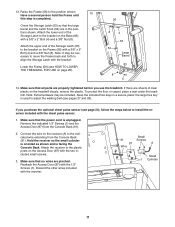
... unplugged. Hold the receiver so the small cylinder is oriented as shown and is completed. To protect the floor or carpet, place a mat under the treadmill. Make sure that no wires are in a secure place; Attach the upper end of clear plastic on page 25). 56 8 4 53 54 Large ... (see page 23), follow the steps below to adjust the walking belt (see HOW TO LOWER THE TREADMILL FOR USE on the treadmill decals, remove the plastic. Discard the other wires included with the 1/2" Screws (1). 13. Make sure that all parts are sheets of the Storage Latch (53) to the position shown.
... unplugged. Hold the receiver so the small cylinder is oriented as shown and is completed. To protect the floor or carpet, place a mat under the treadmill. Make sure that no wires are in a secure place; Attach the upper end of clear plastic on page 25). 56 8 4 53 54 Large ... (see page 23), follow the steps below to adjust the walking belt (see HOW TO LOWER THE TREADMILL FOR USE on the treadmill decals, remove the plastic. Discard the other wires included with the 1/2" Screws (1). 13. Make sure that all parts are sheets of the Storage Latch (53) to the position shown.

Uk Manual
Page 29
... to 10 minutes of the chart (ages are essential for energy. A warm-up to five workouts each week, with 5 to make exercise a regular and enjoyable part of time. Various factors may complete up increases your training zone. Remember, proper nutrition and adequate rest are rounded off to use your "training zone...
... to 10 minutes of the chart (ages are essential for energy. A warm-up to five workouts each week, with 5 to make exercise a regular and enjoyable part of time. Various factors may complete up increases your training zone. Remember, proper nutrition and adequate rest are rounded off to use your "training zone...

Uk Manual
Page 30
... below, see the EXPLODED DRAWING near the end of this manual. PART LIST-Model No. Key No. Qty. Description 1 29 2 4 3 1 4 6 5 3 6 4 7 6 8 8 9 7 10 6 11 5 12 8 13 2 14 2 15 5 16 2 17 2 18 2 19 2 20 2 21 1 22 1 23 2 24 7 25 8 26 2 ...
... below, see the EXPLODED DRAWING near the end of this manual. PART LIST-Model No. Key No. Qty. Description 1 29 2 4 3 1 4 6 5 3 6 4 7 6 8 8 9 7 10 6 11 5 12 8 13 2 14 2 15 5 16 2 17 2 18 2 19 2 20 2 21 1 22 1 23 2 24 7 25 8 26 2 ...

Uk Manual
Page 31
... 1/2" Console Ground Screw Motor Bushing 10" Blue Wire, M/F 10" Blue Wire, 2F 6" Blue Wire, 2F 10" Red Wire, M/F 8" Black Wire, M/F 8" Green Wire, F/R User's Manual *These parts are subject to change without notice. 31 Qty. 101 1 102 1 103 1 104 1 105 1 106 1 107 1 108 1 109 1 110 1 111 1 112 4 113 2 114 1 Description Console Ground...
... 1/2" Console Ground Screw Motor Bushing 10" Blue Wire, M/F 10" Blue Wire, 2F 6" Blue Wire, 2F 10" Red Wire, M/F 8" Black Wire, M/F 8" Green Wire, F/R User's Manual *These parts are subject to change without notice. 31 Qty. 101 1 102 1 103 1 104 1 105 1 106 1 107 1 108 1 109 1 110 1 111 1 112 4 113 2 114 1 Description Console Ground...

Uk Manual
Page 36
... • the name of the product (see the front cover of this manual) • the key number and description of the replacement part(s) (see the front cover of environmental protection. To preserve the environment, this product must not be recycled after its useful life as required ...by law. ORDERING REPLACEMENT PARTS To order replacement parts, please see the PART LIST and the EXPLODED DRAWING near the end of this manual) RECYCLING INFORMATION This electronic product must be disposed of...
... • the name of the product (see the front cover of this manual) • the key number and description of the replacement part(s) (see the front cover of environmental protection. To preserve the environment, this product must not be recycled after its useful life as required ...by law. ORDERING REPLACEMENT PARTS To order replacement parts, please see the PART LIST and the EXPLODED DRAWING near the end of this manual) RECYCLING INFORMATION This electronic product must be disposed of...


