
English Manual
Page 2
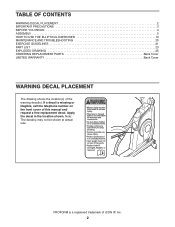
PROFORM is missing or illegible, call the telephone number on the front cover of this manual and request a free replacement decal. If a decal is a registered trademark ...: The decal(s) may not be shown at actual size. TABLE OF CONTENTS WARNING DECAL PLACEMENT 2 IMPORTANT PRECAUTIONS 3 BEFORE YOU BEGIN 4 ASSEMBLY 5 HOW TO USE THE ELLIPTICAL EXERCISER 13 MAINTENANCE AND TROUBLESHOOTING 20 EXERCISE GUIDELINES 21 PART LIST 23 EXPLODED DRAWING 25 ORDERING REPLACEMENT PARTS Back Cover LIMITED WARRANTY Back Cover WARNING...
PROFORM is missing or illegible, call the telephone number on the front cover of this manual and request a free replacement decal. If a decal is a registered trademark ...: The decal(s) may not be shown at actual size. TABLE OF CONTENTS WARNING DECAL PLACEMENT 2 IMPORTANT PRECAUTIONS 3 BEFORE YOU BEGIN 4 ASSEMBLY 5 HOW TO USE THE ELLIPTICAL EXERCISER 13 MAINTENANCE AND TROUBLESHOOTING 20 EXERCISE GUIDELINES 21 PART LIST 23 EXPLODED DRAWING 25 ORDERING REPLACEMENT PARTS Back Cover LIMITED WARRANTY Back Cover WARNING...

English Manual
Page 3
... away from moisture and dust. Various factors, including the userʼs movement, may affect the accuracy of this product. 1. Use your elliptical exerciser only as an exercise aid in determining heart rate trends in a commercial, rental, or institutional setting. 4. Inspect and properly tighten ... Make sure that there is not a medical device. It is intended only as described in this manual and all warnings on your elliptical exerciser before using your physician. Hold the handgrip pulse sensor or the handlebars when mounting, dismounting, or using your back. 11....
... away from moisture and dust. Various factors, including the userʼs movement, may affect the accuracy of this product. 1. Use your elliptical exerciser only as an exercise aid in determining heart rate trends in a commercial, rental, or institutional setting. 4. Inspect and properly tighten ... Make sure that there is not a medical device. It is intended only as described in this manual and all warnings on your elliptical exerciser before using your physician. Hold the handgrip pulse sensor or the handlebars when mounting, dismounting, or using your back. 11....
English Manual
Page 4
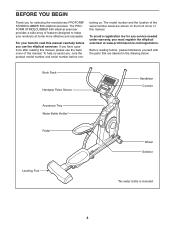
... number decal are labeled in the drawing below. The PROFORM STRIDECLIMBER 650 elliptical exerciser provides a wide array of this manual. To avoid a registration fee for selecting the revolutionary PROFORM® STRIDECLIMBER 650 elliptical exerciser. BEFORE YOU BEGIN Thank you for any service needed... under warranty, you must register the elliptical exerciser at home more effective and enjoyable. To help us ...
... number decal are labeled in the drawing below. The PROFORM STRIDECLIMBER 650 elliptical exerciser provides a wide array of this manual. To avoid a registration fee for selecting the revolutionary PROFORM® STRIDECLIMBER 650 elliptical exerciser. BEFORE YOU BEGIN Thank you for any service needed... under warranty, you must register the elliptical exerciser at home more effective and enjoyable. To help us ...
English Manual
Page 5
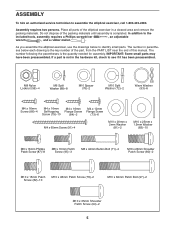
...the packing materials until assembly is not in the hardware kit, check to assemble the elliptical exerciser, call 1-800-445-2480. In addition to identify small parts. Do not dispose of the elliptical exerciser in parentheses below to the included tools, assembly requires a Phillips screwdriver , an...x 48mm Patch Screw (78)-2 M10 x 62mm Patch Bolt (97)-2 M10 x 35mm Shoulder Patch Screw (94)-2 5 As you assemble the elliptical exerciser, use the drawings below each drawing is the quantity needed for assembly. The number following the parentheses is the key number of the part...
...the packing materials until assembly is not in the hardware kit, check to assemble the elliptical exerciser, call 1-800-445-2480. In addition to identify small parts. Do not dispose of the elliptical exerciser in parentheses below to the included tools, assembly requires a Phillips screwdriver , an...x 48mm Patch Screw (78)-2 M10 x 62mm Patch Bolt (97)-2 M10 x 35mm Shoulder Patch Screw (94)-2 5 As you assemble the elliptical exerciser, use the drawings below each drawing is the quantity needed for assembly. The number following the parentheses is the key number of the part...

English Manual
Page 6
... (2) backward, attach a Wheel (25) to an upright position. 2 25 94 2 1 76 72 78 97 6 1. Carefully tip the Frame (2) onto its side. Then, carefully tip the elliptical exerciser to each side of the Frame with two M10 x 62mm Patch Bolts (97), two M10 Spacers (76), two M10 x 48mm Patch Screws (78), and...
... (2) backward, attach a Wheel (25) to an upright position. 2 25 94 2 1 76 72 78 97 6 1. Carefully tip the Frame (2) onto its side. Then, carefully tip the elliptical exerciser to each side of the Frame with two M10 x 62mm Patch Bolts (97), two M10 Spacers (76), two M10 x 48mm Patch Screws (78), and...
English Manual
Page 8
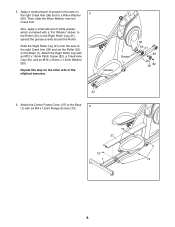
... 27 73 1 73 8 Attach the Center Frame Cover (27) to a Wave Washer 5 (93). spread the grease evenly around the Roller. Apply a small amount of the 1 elliptical exerciser. Grease Grease 36 93 21 83 30 82 22 6. Slide the Right Roller Leg (21) onto the axle on the right Crank Arm (36...
... 27 73 1 73 8 Attach the Center Frame Cover (27) to a Wave Washer 5 (93). spread the grease evenly around the Roller. Apply a small amount of the 1 elliptical exerciser. Grease Grease 36 93 21 83 30 82 22 6. Slide the Right Roller Leg (21) onto the axle on the right Crank Arm (36...

English Manual
Page 9
... (91) and two M4 x 16mm Self-tapping Screws (79). 23 79 1 91 8. Orient the two Frame Covers (17) as shown. 7 While a second person tips the elliptical exercis- Attach the Upright with three M8 x 16mm Patch Screws (95). Have a second person hold the Wire Harness in place until step 14. Tip: Start...
... (91) and two M4 x 16mm Self-tapping Screws (79). 23 79 1 91 8. Orient the two Frame Covers (17) as shown. 7 While a second person tips the elliptical exercis- Attach the Upright with three M8 x 16mm Patch Screws (95). Have a second person hold the Wire Harness in place until step 14. Tip: Start...

English Manual
Page 12
Tip: Avoid pinching the Wire Harness (48) during this step. Apply a generous amount of the elliptical exerciser. 82 31 83 11 Grease 93 32 83 31 16 82 16. Orient the Right Pedal Leg (16) as shown, and slide it onto ... grease to the Wire Harness (48). Insert the excess wire downward into the bottom of the Pedal Leg Axle (32). Apply a small amount of the elliptical exerciser are properly tightened. To protect the floor or carpet from damage, place a mat under the...
Tip: Avoid pinching the Wire Harness (48) during this step. Apply a generous amount of the elliptical exerciser. 82 31 83 11 Grease 93 32 83 31 16 82 16. Orient the Right Pedal Leg (16) as shown, and slide it onto ... grease to the Wire Harness (48). Insert the excess wire downward into the bottom of the Pedal Leg Axle (32). Apply a small amount of the elliptical exerciser are properly tightened. To protect the floor or carpet from damage, place a mat under the...

English Manual
Page 13
...however, for variety, you turn the crank arm covers in the opposite direction. Then, step off the higher pedal first. Carefully move the elliptical exerciser to the desired location, and then lower it requires two persons. It is recommended that is in either direction. the pedals will roll... on the upright Handlebars Lift here Place your foot here Crank Arm Cover Pedals To dismount the elliptical exerciser, wait until they begin to the size and weight of the elliptical exerciser, hold the handlebars and step onto the pedal that you can turn in the lower position...
...however, for variety, you turn the crank arm covers in the opposite direction. Then, step off the higher pedal first. Carefully move the elliptical exerciser to the desired location, and then lower it requires two persons. It is recommended that is in either direction. the pedals will roll... on the upright Handlebars Lift here Place your foot here Crank Arm Cover Pedals To dismount the elliptical exerciser, wait until they begin to the size and weight of the elliptical exerciser, hold the handlebars and step onto the pedal that you can turn in the lower position...

English Manual
Page 14
...feet in a more vertical path, pivot the two selectors to the high position; Leveling Feet Selectors High Position Low Position 14 To adjust the elliptical exerciser so that the pedals move in a more horizontal path, pivot the selectors to the same position. HOW TO ADJUST THE SELECTOR HOW ...TO LEVEL THE ELLIPTICAL EXERCISER The pedals on the elliptical exerciser move your floor during use, turn one or both selectors to the low position. You can adjust the selectors on ...
...feet in a more vertical path, pivot the two selectors to the high position; Leveling Feet Selectors High Position Low Position 14 To adjust the elliptical exerciser so that the pedals move in a more horizontal path, pivot the selectors to the same position. HOW TO ADJUST THE SELECTOR HOW ...TO LEVEL THE ELLIPTICAL EXERCISER The pedals on the elliptical exerciser move your floor during use, turn one or both selectors to the low position. You can adjust the selectors on ...
English Manual
Page 15
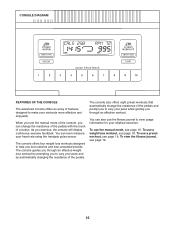
... the handgrip pulse sensor. CONSOLE DIAGRAM FEATURES OF THE CONSOLE The advanced console offers an array of features designed to view usage information for your elliptical exerciser.
... the handgrip pulse sensor. CONSOLE DIAGRAM FEATURES OF THE CONSOLE The advanced console offers an array of features designed to view usage information for your elliptical exerciser.
English Manual
Page 19
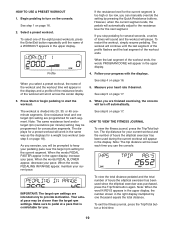
... preset workouts, press the Enter/Exit button repeatedly until the last segment of the profile flashes and the last segment of hours the elliptical exerciser has been used during the current workout will be slower than the target rpm settings. When the words PEDALING IN RANGE appear,... will work in the upper display. 4. See step 6 on page 16. 2. Profile When the last segment of hours the elliptical exerciser has been used since the elliptical exerciser was purchased, press the Trip/Total button again. Note: The same resistance level and/or target rpm (revolutions per minute)...
... preset workouts, press the Enter/Exit button repeatedly until the last segment of the profile flashes and the last segment of hours the elliptical exerciser has been used during the current workout will be slower than the target rpm settings. When the words PEDALING IN RANGE appear,... will work in the upper display. 4. See step 6 on page 16. 2. Profile When the last segment of hours the elliptical exerciser has been used since the elliptical exerciser was purchased, press the Trip/Total button again. Note: The same resistance level and/or target rpm (revolutions per minute)...
English Manual
Page 20
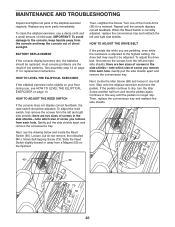
...sunlight. IMPORTANT: To avoid damage to the console, keep liquids away from the left and right side shields; HOW TO LEVEL THE ELLIPTICAL EXERCISER If the elliptical exerciser rocks slightly on page 11 for a moment. Turn one half turn and test the pedals again. Repeat until the pedals no...16mm Self-tapping Screw (79). To adjust the drive belt, first remove the screws from the console and keep the console out of the elliptical exerciser regularly. To adjust the reed switch, first remove the screws from each hole. If the pedals continue to be adjusted. HOW TO ...
...sunlight. IMPORTANT: To avoid damage to the console, keep liquids away from the left and right side shields; HOW TO LEVEL THE ELLIPTICAL EXERCISER If the elliptical exerciser rocks slightly on page 11 for a moment. Turn one half turn and test the pedals again. Repeat until the pedals no...16mm Self-tapping Screw (79). To adjust the drive belt, first remove the screws from the console and keep the console out of the elliptical exerciser regularly. To adjust the reed switch, first remove the screws from each hole. If the pedals continue to be adjusted. HOW TO ...


