

English Manual
Page 1
... Care. USERʼS MANUAL Visit our website at www.proform.com new products, prizes, fitness tips, and much more! Model No. Serial Number Decal (under frame) QUESTIONS? If you have questions, or if parts are committed...Serial No. IMPORTANT: You must note the product model number and serial number (see the drawing above for future reference. Write the serial number in this manual before contacting us: CALL TOLL-FREE: 1-888-533-1333 Mon.-Fri. 6 a.m.-6 p.m. MST ON THE WEB: www.proformservice.com CAUTION Read all precautions and instructions in the space above ) before using this manual...
... Care. USERʼS MANUAL Visit our website at www.proform.com new products, prizes, fitness tips, and much more! Model No. Serial Number Decal (under frame) QUESTIONS? If you have questions, or if parts are committed...Serial No. IMPORTANT: You must note the product model number and serial number (see the drawing above for future reference. Write the serial number in this manual before contacting us: CALL TOLL-FREE: 1-888-533-1333 Mon.-Fri. 6 a.m.-6 p.m. MST ON THE WEB: www.proformservice.com CAUTION Read all precautions and instructions in the space above ) before using this manual...
English Manual
Page 2
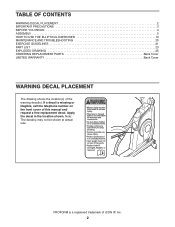
... front cover of this manual and request a free replacement decal. If a decal is a registered trademark of the warning decal(s). TABLE OF CONTENTS WARNING DECAL PLACEMENT 2 IMPORTANT PRECAUTIONS 3 BEFORE YOU BEGIN 4 ASSEMBLY 5 HOW TO USE THE ELLIPTICAL EXERCISER 13 MAINTENANCE AND TROUBLESHOOTING 20 EXERCISE GUIDELINES 21 PART LIST 23 EXPLODED DRAWING 25 ORDERING REPLACEMENT PARTS Back Cover LIMITED WARRANTY Back Cover WARNING DECAL PLACEMENT The drawing shows the location(s) of ICON IP...
... front cover of this manual and request a free replacement decal. If a decal is a registered trademark of the warning decal(s). TABLE OF CONTENTS WARNING DECAL PLACEMENT 2 IMPORTANT PRECAUTIONS 3 BEFORE YOU BEGIN 4 ASSEMBLY 5 HOW TO USE THE ELLIPTICAL EXERCISER 13 MAINTENANCE AND TROUBLESHOOTING 20 EXERCISE GUIDELINES 21 PART LIST 23 EXPLODED DRAWING 25 ORDERING REPLACEMENT PARTS Back Cover LIMITED WARRANTY Back Cover WARNING DECAL PLACEMENT The drawing shows the location(s) of ICON IP...

English Manual
Page 3
... on your elliptical exerciser before using your elliptical exerciser in general. 12. Do not use only. Place your elliptical exerciser on your elliptical exerciser at all parts regularly. Various factors, including the userʼs movement, may affect the accuracy of this manual. 3 The pulse sensor is enough clearance around your elliptical exerciser only as an exercise aid in determining heart rate trends in a commercial, rental, or institutional setting. 4. Keep your elliptical exerciser indoors...
... on your elliptical exerciser before using your elliptical exerciser in general. 12. Do not use only. Place your elliptical exerciser on your elliptical exerciser at all parts regularly. Various factors, including the userʼs movement, may affect the accuracy of this manual. 3 The pulse sensor is enough clearance around your elliptical exerciser only as an exercise aid in determining heart rate trends in a commercial, rental, or institutional setting. 4. Keep your elliptical exerciser indoors...
English Manual
Page 4
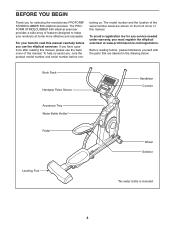
... any service needed under warranty, you must register the elliptical exerciser at home more effective and enjoyable. If you have questions after reading this manual. Book Rack Handgrip Pulse Sensor Handlebar Console Accessory Tray Water Bottle Holder* Pedal Wheel Selector Leveling Foot *No water bottle is included 4 The PROFORM STRIDECLIMBER 650 elliptical exerciser provides a wide array of this manual carefully before you , note the product model number and serial number before...
... any service needed under warranty, you must register the elliptical exerciser at home more effective and enjoyable. If you have questions after reading this manual. Book Rack Handgrip Pulse Sensor Handlebar Console Accessory Tray Water Bottle Holder* Pedal Wheel Selector Leveling Foot *No water bottle is included 4 The PROFORM STRIDECLIMBER 650 elliptical exerciser provides a wide array of this manual carefully before you , note the product model number and serial number before...
English Manual
Page 5
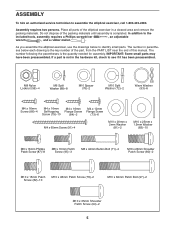
... parts may have been preassembled. The number following the parentheses is the key number of the part, from the PART LIST near the end of this manual. If a part is completed. The number in a cleared area and remove the packing materials. ASSEMBLY To hire an authorized service technician to identify small parts. As you assemble the elliptical exerciser, use the drawings below each drawing is the quantity needed for assembly. Assembly...
... parts may have been preassembled. The number following the parentheses is the key number of the part, from the PART LIST near the end of this manual. If a part is completed. The number in a cleared area and remove the packing materials. ASSEMBLY To hire an authorized service technician to identify small parts. As you assemble the elliptical exerciser, use the drawings below each drawing is the quantity needed for assembly. Assembly...

English Manual
Page 6
... assembly easier, read the 1 information on page 5 before you begin. While a second person tips the Frame (2) backward, attach a Wheel (25) to an upright position. 2 25 94 2 1 76 72 78 97 6 Then, carefully tip the elliptical exerciser to each side of the Frame with two M10 x 62mm Patch Bolts (97), two M10 Spacers (76), two M10 x 48mm Patch Screws...
... assembly easier, read the 1 information on page 5 before you begin. While a second person tips the Frame (2) backward, attach a Wheel (25) to an upright position. 2 25 94 2 1 76 72 78 97 6 Then, carefully tip the elliptical exerciser to each side of the Frame with two M10 x 62mm Patch Bolts (97), two M10 Spacers (76), two M10 x 48mm Patch Screws...
English Manual
Page 8
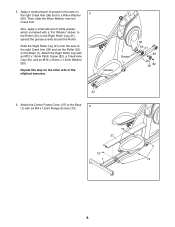
... x 12mm Flange Screws (73). 73 27 73 1 73 8 Repeat this step for the other side of grease to the axle on the right Crank Arm (36) and to the Roller (22) on the Base (1). Slide the Right Roller Leg (21) onto the axle on the right Crank Arm (36) and set the Roller (22) on the Right Roller Leg (21); Attach the Center Frame Cover (27...
... x 12mm Flange Screws (73). 73 27 73 1 73 8 Repeat this step for the other side of grease to the axle on the right Crank Arm (36) and to the Roller (22) on the Base (1). Slide the Right Roller Leg (21) onto the axle on the right Crank Arm (36) and set the Roller (22) on the Right Roller Leg (21); Attach the Center Frame Cover (27...

English Manual
Page 11
... diagram inside the battery compart- Make sure to reattach the battery cover, remove the battery screws, loosen the indicated console screws a few turns, insert the lower edge of the battery cover into an outlet installed in accordance with all local codes and ordinances. To purchase an optional AC adapter, contact the store where you may damage the console displays or other end into the console, and then retighten the console screws...
... diagram inside the battery compart- Make sure to reattach the battery cover, remove the battery screws, loosen the indicated console screws a few turns, insert the lower edge of the battery cover into an outlet installed in accordance with all local codes and ordinances. To purchase an optional AC adapter, contact the store where you may damage the console displays or other end into the console, and then retighten the console screws...

English Manual
Page 12
... the right side of the elliptical exerciser are properly tightened. Repeat this step. While a second person holds the Console (5) 14 near the Upright (6), connect the console wire to a Pedal 15 Leg Axle (32). Insert the Pedal Leg Axle into the Upright. Orient the Right Pedal Leg (16) as shown, and slide it onto the Pedal Leg Axle (32). Make sure that all parts of the Pedal Leg Axle (32). Insert the...
... the right side of the elliptical exerciser are properly tightened. Repeat this step. While a second person holds the Console (5) 14 near the Upright (6), connect the console wire to a Pedal 15 Leg Axle (32). Insert the Pedal Leg Axle into the Upright. Orient the Right Pedal Leg (16) as shown, and slide it onto the Pedal Leg Axle (32). Make sure that all parts of the Pedal Leg Axle (32). Insert the...

English Manual
Page 13
... elliptical exerciser will continue to move with a continuous motion. Pull on the upright Handlebars Lift here Place your foot here Crank Arm Cover Pedals To dismount the elliptical exerciser, wait until they begin to move until the flywheel stops. HOW TO USE THE ELLIPTICAL EXERCISER HOW TO MOVE THE ELLIPTICAL EXERCISER Due to the size and weight of the elliptical exerciser, hold the handlebars and step onto the pedal that you can turn in either direction...
... elliptical exerciser will continue to move with a continuous motion. Pull on the upright Handlebars Lift here Place your foot here Crank Arm Cover Pedals To dismount the elliptical exerciser, wait until they begin to move until the flywheel stops. HOW TO USE THE ELLIPTICAL EXERCISER HOW TO MOVE THE ELLIPTICAL EXERCISER Due to the size and weight of the elliptical exerciser, hold the handlebars and step onto the pedal that you can turn in either direction...
English Manual
Page 15
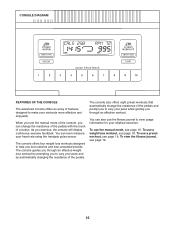
... make your heart rate using the handgrip pulse sensor. The console also offers eight preset workouts that automatically change the resistance of the pedals with the touch of the console, you use the manual mode of a button. To use a weight loss workout, see page 19. To use the manual mode, see page 19. 15 When you can even measure your workouts more effective and enjoyable. The console guides you exercise, the console will display continuous exercise feedback. As...
... make your heart rate using the handgrip pulse sensor. The console also offers eight preset workouts that automatically change the resistance of the pedals with the touch of the console, you use the manual mode of a button. To use a weight loss workout, see page 19. To use the manual mode, see page 19. 15 When you can even measure your workouts more effective and enjoyable. The console guides you exercise, the console will display continuous exercise feedback. As...
English Manual
Page 16
... distance (total revolutions) you use the handgrip pulse sensor (see step 5 on page 17). After several seconds, the display mode will also show the approximate number of the pedals for the pedals to turn on the console, the displays will show the time remaining in revolutions per minute (rpm). Each time you turn on the console. As you can change the display mode, press the Display button repeatedly until the desired exercise information...
... distance (total revolutions) you use the handgrip pulse sensor (see step 5 on page 17). After several seconds, the display mode will also show the approximate number of the pedals for the pedals to turn on the console, the displays will show the time remaining in revolutions per minute (rpm). Each time you turn on the console. As you can change the display mode, press the Display button repeatedly until the desired exercise information...

English Manual
Page 17
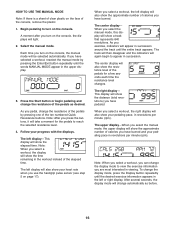
... display. If the pedals do not move your palms Contacts resting against the metal contacts. 5. Measure your hands or gripping the contacts tightly. To measure your heart rate, hold the contacts for about five minutes, the console will turn off and the display will show your heart rate is detected, a heartshaped symbol will be reset. 17 Note: If you are finished exercising...
... display. If the pedals do not move your palms Contacts resting against the metal contacts. 5. Measure your hands or gripping the contacts tightly. To measure your heart rate, hold the contacts for about five minutes, the console will turn off and the display will show your heart rate is detected, a heartshaped symbol will be reset. 17 Note: If you are finished exercising...
English Manual
Page 18
... and the last segment of tones will sound and the workout will begin pedaling to alert you can manually override the setting by pressing the Quick Resistance buttons. Press Start or begin to keep your pace. When the words PEDAL FASTER appear in the display for the current segment. Each weight loss workout is too high or too low, you . The flashing segment...
... and the last segment of tones will sound and the workout will begin pedaling to alert you can manually override the setting by pressing the Quick Resistance buttons. Press Start or begin to keep your pace. When the words PEDAL FASTER appear in the display for the current segment. Each weight loss workout is too high or too low, you . The flashing segment...
English Manual
Page 19
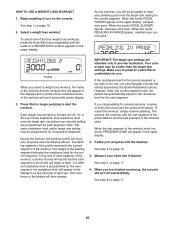
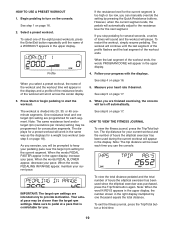
... display. The trip distance for a weight loss workout (see step 3 on the console. If you stop pedaling for each time you use the console. When you . To exit the fitness journal, press the Trip/Total button a third time. 19 However, when the current segment ends, the pedals will scroll across the center display. See step 5 on page 17. As you exercise, you will be prompted to the resistance...
... display. The trip distance for a weight loss workout (see step 3 on the console. If you stop pedaling for each time you use the console. When you . To exit the fitness journal, press the Trip/Total button a third time. 19 However, when the current segment ends, the pedals will scroll across the center display. See step 5 on page 17. As you exercise, you will be prompted to the resistance...
English Manual
Page 20
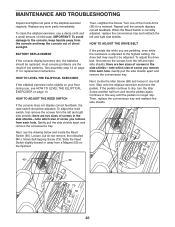
... shields; most console problems are two sizes of screws in the side shields-note which size of direct sunlight. Repeat until the pedals no longer slip. Continue in the side shields-note which size of the Crank Arms (36) for replacement instructions. Loosen, but do not remove, the indicated M4 x 16mm Self-tapping Screw (79). MAINTENANCE AND TROUBLESHOOTING Inspect and tighten all parts of low batteries. If the pedals continue to...
... shields; most console problems are two sizes of screws in the side shields-note which size of direct sunlight. Repeat until the pedals no longer slip. Continue in the side shields-note which size of the Crank Arms (36) for replacement instructions. Loosen, but do not remove, the indicated M4 x 16mm Self-tapping Screw (79). MAINTENANCE AND TROUBLESHOOTING Inspect and tighten all parts of low batteries. If the pedals continue to...
English Manual
Page 21
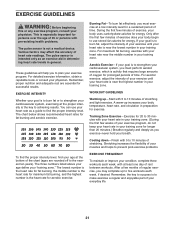
... workouts each week, with pre-existing health problems. The pulse sensor is near the middle number in general. EXERCISE FREQUENCY To maintain or improve your physician. Remember, the key to success is especially important for longer than 20 minutes.) Breathe regularly and deeply as an exercise aid in determining heart rate trends in your body uses carbohydrate calories for a sustained period of exercise, your training...
... workouts each week, with pre-existing health problems. The pulse sensor is near the middle number in general. EXERCISE FREQUENCY To maintain or improve your physician. Remember, the key to success is especially important for longer than 20 minutes.) Breathe regularly and deeply as an exercise aid in determining heart rate trends in your body uses carbohydrate calories for a sustained period of exercise, your training...
English Manual
Page 23
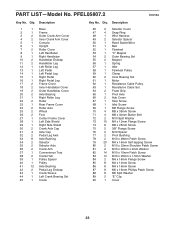
... Axle Bushing 42 2 Pedal Leg Endcap 43 1 Crank Sleeve 44 1 Left Crank Bearing Set 45 1 Crank Key No. PART LIST-Model No. Description 46 2 Selector Cover 47 4 Snap Ring 48 1 Wire Harness 49 2 Selector Spacer 50 1 Reed Switch/Wire 51 1 Belt 52 1 Flywheel 53 1 "C" Magnet 54 2 Outer Bearing Set 55 2 Magnet 56 1 Spring 57 1 Idler 58 1 Flywheel Pulley 59 1 Clamp 60 2 Inner Bearing Set 61 1 Motor 62 1 Resistance Cable Pulley 63 1 Resistance Cable Set 64 2 Foam...
... Axle Bushing 42 2 Pedal Leg Endcap 43 1 Crank Sleeve 44 1 Left Crank Bearing Set 45 1 Crank Key No. PART LIST-Model No. Description 46 2 Selector Cover 47 4 Snap Ring 48 1 Wire Harness 49 2 Selector Spacer 50 1 Reed Switch/Wire 51 1 Belt 52 1 Flywheel 53 1 "C" Magnet 54 2 Outer Bearing Set 55 2 Magnet 56 1 Spring 57 1 Idler 58 1 Flywheel Pulley 59 1 Clamp 60 2 Inner Bearing Set 61 1 Motor 62 1 Resistance Cable Pulley 63 1 Resistance Cable Set 64 2 Foam...

English Manual
Page 24
Qty. Hex Key 95 3 M8 x 16mm Patch Screw * - Userʼs Manual Specifications are not illustrated. 24 Qty. Description 91 4 M4 x 65mm Screw 97 2 M10 x 62mm Patch Bolt 92 1 M4 x 12mm Screw 98 2 Selector Axle Cap 93 8 Wave Washer 99 1 Right Crank Bearing Set 94 2 M10 X 35mm Shoulder Patch Screw * - Grease Packet 96 6 M8 Nylon Locknut * - See the back cover of this manual for information about ordering replacement parts. *These parts are subject to change without notice. Key No. Description Key No.
Qty. Hex Key 95 3 M8 x 16mm Patch Screw * - Userʼs Manual Specifications are not illustrated. 24 Qty. Description 91 4 M4 x 65mm Screw 97 2 M10 x 62mm Patch Bolt 92 1 M4 x 12mm Screw 98 2 Selector Axle Cap 93 8 Wave Washer 99 1 Right Crank Bearing Set 94 2 M10 X 35mm Shoulder Patch Screw * - Grease Packet 96 6 M8 Nylon Locknut * - See the back cover of this manual for information about ordering replacement parts. *These parts are subject to change without notice. Key No. Description Key No.
English Manual
Page 28
... of enjoyment or use, costs of removal or installation or other warranty beyond that specifically set forth herein. ICON is shipped to a service center, freight charges to you . Accordingly, the above is warranted for a lifetime from the date of merchantability or fitness for a period of one of this manual) LIMITED WARRANTY ICON Health & Fitness, Inc. (ICON) warrants this manual. This warranty extends only to state. Parts and labor are...
... of enjoyment or use, costs of removal or installation or other warranty beyond that specifically set forth herein. ICON is shipped to a service center, freight charges to you . Accordingly, the above is warranted for a lifetime from the date of merchantability or fitness for a period of one of this manual) LIMITED WARRANTY ICON Health & Fitness, Inc. (ICON) warrants this manual. This warranty extends only to state. Parts and labor are...

