
English Manual
Page 1
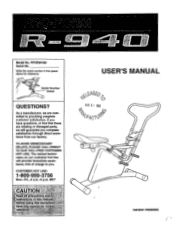
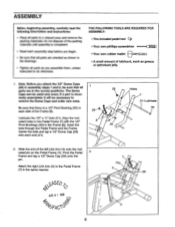
... line will guarantee you . TO AVOID UNNECESSARY DELAYS, PLEASE CALL DIRECT TO OUR TOLL-FREE CUSTOMER HOT LINE. PFCR94160 Serial No. CUSTOMER HOT LINE: 1-800-999-3756 Mon.-Fri., 6 a.m.-6 p.m. MST CAUTION Re=ad all ptecautions and instructions inplamanual 604rP using this equlpmenL Save this manual fot fuhite reference. Model No. Write the serial number in the space above for reference.
... line will guarantee you . TO AVOID UNNECESSARY DELAYS, PLEASE CALL DIRECT TO OUR TOLL-FREE CUSTOMER HOT LINE. PFCR94160 Serial No. CUSTOMER HOT LINE: 1-800-999-3756 Mon.-Fri., 6 a.m.-6 p.m. MST CAUTION Re=ad all ptecautions and instructions inplamanual 604rP using this equlpmenL Save this manual fot fuhite reference. Model No. Write the serial number in the space above for reference.
English Manual
Page 2
-4 TABLE OF CONTENTS IMPORTANT PRECAUTIONS BEFORE YOU BEGIN ASSEMBLY HOW TO USE THE R-940 MAINTENANCE CONDITIONING GUIDELINES PART LIST EXPLODED DRAWING ORDERING REPLACEMENT PARTS LIMITED WARRANTY 3 4 5 8 11 12 14 15 Back Cover Back Cover PROFORM is a registered trademark of ICON Health & Fitness, Inc. 2
-4 TABLE OF CONTENTS IMPORTANT PRECAUTIONS BEFORE YOU BEGIN ASSEMBLY HOW TO USE THE R-940 MAINTENANCE CONDITIONING GUIDELINES PART LIST EXPLODED DRAWING ORDERING REPLACEMENT PARTS LIMITED WARRANTY 3 4 5 8 11 12 14 15 Back Cover Back Cover PROFORM is a registered trademark of ICON Health & Fitness, Inc. 2
English Manual
Page 3
...adjusting the position of the owner to ensure • that could become caught on the seat to make sure that the seat knob is especially ii: important for foot protection. If you feel pain or dizziness while exercising, stop immediately and begin cooling down . , WARNINGi Before beginning Ulla or any worn parts immediately. ICON a-rssum. M1G 0 1 1996 Informed...at all instructions'in this product. ' ' - Replace any exercise program, consult your back. 11. Do not use of the holes in the seat frame. VSED 4t- Never allow more than one of this manual before using. IMPORTANT ...
...adjusting the position of the owner to ensure • that could become caught on the seat to make sure that the seat knob is especially ii: important for foot protection. If you feel pain or dizziness while exercising, stop immediately and begin cooling down . , WARNINGi Before beginning Ulla or any worn parts immediately. ICON a-rssum. M1G 0 1 1996 Informed...at all instructions'in this product. ' ' - Replace any exercise program, consult your back. 11. Do not use of the holes in the seat frame. VSED 4t- Never allow more than one of this manual before using. IMPORTANT ...
English Manual
Page 4
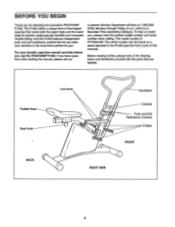
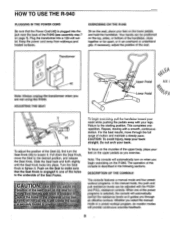
... Seat Seat Knob BACK Link Arms ri 0 00 0 Handlebar Console Push and Pull Resistance Controls Pedals FRONT RIGHT SIDE 4 The model number is PFCR94160. The serial number can be found on a decal attached to the level that works both the upper body and the lower body for selecting the innovative PROFORM• R-940. The R-940 offers a unique form of this manual carefully before you , please note the product model number and serial number when...
... Seat Seat Knob BACK Link Arms ri 0 00 0 Handlebar Console Push and Pull Resistance Controls Pedals FRONT RIGHT SIDE 4 The model number is PFCR94160. The serial number can be found on a decal attached to the level that works both the upper body and the lower body for selecting the innovative PROFORM• R-940. The R-940 offers a unique form of this manual carefully before you , please note the product model number and serial number when...
English Manual
Page 5
...; A small amount of the left Link Arm (4) onto the indicated pin on the Pedal Frame (7). if a part is a 1/2" Pivot Bushing (25) in each assembly step before you attach the 1/2" Dome Caps (29) in the Frame (6). Attach the right Link Arm (4) to remove the Dome Caps and order new ones. Slide the end of lubricant, such as grease or petroleum jelly. 1. Note: Before...
...; A small amount of the left Link Arm (4) onto the indicated pin on the Pedal Frame (7). if a part is a 1/2" Pivot Bushing (25) in each assembly step before you attach the 1/2" Dome Caps (29) in the Frame (6). Attach the right Link Arm (4) to remove the Dome Caps and order new ones. Slide the end of lubricant, such as grease or petroleum jelly. 1. Note: Before...

English Manual
Page 6
... (7). Lubricate the indicated axles on the Seat to tighten it . Slide the Seat (3) onto the Seat Frame (5) and move the Seat to loosen it. Turn the Seat Knob to make sure that the Pedals are turned as shown. Push on the Pedal Frame (7). Be sure that the Seat Knob is *timed as shown in the Inset drawing, with four #8 x 1/2" Screws (16). 2 13 7 16 13 16 0 4. Attach two Pedals...
... (7). Lubricate the indicated axles on the Seat to tighten it . Slide the Seat (3) onto the Seat Frame (5) and move the Seat to loosen it. Turn the Seat Knob to make sure that the Pedals are turned as shown. Push on the Pedal Frame (7). Be sure that the Seat Knob is *timed as shown in the Inset drawing, with four #8 x 1/2" Screws (16). 2 13 7 16 13 16 0 4. Attach two Pedals...

English Manual
Page 7
Attach the Console (1) to the Frame (6) with four #8 x 1/2" Scrgws (16). 6 1 / 7. Plug the Wire Harness (28) into the Power Plug (40) as shown. 7 28 Jack • 16 1 28 O 40 42 *Note: Vile extra JIG x 1/2" Screw, one extra 1/2" Dome Cap, and extra 1/2' Push Nuts may have been included. 7 Plug the Power Cord (42) into the jack on the back of the Console (1) (see the inset drawing). 6.
Attach the Console (1) to the Frame (6) with four #8 x 1/2" Scrgws (16). 6 1 / 7. Plug the Wire Harness (28) into the Power Plug (40) as shown. 7 28 Jack • 16 1 28 O 40 42 *Note: Vile extra JIG x 1/2" Screw, one extra 1/2" Dome Cap, and extra 1/2' Push Nuts may have been included. 7 Plug the Power Cord (42) into the jack on the back of the Console (1) (see the inset drawing). 6.
English Manual
Page 8
... THE CONSOLE The console features a manual mode and four preset workout programs. In the manual mode, the push and pull resistance levels can be adjusted with a smooth, continuous motion. Whether you through the full range of the seat. Repeat, moving with the PUSH and PULL resistance controls. Push on the lower pedals, and hold the handlebar. seat . HOW TO USE THE R-940 PLUGGING IN THE POWER CORD Be sure that the Power Cord...
... THE CONSOLE The console features a manual mode and four preset workout programs. In the manual mode, the push and pull resistance levels can be adjusted with a smooth, continuous motion. Whether you through the full range of the seat. Repeat, moving with the PUSH and PULL resistance controls. Push on the lower pedals, and hold the handlebar. seat . HOW TO USE THE R-940 PLUGGING IN THE POWER CORD Be sure that the Power Cord...
English Manual
Page 9
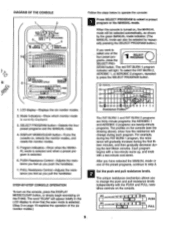
..., and then gradually decrease during the FAT BURN 1 program, the resistance will light. MIN. LCD display-Displays the six monitor modes. 2. STEP-BY-STEP CONSOLE OPERATION To turn on the console, press the DISPLAY MODE/CLEAR button, or simply begin exercising on , selects the monitor modes, and resets the monitor modes. 5. PULL Resistance Control-Adjusts the resistance you feel as shown by the green MANUAL mode indicator. (The MANUAL mode can also be selected automatically, as you pull the...
..., and then gradually decrease during the FAT BURN 1 program, the resistance will light. MIN. LCD display-Displays the six monitor modes. 2. STEP-BY-STEP CONSOLE OPERATION To turn on the console, press the DISPLAY MODE/CLEAR button, or simply begin exercising on , selects the monitor modes, and resets the monitor modes. 5. PULL Resistance Control-Adjusts the resistance you feel as shown by the green MANUAL mode indicator. (The MANUAL mode can also be selected automatically, as you pull the...
English Manual
Page 10
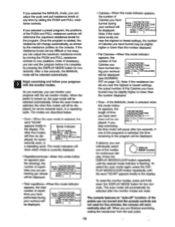
... adjust the maximum resistance levels by sliding the PUSH and PULL resistance controls. After a few seconds, the MANUAL mode will change automatically, as shown by pressing the DISPLAY MODE button for five minutes, the console will automatically be slightly higher or lower than the number displayed. • Time-If the MANUAL mode is flashing. I I FAT""1"1!''' CEPS. To reset the monitor modes, press and hold down the DISPLAY MODE button for the program. The modes are not used...
... adjust the maximum resistance levels by sliding the PUSH and PULL resistance controls. After a few seconds, the MANUAL mode will change automatically, as shown by pressing the DISPLAY MODE button for five minutes, the console will automatically be slightly higher or lower than the number displayed. • Time-If the MANUAL mode is flashing. I I FAT""1"1!''' CEPS. To reset the monitor modes, press and hold down the DISPLAY MODE button for the program. The modes are not used...
English Manual
Page 11
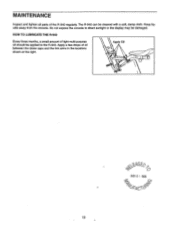
HOW TO LUBRICATE THE R-940 Every three months, a small amount of light multi-purpose oil should be damaged. Do not expose the console to direct sunlight or the display may be applied to the R-940. Apply a few drops of the R-940 regularly. Keep liquids away from the console. Apply Oil MAINTENANCE Inspect and tighten all parts of oil between the dome caps and the link arms in the locations shown at the right. The R-940 can be cleaned with a soft, damp cloth.
HOW TO LUBRICATE THE R-940 Every three months, a small amount of light multi-purpose oil should be damaged. Do not expose the console to direct sunlight or the display may be applied to the R-940. Apply a few drops of the R-940 regularly. Keep liquids away from the console. Apply Oil MAINTENANCE Inspect and tighten all parts of oil between the dome caps and the link arms in the locations shown at the right. The R-940 can be cleaned with a soft, damp cloth.
English Manual
Page 12
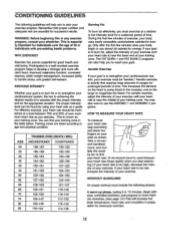
..., controlled stretches, and progress to more efficient heart, improved respiratory function, increased stamina, better weight management, increased ability to strengthen your cardiovascular system, your exercise program. This increases the demand on the heart to pump blood to the muscles, and on your body begin to use the AEROBIC 1 and AEROBIC 2 programs. HOW TO MEASURE YOUR HEART RATE To measure your heart rate, stop exercising.) If...
..., controlled stretches, and progress to more efficient heart, improved respiratory function, increased stamina, better weight management, increased ability to strengthen your cardiovascular system, your exercise program. This increases the demand on the heart to pump blood to the muscles, and on your body begin to use the AEROBIC 1 and AEROBIC 2 programs. HOW TO MEASURE YOUR HEART RATE To measure your heart rate, stop exercising.) If...
English Manual
Page 13
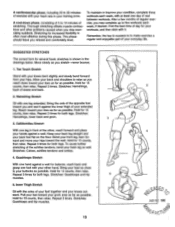
...and your back leg as possible. Bend your front leg, lean forward and move your hips toward your toes as far as close to five workouts each week, with your heart rate in front of the other problems caused when ...form for 15 counts, then relax. Calf/Achilles Stretch With one day of rest between workouts. Stretching for both legs. Repeat 3 times for increased flexibility is to 30 minutes of exercise with at least one leg in your training zone. Repeat 3 times for 15 counts, then relax. A cardiovascular phase, including 20 to make exercise a regular and enjoyable part...
...and your back leg as possible. Bend your front leg, lean forward and move your hips toward your toes as far as close to five workouts each week, with your heart rate in front of the other problems caused when ...form for 15 counts, then relax. Calf/Achilles Stretch With one day of rest between workouts. Stretching for both legs. Repeat 3 times for increased flexibility is to 30 minutes of exercise with at least one leg in your training zone. Repeat 3 times for 15 counts, then relax. A cardiovascular phase, including 20 to make exercise a regular and enjoyable part...
English Manual
Page 14
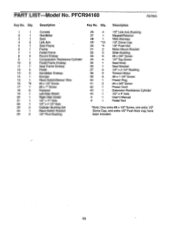
...Mount Bracket 32 5 Slide Bushing 33 6 #8 x 3/4" Screw 34 4 1/4" Tap Screw 35 1 Seat Knob 36 1 Seat Bracket 37 2 1/2" x 2 1/4" Bushing 38 2 Tension Motor 39 5 #8 x 1 1/4" Screw 40 1 Power Plug 41 2 #6 x 3/8" Screw 42 1 Power Cord 43 1 Extension Resistance Cylinder 44 1/2" x 4" Axle 1 User's Manual 1 Pedal Tool *Note: One extra #8 x 1/2" Screw, one extra 1/2" Dome Cap, and extra 1/2" Push Nuts may have been included. 14 PART LIST Model No. PFCR94160 R0796A Key No. Qty. Qty. 1 1 2 1 3 1 4 2 5 1 6 1 7 1 8 4 9 1 10 2 11 1 12...
...Mount Bracket 32 5 Slide Bushing 33 6 #8 x 3/4" Screw 34 4 1/4" Tap Screw 35 1 Seat Knob 36 1 Seat Bracket 37 2 1/2" x 2 1/4" Bushing 38 2 Tension Motor 39 5 #8 x 1 1/4" Screw 40 1 Power Plug 41 2 #6 x 3/8" Screw 42 1 Power Cord 43 1 Extension Resistance Cylinder 44 1/2" x 4" Axle 1 User's Manual 1 Pedal Tool *Note: One extra #8 x 1/2" Screw, one extra 1/2" Dome Cap, and extra 1/2" Push Nuts may have been included. 14 PART LIST Model No. PFCR94160 R0796A Key No. Qty. Qty. 1 1 2 1 3 1 4 2 5 1 6 1 7 1 8 4 9 1 10 2 11 1 12...
English Manual
Page 15
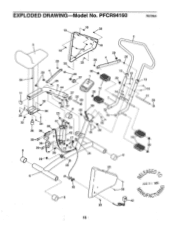
PFCR94160 R0796A . 18 19 2 3 18 18 29 4 26 26 1 33\4, -4 26 33 • 4 29 30 29 37 1 32 / 26 OO 13 1n6 . 29 5 44 12 11 O. 37 30 14 32 22 29 7 27 36 23 28 25 10 -Qs': 32 ci 4,1 34 31 28 35 38 23 43 6.. %" 1 6 25 16 9 17 12 31 38 4.1 39 23 5 8 28. 24 8 13 16 21 29 30 29 6 41 20 VSED 7 AUG 0 1 1996 40 CD. 8 OFAC 42 EXPLODED DRAWING Model No.
PFCR94160 R0796A . 18 19 2 3 18 18 29 4 26 26 1 33\4, -4 26 33 • 4 29 30 29 37 1 32 / 26 OO 13 1n6 . 29 5 44 12 11 O. 37 30 14 32 22 29 7 27 36 23 28 25 10 -Qs': 32 ci 4,1 34 31 28 35 38 23 43 6.. %" 1 6 25 16 9 17 12 31 38 4.1 39 23 5 8 28. 24 8 13 16 21 29 30 29 6 41 20 VSED 7 AUG 0 1 1996 40 CD. 8 OFAC 42 EXPLODED DRAWING Model No.
English Manual
Page 16
... this warranty is limited in connection with the use , costs of removal, installation or other transportation charges prepaid, accompanied by ICON. Accordingly; All returns must be prepared to give the following information: • The MODEL NUMBER of the product (PFCR94160). • The NAME of the product (PROFORM® R-940). • The SERIAL NUMBER of the product (see the front cover of this manual). • The KEY NUMBER...
... this warranty is limited in connection with the use , costs of removal, installation or other transportation charges prepaid, accompanied by ICON. Accordingly; All returns must be prepared to give the following information: • The MODEL NUMBER of the product (PFCR94160). • The NAME of the product (PROFORM® R-940). • The SERIAL NUMBER of the product (see the front cover of this manual). • The KEY NUMBER...

