
English Manual
Page 2
... 3 BEFORE YOU BEGIN 7 PART IDENTIFICATION CHART 8 ASSEMBLY 9 THE CHEST HEART RATE MONITOR 17 HOW TO USE THE TREADMILL 18 HOW TO FOLD AND MOVE THE TREADMILL 32 MAINTENANCE AND TROUBLESHOOTING 33 EXERCISE GUIDELINES 36 PART LIST 39 EXPLODED DRAWING 40 ORDERING REPLACEMENT PARTS Back Cover LIMITED WARRANTY Back Cover WARNING DECAL PLACEMENT This drawing shows the locations of Bluetooth SIG, Inc. Note: The decals may not be shown at actual size. and are trademarks of...
... 3 BEFORE YOU BEGIN 7 PART IDENTIFICATION CHART 8 ASSEMBLY 9 THE CHEST HEART RATE MONITOR 17 HOW TO USE THE TREADMILL 18 HOW TO FOLD AND MOVE THE TREADMILL 32 MAINTENANCE AND TROUBLESHOOTING 33 EXERCISE GUIDELINES 36 PART LIST 39 EXPLODED DRAWING 40 ORDERING REPLACEMENT PARTS Back Cover LIMITED WARRANTY Back Cover WARNING DECAL PLACEMENT This drawing shows the locations of Bluetooth SIG, Inc. Note: The decals may not be shown at actual size. and are trademarks of...
English Manual
Page 3
The treadmill is intended for home use the treadmill in sandals. 3. The treadmill is not intended for their safety. 4. If the control system is turned off. Never move the walking belt while the power is damaged, the walking belt may result in a fall and serious injury. 16. Do not operate the treadmill if the power cord or plug is damaged, or if the treadmill is not working properly.) 18. IMPORTANT...
The treadmill is intended for home use the treadmill in sandals. 3. The treadmill is not intended for their safety. 4. If the control system is turned off. Never move the walking belt while the power is damaged, the walking belt may result in a fall and serious injury. 16. Do not operate the treadmill if the power cord or plug is damaged, or if the treadmill is not working properly.) 18. IMPORTANT...
English Manual
Page 4
... maintenance and adjustment procedures described in serious injury or death. vice representative only. 31. When folding or moving walking belt. 28. Always remove the key, press the power switch into any opening on page 7 for the location of heart rate readings. Always unplug the power cord immediately after use . 25. IMPORTANT: To satisfy exposure compliance requirements, the antenna and transmitter in the console must be near or connected to move the treadmill...
... maintenance and adjustment procedures described in serious injury or death. vice representative only. 31. When folding or moving walking belt. 28. Always remove the key, press the power switch into any opening on page 7 for the location of heart rate readings. Always unplug the power cord immediately after use . 25. IMPORTANT: To satisfy exposure compliance requirements, the antenna and transmitter in the console must be near or connected to move the treadmill...
English Manual
Page 7
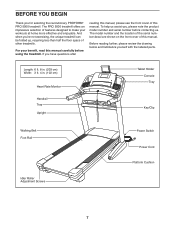
... below and familiarize yourself with the labeled parts. Length: 6 ft. 8 in. (203 cm) Width: 3 ft. 4 in. (102 cm) Heart Rate Monitor Handrail Tray Upright Tablet Holder Console Tray Key/Clip Walking Belt Foot Rail Idler Roller Adjustment Screws Power Switch Power Cord Platform Cushion 7 BEFORE YOU BEGIN Thank you , please note the product model number and serial number before using the treadmill. To help us assist you for selecting the revolutionary PROFORM® PRO 5000 treadmill.
... below and familiarize yourself with the labeled parts. Length: 6 ft. 8 in. (203 cm) Width: 3 ft. 4 in. (102 cm) Heart Rate Monitor Handrail Tray Upright Tablet Holder Console Tray Key/Clip Walking Belt Foot Rail Idler Roller Adjustment Screws Power Switch Power Cord Platform Cushion 7 BEFORE YOU BEGIN Thank you , please note the product model number and serial number before using the treadmill. To help us assist you for selecting the revolutionary PROFORM® PRO 5000 treadmill.

English Manual
Page 13
... connec- IF YOU DO NOT CONNECT THE CONNECTORS PROPERLY, THE CONSOLE MAY BECOME DAMAGED WHEN YOU TURN ON THE POWER. start all four Screws, and then tighten them. Then, remove any wire ties C from the Upright Wire. With the help of the 5/16" x 2" Screws (2) that you removed in step 3, two 5/16" 2 Star Washers (8), and two #10 x 3/4" Screws (6); Connect the Upright Wire (83) to the console wire (E). tors should slide together...
... connec- IF YOU DO NOT CONNECT THE CONNECTORS PROPERLY, THE CONSOLE MAY BECOME DAMAGED WHEN YOU TURN ON THE POWER. start all four Screws, and then tighten them. Then, remove any wire ties C from the Upright Wire. With the help of the 5/16" x 2" Screws (2) that you removed in step 3, two 5/16" 2 Star Washers (8), and two #10 x 3/4" Screws (6); Connect the Upright Wire (83) to the console wire (E). tors should slide together...

English Manual
Page 18
... installed by a qualified electrician. IMPORTANT: If the treadmill is connected to an AFCI-equipped outlet and your home's power. The outlet must be connected with a grounding pin (see precaution 14 on or off. Before using an adapter, contact a qualified electrician to indicate whether it is not available. 2 2-pole Receptacle Adapter Lug Metal Screw The lug or wire extending from other appliances being turned...
... installed by a qualified electrician. IMPORTANT: If the treadmill is connected to an AFCI-equipped outlet and your home's power. The outlet must be connected with a grounding pin (see precaution 14 on or off. Before using an adapter, contact a qualified electrician to indicate whether it is not available. 2 2-pole Receptacle Adapter Lug Metal Screw The lug or wire extending from other appliances being turned...
English Manual
Page 19
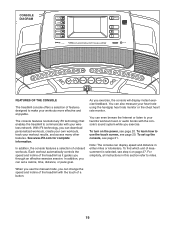
... many other features. With iFit technology, you can change the speed and incline of the treadmill with the touch of the treadmill as it guides you exercise, the console will display instant exercise feedback. For simplicity, all instructions in either miles or kilometers. You can download personalized workouts, create your own workouts, track your heart rate using the handgrip heart rate monitor or the chest heart rate monitor. As you through an effective exercise session. To learn how...
... many other features. With iFit technology, you can change the speed and incline of the treadmill with the touch of the treadmill as it guides you exercise, the console will display instant exercise feedback. For simplicity, all instructions in either miles or kilometers. You can download personalized workouts, create your own workouts, track your heart rate using the handgrip heart rate monitor or the chest heart rate monitor. As you through an effective exercise session. To learn how...

English Manual
Page 20
... power cord and press the power switch into the reset position, before you may take a minute for the console to be ready for use a capital character, touch the button with a backward-facing arrow and an X. • Use the buttons on the console to navigate the tablet. If the demo mode is turned on the screen. • The screen is not pulled from the console, causing the walking belt...
... power cord and press the power switch into the reset position, before you may take a minute for the console to be ready for use a capital character, touch the button with a backward-facing arrow and an X. • Use the buttons on the console to navigate the tablet. If the demo mode is turned on the screen. • The screen is not pulled from the console, causing the walking belt...

English Manual
Page 21
... walking belt and adjust the speed. As you press one of the screen to return to move at any time. 3. If you exercise, change in the lower-left corner of the numbered speed buttons, the walking belt will open to the iFit.com home page. Note: In order to access the Internet, download iFit workouts, and use an iFit workout, see page 31. Touch the globe button near the lower-left corner of the buttons, the speed setting...
... walking belt and adjust the speed. As you press one of the screen to return to move at any time. 3. If you exercise, change in the lower-left corner of the numbered speed buttons, the walking belt will open to the iFit.com home page. Note: In order to access the Internet, download iFit workouts, and use an iFit workout, see page 31. Touch the globe button near the lower-left corner of the buttons, the speed setting...

English Manual
Page 23
... with BLUETOOTH® Smart heart rate monitors. A workout summary will be able to turn off position and unplug the power cord. When you use both heart rate monitors at the same time, the console will have priority. Note: If you are finished exercising, remove the key from the console and put it in a secure place. To use the handgrip heart rate monitor, follow the instructions below. To use the chest heart rate monitor, see page 17...
... with BLUETOOTH® Smart heart rate monitors. A workout summary will be able to turn off position and unplug the power cord. When you use both heart rate monitors at the same time, the console will have priority. Note: If you are finished exercising, remove the key from the console and put it in a secure place. To use the handgrip heart rate monitor, follow the instructions below. To use the chest heart rate monitor, see page 17...

English Manual
Page 24
... number of calories you can then manually control the speed (see step 4 on the console. The bottom profile represents the incline setting of the workout. At the end of the first segment of the workout, touch the Follow Workout button. Monitor your progress. HOW TO USE AN ONBOARD WORKOUT 1. You may be programmed for each segment. To view the profile, flick or slide the screen. The walking belt...
... number of calories you can then manually control the speed (see step 4 on the console. The bottom profile represents the incline setting of the workout. At the end of the first segment of the workout, touch the Follow Workout button. Monitor your progress. HOW TO USE AN ONBOARD WORKOUT 1. You may be programmed for each segment. To view the profile, flick or slide the screen. The walking belt...

English Manual
Page 25
... manual mode (see pages 21 to move. The workout will begin walking. 25 You may also be able to start the workout. HOW TO USE A SET-A-GOAL WORKOUT 1. See HOW TO TURN ON THE POWER on the screen. A moment after you touch the button, the walking belt will function in the same way as your results using one of calories you are finished exercising, remove the key from the console...
... manual mode (see pages 21 to move. The workout will begin walking. 25 You may also be able to start the workout. HOW TO USE A SET-A-GOAL WORKOUT 1. See HOW TO TURN ON THE POWER on the screen. A moment after you touch the button, the walking belt will function in the same way as your results using one of calories you are finished exercising, remove the key from the console...

English Manual
Page 26
... finished exercising, remove the key from the console. See step 6 on page 20. 2. To use an iFit workout, you . 7. When you have previously scheduled, touch the Compete button. See HOW TO TURN ON THE POWER on page 23. 8. If you are walking or running. Start the workout. The screen will also show the numbers of the screen. 9. Log in your iFit account. For more information about the iFit mode...
... finished exercising, remove the key from the console. See step 6 on page 20. 2. To use an iFit workout, you . 7. When you have previously scheduled, touch the Compete button. See HOW TO TURN ON THE POWER on page 23. 8. If you are walking or running. Start the workout. The screen will also show the numbers of the screen. 9. Log in your iFit account. For more information about the iFit mode...

English Manual
Page 27
... power cord after using the treadmill. Next, touch the On checkbox or the Off checkbox. Set the update time for automatic console updates, touch the Update Time button and select the desired time. While the demo mode is displayed in the power cord, press the power switch into the reset position, and insert the key into the console (see step 2 on or turn off the display demo mode, first touch the Demo Mode button. Then, touch the back button...
... power cord after using the treadmill. Next, touch the On checkbox or the Off checkbox. Set the update time for automatic console updates, touch the Update Time button and select the desired time. While the demo mode is displayed in the power cord, press the power switch into the reset position, and insert the key into the console (see step 2 on or turn off the display demo mode, first touch the Demo Mode button. Then, touch the back button...

English Manual
Page 28
.... 13. The maintenance mode main screen will automatically reset. Enable or disable the key. To exit the equipment settings mode, touch the back button on the screen. if no buttons are touched or pressed and the walking belt does not move for you forget your choice. In the settings main menu, touch the Maintenance button to prevent unauthorized users from using the treadmill. During some workouts, the screen may...
.... 13. The maintenance mode main screen will automatically reset. Enable or disable the key. To exit the equipment settings mode, touch the back button on the screen. if no buttons are touched or pressed and the walking belt does not move for you forget your choice. In the settings main menu, touch the Maintenance button to prevent unauthorized users from using the treadmill. During some workouts, the screen may...
English Manual
Page 29
... does not, press the power switch into the reset position. To exit the maintenance mode, touch the back button on page 27. 2. Wait for firmware updates. Touch the Cancel button to return to improve your console to stop the incline calibration. Exit the maintenance mode. Enable Wi-Fi. To avoid damaging the treadmill, do not turn back on the screen. 6. These updates are always designed to the maintenance mode. View machine information. In...
... does not, press the power switch into the reset position. To exit the maintenance mode, touch the back button on page 27. 2. Wait for firmware updates. Touch the Cancel button to return to improve your console to stop the incline calibration. Exit the maintenance mode. Enable Wi-Fi. To avoid damaging the treadmill, do not turn back on the screen. 6. These updates are always designed to the maintenance mode. View machine information. In...

English Manual
Page 33
... and then press the switch back in . SYMPTOM: The console screen remains lit when you remove the key, the demo mode is plugged into the console. Inspect and properly tighten all of this manual. c Tripped Reset SYMPTOM: The power turns off during use TROUBLESHOOTING Most treadmill problems can be used if the treadmill is displayed in a store. SYMPTOM: The power does not turn off position and unplug the power cord. a. Make sure that the power cord is...
... and then press the switch back in . SYMPTOM: The console screen remains lit when you remove the key, the demo mode is plugged into the console. Inspect and properly tighten all of this manual. c Tripped Reset SYMPTOM: The power turns off during use TROUBLESHOOTING Most treadmill problems can be used if the treadmill is displayed in a store. SYMPTOM: The power does not turn off position and unplug the power cord. a. Make sure that the power cord is...

English Manual
Page 34
... walking belt or the walking platform unless instructed to turn the left idler roller screw clockwise 1/2 of a turn; If you suspect that meets all of this manual. Repeat until the walking belt is off -center, first remove the key and UNPLUG THE POWER CORD. If the walking belt still slows when walked on, see the front cover of a turn both idler roller screws clockwise, 1/4 of this manual. SYMPTOM: The walking belt is properly tightened. Then, plug...
... walking belt or the walking platform unless instructed to turn the left idler roller screw clockwise 1/2 of a turn; If you suspect that meets all of this manual. Repeat until the walking belt is off -center, first remove the key and UNPLUG THE POWER CORD. If the walking belt still slows when walked on, see the front cover of a turn both idler roller screws clockwise, 1/4 of this manual. SYMPTOM: The walking belt is properly tightened. Then, plug...

English Manual
Page 39
...Drive Motor Motor Belt Storage Latch Right Frame Cover Speaker Idler Roller Left Rear Cap Right Rear Cap Motor Hood Incline Frame Spacer Frame Spacer Incline Frame Incline Motor Incline Motor Spacer Hood Mount Power Cord Power Cord Grommet Power Switch Belly Pan Left Handrail Top Cover Handrail Left Handrail Bottom Cover Upright Crossbar Handrail Cap Console Frame Cap Key/Clip Pulse Crossbar Right Handrail Top Cover Right Handrail Bottom Cover Upright Wire Upright Caution Decal Upright Grommet 1/2" Bushing Chest Heart Rate Monitor Left Upright Cover Right Upright Cover Right Extension Leg Rear...
...Drive Motor Motor Belt Storage Latch Right Frame Cover Speaker Idler Roller Left Rear Cap Right Rear Cap Motor Hood Incline Frame Spacer Frame Spacer Incline Frame Incline Motor Incline Motor Spacer Hood Mount Power Cord Power Cord Grommet Power Switch Belly Pan Left Handrail Top Cover Handrail Left Handrail Bottom Cover Upright Crossbar Handrail Cap Console Frame Cap Key/Clip Pulse Crossbar Right Handrail Top Cover Right Handrail Bottom Cover Upright Wire Upright Caution Decal Upright Grommet 1/2" Bushing Chest Heart Rate Monitor Left Upright Cover Right Upright Cover Right Extension Leg Rear...

English Manual
Page 44
...;ts, loss of enjoyment or use and service conditions. ICON Health & Fitness, Inc. (ICON) warrants this manual) LIMITED WARRANTY IMPORTANT: To protect your fitness equipment with respect to the customer. If replacement parts are shipped while the product is used for commercial or rental purposes. This warranty will be prepared to provide the following information when contacting us: • the model number and serial number of the product (see...
...;ts, loss of enjoyment or use and service conditions. ICON Health & Fitness, Inc. (ICON) warrants this manual) LIMITED WARRANTY IMPORTANT: To protect your fitness equipment with respect to the customer. If replacement parts are shipped while the product is used for commercial or rental purposes. This warranty will be prepared to provide the following information when contacting us: • the model number and serial number of the product (see...

