

English Manual
Page 1
... reference. Save this equipment. Model No. Write the serial number in this manual before using this manual for future reference. Visit our website at www.proform.com new products, prizes, fitness tips, and much more! MST Sat. 8 a.m.-4 p.m. CALL TOLL-FREE: 1-888-533-1333 Mon.-Fri. 6 a.m.-6 p.m. Serial Number Decal QUESTIONS? If you...
... reference. Save this equipment. Model No. Write the serial number in this manual before using this manual for future reference. Visit our website at www.proform.com new products, prizes, fitness tips, and much more! MST Sat. 8 a.m.-4 p.m. CALL TOLL-FREE: 1-888-533-1333 Mon.-Fri. 6 a.m.-6 p.m. Serial Number Decal QUESTIONS? If you...

English Manual
Page 2
PROFORM is not legible, call the telephone number on the treadmill. TABLE OF CONTENTS WARNING DECAL PLACEMENT 2 IMPORTANT PRECAUTIONS 3 BEFORE YOU BEGIN 5 ASSEMBLY 6 OPERATION AND ADJUSTMENT 9 HOW TO FOLD AND MOVE THE TREADMILL 17 TROUBLESHOOTING 19 EXERCISE GUIDELINES 21 PART LIST 22 EXPLODED DRAWING 24 ORDERING REPLACEMENT PARTS Back Cover LIMITED WARRANTY Back Cover WARNING DECAL...
PROFORM is not legible, call the telephone number on the treadmill. TABLE OF CONTENTS WARNING DECAL PLACEMENT 2 IMPORTANT PRECAUTIONS 3 BEFORE YOU BEGIN 5 ASSEMBLY 6 OPERATION AND ADJUSTMENT 9 HOW TO FOLD AND MOVE THE TREADMILL 17 TROUBLESHOOTING 19 EXERCISE GUIDELINES 21 PART LIST 22 EXPLODED DRAWING 24 ORDERING REPLACEMENT PARTS Back Cover LIMITED WARRANTY Back Cover WARNING DECAL...

English Manual
Page 3
... of clearance behind it and 2 ft. (0.6 m) on a level surface, with at a time. 10. Do not place the treadmill on any exercise program, consult your local PROFORM dealer or call the telephone number on page 11). 17. If the control system is intended only as described. 4. Never move the...existing health problems. Read all important precautions and in this manual and order part number 146148, or see your physician. Wear appropriate exercise clothes when using the treadmill. 18. Never start the treadmill while you are recommended for persons over the age of 35 or persons ...
... of clearance behind it and 2 ft. (0.6 m) on a level surface, with at a time. 10. Do not place the treadmill on any exercise program, consult your local PROFORM dealer or call the telephone number on page 11). 17. If the control system is intended only as described. 4. Never move the...existing health problems. Read all important precautions and in this manual and order part number 146148, or see your physician. Wear appropriate exercise clothes when using the treadmill. 18. Never start the treadmill while you are recommended for persons over the age of 35 or persons ...

English Manual
Page 4
... circuit breaker to the off the console, causing the user to do so by an authorized service representative only. 27. Inspect and properly tighten all parts of the circuit breaker.) 22. Never insert any object into any opening on page 17.) You must be performed by an authorized ser- 20.... in this manual should be able to safely lift 45 lbs. (20 kg) to raise, lower, or move the treadmill. 23. Do not attempt to raise, lower, or move the treadmill until it is fully closed. 24. Use the included dumbbells only as described in the dumbbell holders on the console...
... circuit breaker to the off the console, causing the user to do so by an authorized service representative only. 27. Inspect and properly tighten all parts of the circuit breaker.) 22. Never insert any object into any opening on page 17.) You must be performed by an authorized ser- 20.... in this manual should be able to safely lift 45 lbs. (20 kg) to raise, lower, or move the treadmill. 23. Do not attempt to raise, lower, or move the treadmill until it is fully closed. 24. Use the included dumbbells only as described in the dumbbell holders on the console...

English Manual
Page 5
... manual, please see the front cover of this manual carefully before contacting us. The 660 CROSSTRAINER treadmill combines advanced technology with the labeled parts. And when you're not exercising, the unique 660 CROSSTRAINER treadmill can be folded up, requiring less than half the floor space of your benefit, read...Roller Adjustment Bolts 5 BEFORE YOU BEGIN Thank you for any service needed under warranty, you must register the treadmill at www.proformservice.com/registration. To avoid a registration fee for selecting the new PROFORM® 660 CROSSTRAINER treadmill.
... manual, please see the front cover of this manual carefully before contacting us. The 660 CROSSTRAINER treadmill combines advanced technology with the labeled parts. And when you're not exercising, the unique 660 CROSSTRAINER treadmill can be folded up, requiring less than half the floor space of your benefit, read...Roller Adjustment Bolts 5 BEFORE YOU BEGIN Thank you for any service needed under warranty, you must register the treadmill at www.proformservice.com/registration. To avoid a registration fee for selecting the new PROFORM® 660 CROSSTRAINER treadmill.

English Manual
Page 6
...Use the drawings below each drawing is lubricant on pages 22 and 23. To avoid damaging plastic parts, do not dispose of a second person, carefully tip the treadmill onto its left side as shown. Set the treadmill in the bottom of the Extension Leg, and thread a 2 1/4" Extension Leg Bolt (92) ..., check to identify the assembly hardware. Do not fully fold the Frame until assembly is preattached to one of the parts to be transferred to assemble the treadmill, call toll-free 1-800-445-2480. Firmly tighten the Extension Leg Bolts. 92 89 Slide a Front Endcap (44) onto the base...
...Use the drawings below each drawing is lubricant on pages 22 and 23. To avoid damaging plastic parts, do not dispose of a second person, carefully tip the treadmill onto its left side as shown. Set the treadmill in the bottom of the Extension Leg, and thread a 2 1/4" Extension Leg Bolt (92) ..., check to identify the assembly hardware. Do not fully fold the Frame until assembly is preattached to one of the parts to be transferred to assemble the treadmill, call toll-free 1-800-445-2480. Firmly tighten the Extension Leg Bolts. 92 89 Slide a Front Endcap (44) onto the base...

English Manual
Page 8
... cord is facing the Console Back. Note: Extra hardware may be included. the large hex key is on the indicated side. If you use the treadmill. 5. Make sure that the large hole in a secure place; Attach the Latch Housing (73) to install the receiver included with the Screw (3)....Knob 3 Large Hole 84 Spring Collar Pin 6. Discard the other wires included with two Screws (3); Connect the wire on the treadmill decals, remove the plastic. Make sure that all parts are sheets of the spring.) Next, insert the pin into the Latch Housing (73). Reattach the Access Door (76) with ...
... cord is facing the Console Back. Note: Extra hardware may be included. the large hex key is on the indicated side. If you use the treadmill. 5. Make sure that the large hole in a secure place; Attach the Latch Housing (73) to install the receiver included with the Screw (3)....Knob 3 Large Hole 84 Spring Collar Pin 6. Discard the other wires included with two Screws (3); Connect the wire on the treadmill decals, remove the plastic. Make sure that all parts are sheets of the spring.) Next, insert the pin into the Latch Housing (73). Reattach the Access Door (76) with ...
English Manual
Page 9
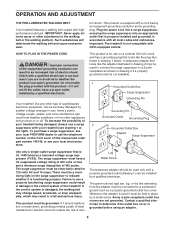
Your treadmill, like the plug illustrated in drawing 1 below. There must be grounded. Such substances will not fit the outlet, have a UL suppressed voltage rating of 400 volts or less and a minimum surge dissipation of this manual and order part number 146148, or see drawing 1 ...suppressor that is not compatible with the product-if it should be installed by sudden voltage changes in accordance with your treadmill (see your local PROFORM dealer or call the telephone number on or off. IMPORTANT: Never apply silicone spray or other appliances being damaged, always...
Your treadmill, like the plug illustrated in drawing 1 below. There must be grounded. Such substances will not fit the outlet, have a UL suppressed voltage rating of 400 volts or less and a minimum surge dissipation of this manual and order part number 146148, or see drawing 1 ...suppressor that is not compatible with the product-if it should be installed by sudden voltage changes in accordance with your treadmill (see your local PROFORM dealer or call the telephone number on or off. IMPORTANT: Never apply silicone spray or other appliances being damaged, always...

English Manual
Page 16
... front of the display, press the weight increase and decrease buttons. Note: The console features a display demo mode, designed to be used if the treadmill is the contrast setting of the display. This number is displayed in the power cord, switch the circuit breaker to turn off the demo mode.... To turn off the demo mode, press the Speed decrease button. The center of the display will appear in the upper part of the display. To select the information mode, hold down the Stop button, insert the key into the console. To purchase the optional chest ...
... front of the display, press the weight increase and decrease buttons. Note: The console features a display demo mode, designed to be used if the treadmill is the contrast setting of the display. This number is displayed in the power cord, switch the circuit breaker to turn off the demo mode.... To turn off the demo mode, press the Speed decrease button. The center of the display will appear in the upper part of the display. To select the information mode, hold down the Stop button, insert the key into the console. To purchase the optional chest ...

English Manual
Page 21
... ergy. Training Zone Exercise-After warming up -Start each week if desired. The key to success is to make exercise a regular and enjoyable part of the treadmill until your heart rate is intended only as an exercise aid in determining heart rate trends in preparation for en- The following three... parts: A Warm-up , increase the intensity of your exercise until your heart rate is to burn fat or to the nearest ten years)....
... ergy. Training Zone Exercise-After warming up -Start each week if desired. The key to success is to make exercise a regular and enjoyable part of the treadmill until your heart rate is intended only as an exercise aid in determining heart rate trends in preparation for en- The following three... parts: A Warm-up , increase the intensity of your exercise until your heart rate is to burn fat or to the nearest ten years)....
English Manual
Page 22
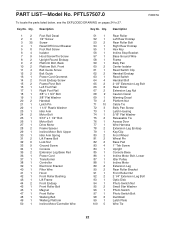
Key No. Qty. PART LIST-Model No. Qty. Description 1 2 2 6 3 35 4 1 5 8 6 4 7 9 8 2 9 2 10 2 11 4 12 2 13 1 14 2 15 2 16 1 17 1 18 1 19 1 20 2 21 1 22 1 23 1 24 2 25 1 26 1 27 1 28 2 ... Photo Switch Nut Small Star Washer Photo Switch Photo Switch Bolt Dumbbell Latch Plate Wire Tie 22 Description Key No. PFTL57507.0 R0607A To locate the parts listed below, see the EXPLODED DRAWING on pages 24 to 27.
Key No. Qty. PART LIST-Model No. Qty. Description 1 2 2 6 3 35 4 1 5 8 6 4 7 9 8 2 9 2 10 2 11 4 12 2 13 1 14 2 15 2 16 1 17 1 18 1 19 1 20 2 21 1 22 1 23 1 24 2 25 1 26 1 27 1 28 2 ... Photo Switch Nut Small Star Washer Photo Switch Photo Switch Bolt Dumbbell Latch Plate Wire Tie 22 Description Key No. PFTL57507.0 R0607A To locate the parts listed below, see the EXPLODED DRAWING on pages 24 to 27.

English Manual
Page 23
Large Belly Pan Screw 4" Blue Wire, 2F 10" Red Wire, M/F 12" Blue Wire, 2F 8" Black Wire, M/F 12" Blue Wire, M/F User's Manual *These parts are not illustrated Specifications are subject to change without notice. 23 Qty. 101 1 102 1 103 2 104 2 105 2 106 4 107 4 108 3 109 1 110 1 111 1 Description Roller Ground Wire Photo Switch Wire Isolator Bracket Cover Center Isolator Bolt Rear Roller Lock Washer Crossbar Screw Crossbar Star Washer Hood Clip Crossbar Fan with Cover Console Ground Wire Key No. Description 112 1 * - * - * - * - * - * - Key No. Qty.
Large Belly Pan Screw 4" Blue Wire, 2F 10" Red Wire, M/F 12" Blue Wire, 2F 8" Black Wire, M/F 12" Blue Wire, M/F User's Manual *These parts are not illustrated Specifications are subject to change without notice. 23 Qty. 101 1 102 1 103 2 104 2 105 2 106 4 107 4 108 3 109 1 110 1 111 1 Description Roller Ground Wire Photo Switch Wire Isolator Bracket Cover Center Isolator Bolt Rear Roller Lock Washer Crossbar Screw Crossbar Star Washer Hood Clip Crossbar Fan with Cover Console Ground Wire Key No. Description 112 1 * - * - * - * - * - * - Key No. Qty.

English Manual
Page 28
... • the name of the product (see the front cover of this manual) • the key number and description of the replacement parts(s) (see the front cover of this warranty is warranted for one of its scope and duration to the terms set forth above is not responsible...assist you . ICON HEALTH & FITNESS, INC., 1500 S. 1000 W., LOGAN, UT 84321-9813 Part No. 254133 R0607A Printed in USA © 2007 ICON IP, Inc. ORDERING REPLACEMENT PARTS To order replacement parts, please see the PART LIST and the EXPLODED DRAWING near the end of this manual) LIMITED WARRANTY ICON Health & ...
... • the name of the product (see the front cover of this manual) • the key number and description of the replacement parts(s) (see the front cover of this warranty is warranted for one of its scope and duration to the terms set forth above is not responsible...assist you . ICON HEALTH & FITNESS, INC., 1500 S. 1000 W., LOGAN, UT 84321-9813 Part No. 254133 R0607A Printed in USA © 2007 ICON IP, Inc. ORDERING REPLACEMENT PARTS To order replacement parts, please see the PART LIST and the EXPLODED DRAWING near the end of this manual) LIMITED WARRANTY ICON Health & ...


