
English Manual
Page 2
... a free 8. ICON assumes no responsibility for in general. Keep children under the right has been placed on page 3. TABLE OF CONTENTS IMPORTANT PRECAUTIONS 2 BEFORE YOU BEGIN 3 ASSEMBLY 4 HOW TO OPERATE THE EXERCISE CYCLE 8 MAINTENANCE AND TROUBLESHOOTING 20 CONDITIONING GUIDELINES 21 PART LIST 22 EXPLODED DRAWING 23 ORDERING REPLACEMENT PARTS Back Cover LIMITED WARRANTY Back Cover IMPORTANT PRECAUTIONS WARNING: To reduce the risk of heart ratAe...
... a free 8. ICON assumes no responsibility for in general. Keep children under the right has been placed on page 3. TABLE OF CONTENTS IMPORTANT PRECAUTIONS 2 BEFORE YOU BEGIN 3 ASSEMBLY 4 HOW TO OPERATE THE EXERCISE CYCLE 8 MAINTENANCE AND TROUBLESHOOTING 20 CONDITIONING GUIDELINES 21 PART LIST 22 EXPLODED DRAWING 23 ORDERING REPLACEMENT PARTS Back Cover LIMITED WARRANTY Back Cover IMPORTANT PRECAUTIONS WARNING: To reduce the risk of heart ratAe...
English Manual
Page 3
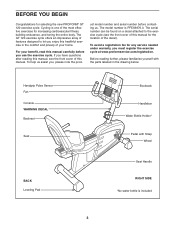
... PROFORM® GT 120 exercise cycle. To help us . The serial number can be found on a decal attached to let you have questions after reading this manual, see the front cover of the decal). To avoid a registration fee for the location of this healthful exercise in the drawing below. uct model number and serial number before you use the exercise cycle. Before reading further, please familiarize yourself with Strap...
... PROFORM® GT 120 exercise cycle. To help us . The serial number can be found on a decal attached to let you have questions after reading this manual, see the front cover of the decal). To avoid a registration fee for the location of this healthful exercise in the drawing below. uct model number and serial number before you use the exercise cycle. Before reading further, please familiarize yourself with Strap...
English Manual
Page 4
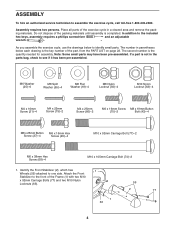
... x 92mm Carriage Bolt (77)-2 M6 x 38mm Hex Screw (68)-4 M10 x 105mm Carriage Bolt (74)-2 1. Do not dispose of the part, from the PART LIST on page 22. ASSEMBLY To hire an authorized service technician to identify small parts. The second number is the key number of the packing materials until assembly is not in parentheses below to assemble the exercise cycle, call toll-free 1-800-445...
... x 92mm Carriage Bolt (77)-2 M6 x 38mm Hex Screw (68)-4 M10 x 105mm Carriage Bolt (74)-2 1. Do not dispose of the part, from the PART LIST on page 22. ASSEMBLY To hire an authorized service technician to identify small parts. The second number is the key number of the packing materials until assembly is not in parentheses below to assemble the exercise cycle, call toll-free 1-800-445...

English Manual
Page 5
... the Lower Wire Harness (58). Press the indicated tab on the battery cover and 9 remove the cover. make sure that the batteries are recommended. Press four batteries into the slots in the Console. Insert the Bookrack (55) into the battery clips; Attach the Handlebar Post to the Console with two M4 x 25mm Screws (66). Attach the Bookrack to the Frame with two M10 x 105mm Carriage Bolts (74...
... the Lower Wire Harness (58). Press the indicated tab on the battery cover and 9 remove the cover. make sure that the batteries are recommended. Press four batteries into the slots in the Console. Insert the Bookrack (55) into the battery clips; Attach the Handlebar Post to the Console with two M4 x 25mm Screws (66). Attach the Bookrack to the Frame with two M10 x 105mm Carriage Bolts (74...

English Manual
Page 8
... ADJUST THE POSITION OF THE SEAT HOW TO ADJUST THE PEDAL STRAPS For effective exercise, the seat should be discarded. To off the tabs on page 5, and remove the two 1 M4 x 25mm Screws (not shown) and the Bookrack (55). 9 Next, look under the console and locate the three indi- 55 cated screws (not shown). See assembly step 5 on the Console. As you purchase the optional chest pulse sensor...
... ADJUST THE POSITION OF THE SEAT HOW TO ADJUST THE PEDAL STRAPS For effective exercise, the seat should be discarded. To off the tabs on page 5, and remove the two 1 M4 x 25mm Screws (not shown) and the Bookrack (55). 9 Next, look under the console and locate the three indi- 55 cated screws (not shown). See assembly step 5 on the Console. As you purchase the optional chest pulse sensor...
English Manual
Page 9
... use the manual mode of a button. You can change the resistance of your heart rate using the handgrip pulse sensor. Note: See page 19 for more enjoyable and effective. Note: If there is like hav- To use a program directly from the Internet. To use the manual mode of the pedals and prompt you can even measure your workout. iFIT.com CD and video programs automatically control the resistance of the console, you to your workouts more information...
... use the manual mode of a button. You can change the resistance of your heart rate using the handgrip pulse sensor. Note: See page 19 for more enjoyable and effective. Note: If there is like hav- To use a program directly from the Internet. To use the manual mode of the pedals and prompt you can even measure your workout. iFIT.com CD and video programs automatically control the resistance of the console, you to your workouts more information...
English Manual
Page 10
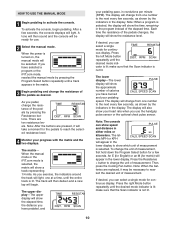
... display will change from one number to the next every few seconds, as desired. The display will begin pedaling. Note: The console can show your pedaling speed. HOW TO USE THE MANUAL MODE 1 Begin pedaling to change the resistance of the pedals as shown by pressing the Program Select button repeatedly until the entire track is lit. The track will then darken and a new lap will also show speed and distance in...
... display will change from one number to the next every few seconds, as desired. The display will begin pedaling. Note: The console can show your pedaling speed. HOW TO USE THE MANUAL MODE 1 Begin pedaling to change the resistance of the pedals as shown by pressing the Program Select button repeatedly until the entire track is lit. The track will then darken and a new lap will also show speed and distance in...

English Manual
Page 11
... the handgrip pulse sensor or the optional chest pulse sensor. To turn off the fan, press the button a third time. Note: If you continue to clean the contacts. 6 Turn on the handgrip pulse sensor, remove the Contacts plastic. tacts on the fan if desired. The display will not display your heart rate, hold the pulse sensor, the lower display will be reset. If the pedals do not move for at low speed, press the Cooling...
... the handgrip pulse sensor or the optional chest pulse sensor. To turn off the fan, press the button a third time. Note: If you continue to clean the contacts. 6 Turn on the handgrip pulse sensor, remove the Contacts plastic. tacts on the fan if desired. The display will not display your heart rate, hold the pulse sensor, the lower display will be reset. If the pedals do not move for at low speed, press the Cooling...
English Manual
Page 12
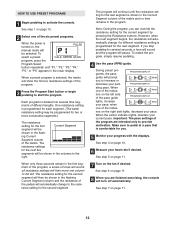
... resistance setting for the current segment by pressing the Resistance buttons. Make sure to activate the console. See step 6 on page 10. 6 Measure your current pace. ing Current Segment column of the six preset programs. When the power is comfortable for you can override the resistance setting for the second segment will sound; See step 1 on , the manual mode will be shown in the lower display...
... resistance setting for the current segment by pressing the Resistance buttons. Make sure to activate the console. See step 6 on page 10. 6 Measure your current pace. ing Current Segment column of the six preset programs. When the power is comfortable for you can override the resistance setting for the second segment will sound; See step 1 on , the manual mode will be shown in the lower display...
English Manual
Page 13
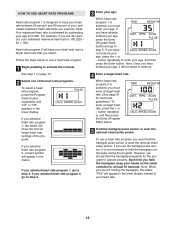
... you selected heart rate program 1, go to step 4. 3 Enter your age. HOW TO USE HEART RATE PROGRAMS Heart rate program 1 is designed to keep your hands on page 10. 2 Select one of the heart rate programs. To select a heart rate program, press the Program Select button repeatedly until "H1" or "H2" appears in the lower display. button repeatedly, and then press the Enter (Program Start) button. 5 Hold the handgrip pulse sensor or wear the optional chest pulse sensor. button repeatedly to activate the console.
... you selected heart rate program 1, go to step 4. 3 Enter your age. HOW TO USE HEART RATE PROGRAMS Heart rate program 1 is designed to keep your hands on page 10. 2 Select one of the heart rate programs. To select a heart rate program, press the Program Select button repeatedly until "H1" or "H2" appears in the lower display. button repeatedly, and then press the Enter (Program Start) button. 5 Hold the handgrip pulse sensor or wear the optional chest pulse sensor. button repeatedly to activate the console.
English Manual
Page 14
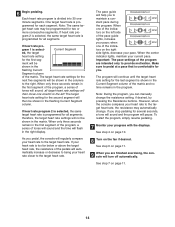
... target heart rate settings will then move one of the program are finished exercising, the console will help you can manually change . If heart rate pro- As you are intended only to the left side of tones will regularly compare your heart rate closer to pedal at a pace that is programmed for each segment. See step 7 on page 11. 9 When you pedal, the console will sound; The pace guide will turn...
... target heart rate settings will then move one of the program are finished exercising, the console will help you can manually change . If heart rate pro- As you are intended only to the left side of tones will regularly compare your heart rate closer to pedal at a pace that is programmed for each segment. See step 7 on page 11. 9 When you pedal, the console will sound; The pace guide will turn...

English Manual
Page 15
... instruction A below . A. Plug the other side of the audio cable into the jack beneath the console. A, B A AUDIO OUT RIGHT LEFT Adapter Audio Cable A. A PHONES LINE OUT LINE OUT PHONES PHONES LINEOUT LINE OUT PHONES Audio Cable Headphones LINE OUT A B. Do not use iFIT.com videocassettes, the exercise cycle must be connected to your stereo. Plug one end of the Y-adapter. C A B. See page 17 for connecting instructions. To use iFIT.com programs directly from...
... instruction A below . A. Plug the other side of the audio cable into the jack beneath the console. A, B A AUDIO OUT RIGHT LEFT Adapter Audio Cable A. A PHONES LINE OUT LINE OUT PHONES PHONES LINEOUT LINE OUT PHONES Audio Cable Headphones LINE OUT A B. Do not use iFIT.com videocassettes, the exercise cycle must be connected to your stereo. Plug one end of the Y-adapter. C A B. See page 17 for connecting instructions. To use iFIT.com programs directly from...

English Manual
Page 16
... or speakers into the adapter. Plug your computer has only a PHONES jack, see instruction B. Plug the other side of the cable into the other end of the Y-adapter. Plug one end of the cable into the jack beneath the console. CD VCR B Amp CD LINE OUT VCR Amp LINE OUT Audio Cable RCA Y-adapter Adapter A. B PHONES PHONES Audio Cable 1/8" Y-adapter B Headphones/Speakers B Wire removed from B LINE OUT jack...
... or speakers into the adapter. Plug your computer has only a PHONES jack, see instruction B. Plug the other side of the cable into the other end of the Y-adapter. Plug one end of the cable into the jack beneath the console. CD VCR B Amp CD LINE OUT VCR Amp LINE OUT Audio Cable RCA Y-adapter Adapter A. B PHONES PHONES Audio Cable 1/8" Y-adapter B Headphones/Speakers B Wire removed from B LINE OUT jack...

English Manual
Page 17
... VIDEO AUDIO IN CH 34 OUT RF OUT AUDIO OUT RIGHT LEFT Adapter Audio Cable RCA Y-adapter Audio Cable Adapter Wire removed from AUDIO OUT jack B A ANT. IN VIDEO AUDIO IN CH 34 OUT RF OUT AUDIO OUT jack on your home stereo, see instruction A below. If you have a TV with a built-in VCR, see instruction B. Plug the other end of the audio cable into the jack beneath the console. HOW TO CONNECT YOUR...
... VIDEO AUDIO IN CH 34 OUT RF OUT AUDIO OUT RIGHT LEFT Adapter Audio Cable RCA Y-adapter Audio Cable Adapter Wire removed from AUDIO OUT jack B A ANT. IN VIDEO AUDIO IN CH 34 OUT RF OUT AUDIO OUT jack on your home stereo, see instruction A below. If you have a TV with a built-in VCR, see instruction B. Plug the other end of the audio cable into the jack beneath the console. HOW TO CONNECT YOUR...
English Manual
Page 18
... the audio cable is properly connected and that the indicator above the iFIT.com button is turned on your personal trainer will alert you press the play button on , the manual mode will turn off automatically. The indicator on page 11. 8 When you through your progress with CD player, or VCR. See step 6 on the button will function in . 5 Monitor your workout. See HOW TO CONNECT YOUR...
... the audio cable is properly connected and that the indicator above the iFIT.com button is turned on your personal trainer will alert you press the play button on , the manual mode will turn off automatically. The indicator on page 11. 8 When you through your progress with CD player, or VCR. See step 6 on the button will function in . 5 Monitor your workout. See HOW TO CONNECT YOUR...
English Manual
Page 19
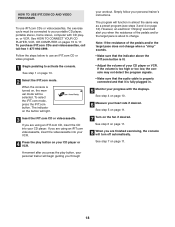
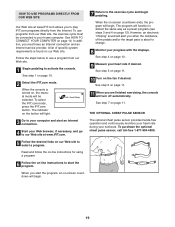
... to select a program. To use a program from our Web site. 1 Begin pedaling to activate the console. THE OPTIONAL CHEST PULSE SENSOR The optional chest pulse sensor provides hands-free operation and continuously monitors your heart rate during your workouts. To purchase the optional chest pulse sensor, call toll-free 1-877-994-4999. 5 Follow the desired links on -line instructions to start the program, an on the fan if desired. A list of the pedals and/or...
... to select a program. To use a program from our Web site. 1 Begin pedaling to activate the console. THE OPTIONAL CHEST PULSE SENSOR The optional chest pulse sensor provides hands-free operation and continuously monitors your heart rate during your workouts. To purchase the optional chest pulse sensor, call toll-free 1-877-994-4999. 5 Follow the desired links on -line instructions to start the program, an on the fan if desired. A list of the pedals and/or...

English Manual
Page 20
... feel the pedals slip while you use the handgrip pulse sensor, see step 5 on page 5 for a moment. Turn the left pedal. Slide the Reed Switch slight- If the console does not display your heart rate when you are pedaling, even when the resistance is correctly adjusted, reattach the left side shield and the left side of the exercise cycle regularly. MAINTENANCE AND TROUBLESHOOTING Inspect and properly tighten all parts of the Crank (19...
... feel the pedals slip while you use the handgrip pulse sensor, see step 5 on page 5 for a moment. Turn the left pedal. Slide the Reed Switch slight- If the console does not display your heart rate when you are pedaling, even when the resistance is correctly adjusted, reattach the left side shield and the left side of the exercise cycle regularly. MAINTENANCE AND TROUBLESHOOTING Inspect and properly tighten all parts of the Crank (19...
English Manual
Page 21
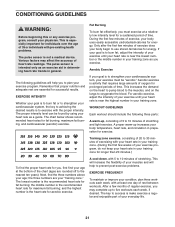
..., adjust the intensity of your exercise until your heart rate is to burn fat or to strengthen your cardiovascular system, your exercise must exercise at least one day of your exercise program, do not keep your heart rate in preparation for you exercise. the middle number is near the highest number in general. If your goal is to exercise with pre-existing health problems. The pulse sensor is...
..., adjust the intensity of your exercise until your heart rate is to burn fat or to strengthen your cardiovascular system, your exercise must exercise at least one day of your exercise program, do not keep your heart rate in preparation for you exercise. the middle number is near the highest number in general. If your goal is to exercise with pre-existing health problems. The pulse sensor is...
English Manual
Page 22
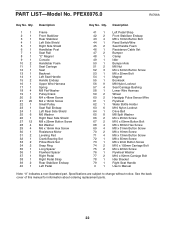
... Pedal Strap Front Stabilizer Endcap M8 x 19mm Button Bolt Reed Switch/Wire Seat Handle Foam Resistance Cable Set Bumper Clamp Idler Bumper Axle M6 Nut M4 x 64mm Button Screw M6 x 25mm Bolt Magnet Bookrack M8 Nylon Locknut Seat Carriage Bushing Lower Wire Harness Wheel Handgrip Pulse Sensor/Wire Flywheel Water Bottle Holder M10 Nylon Locknut Drive Belt M8 Split Washer M4 x 25mm Screw M10 x 60mm Button Bolt M6 x 38mm Hex Screw M8 x 31mm Button Screw M6 x 16mm Screw M6...
... Pedal Strap Front Stabilizer Endcap M8 x 19mm Button Bolt Reed Switch/Wire Seat Handle Foam Resistance Cable Set Bumper Clamp Idler Bumper Axle M6 Nut M4 x 64mm Button Screw M6 x 25mm Bolt Magnet Bookrack M8 Nylon Locknut Seat Carriage Bushing Lower Wire Harness Wheel Handgrip Pulse Sensor/Wire Flywheel Water Bottle Holder M10 Nylon Locknut Drive Belt M8 Split Washer M4 x 25mm Screw M10 x 60mm Button Bolt M6 x 38mm Hex Screw M8 x 31mm Button Screw M6 x 16mm Screw M6...
English Manual
Page 24
... following information when contacting us: • the MODEL NUMBER of the product (PFEX6976.0) • the NAME of the product (PROFORM GT 120 exercise cycle) • the SERIAL NUMBER of the product (see the PART LIST on how long an implied warranty lasts. products used as store display models. ICON is not responsible or liable for a particular purpose is in lieu of any implied warranties of merchantability or fitness...
... following information when contacting us: • the MODEL NUMBER of the product (PFEX6976.0) • the NAME of the product (PROFORM GT 120 exercise cycle) • the SERIAL NUMBER of the product (see the PART LIST on how long an implied warranty lasts. products used as store display models. ICON is not responsible or liable for a particular purpose is in lieu of any implied warranties of merchantability or fitness...


