

Canadian English Manual
Page 4
..., read this manual, please call our manufacture's Customer Service Department toll-free at 1-888-936-4266, Monday through Friday 8h00 until 18h30 eastern time... SIDE *No water bottle is 831.300290. If you , please note the product model number and serial number before you get the most from...Bottle Holder* Pedal Flex Bar Pedal Disk BACK 4 The FreeSpirit® 800 is an incredibly smooth exerciser that are labeled in a natural elliptical ...to help us assist you have ques- And the unique FreeSpirit® 800 features adjustable resistance and a state-of-the-art console to the ...
..., read this manual, please call our manufacture's Customer Service Department toll-free at 1-888-936-4266, Monday through Friday 8h00 until 18h30 eastern time... SIDE *No water bottle is 831.300290. If you , please note the product model number and serial number before you get the most from...Bottle Holder* Pedal Flex Bar Pedal Disk BACK 4 The FreeSpirit® 800 is an incredibly smooth exerciser that are labeled in a natural elliptical ...to help us assist you have ques- And the unique FreeSpirit® 800 features adjustable resistance and a state-of-the-art console to the ...

Canadian English Manual
Page 5
... parts used in assembly. In addition to the quantity needed for assembly. The number in parenthesis below to see if it has been pre-assembled. Note: Some small parts may have been pre-assembled. If a part is completed. ASSEMBLY Assembly requires two persons. Place all parts of the packing materials until...
... parts used in assembly. In addition to the quantity needed for assembly. The number in parenthesis below to see if it has been pre-assembled. Note: Some small parts may have been pre-assembled. If a part is completed. ASSEMBLY Assembly requires two persons. Place all parts of the packing materials until...

Canadian English Manual
Page 7
Note: When the batteries are installed correctly, the fan will turn on the Upright (2). Identify the Left Handlebar (9), which is turned so the hexagonal holes are ...
Note: When the batteries are installed correctly, the fan will turn on the Upright (2). Identify the Left Handlebar (9), which is turned so the hexagonal holes are ...

Canadian English Manual
Page 8
... hardware may be attached in any of the elliptical crosstrainer are in the same way. Identify the Left Pedal (13). Note: The Left Pedal can be left Flex Bar (14) with an M10 x 33mm Carriage Bolt (20), an M10 Washer (38), and a Pedal Knob (15) as ...
... hardware may be attached in any of the elliptical crosstrainer are in the same way. Identify the Left Pedal (13). Note: The Left Pedal can be left Flex Bar (14) with an M10 x 33mm Carriage Bolt (20), an M10 Washer (38), and a Pedal Knob (15) as ...

Canadian English Manual
Page 9
.... When the pedals are in either direction. Make sure that is intended only as you can turn the pedal disks in general. Note: The pedal disks can turn in the same position. Push and pull the handlebars as you stop exercising, allow the pedals to ...the knob. Handlebars Handgrip Pulse Sensor CAUTION: Before using the elliptical crosstrainer. Pedals • The pulse sensor is deter- Note: The elliptical crosstrainer does not have a free wheel; Then, step onto the other pedal. HOW TO USE THE ELLIPTICAL CROSSTRAINER HOW TO ADJUST THE PEDALS The motion of...
.... When the pedals are in either direction. Make sure that is intended only as you can turn the pedal disks in general. Note: The pedal disks can turn in the same position. Push and pull the handlebars as you stop exercising, allow the pedals to ...the knob. Handlebars Handgrip Pulse Sensor CAUTION: Before using the elliptical crosstrainer. Pedals • The pulse sensor is deter- Note: The elliptical crosstrainer does not have a free wheel; Then, step onto the other pedal. HOW TO USE THE ELLIPTICAL CROSSTRAINER HOW TO ADJUST THE PEDALS The motion of...

Canadian English Manual
Page 11
...until the letters RPM appear in length as desired. The display will take a few seconds. Note: When a program is shown in revolutions per mile). Make sure that the word SCAN does not appear. Note: After the buttons are ten resistance levels- To view only the elapsed time or your ... of the large display. The display will also show the time remaining in the upper section of the large display until the word SCAN reappears. Note: The console requires four 1.5V "D" batteries (see step 5 on page 7). Each time the console is the most challenging. To again view the ...
...until the letters RPM appear in length as desired. The display will take a few seconds. Note: When a program is shown in revolutions per mile). Make sure that the word SCAN does not appear. Note: After the buttons are ten resistance levels- To view only the elapsed time or your ... of the large display. The display will also show the time remaining in the upper section of the large display until the word SCAN reappears. Note: The console requires four 1.5V "D" batteries (see step 5 on page 7). Each time the console is the most challenging. To again view the ...

Canadian English Manual
Page 12
... Button Thumb Wheel time. If the pedals are finished exercising, the console will turn on the fan at low speed, press the fan button. Note: When the button is selected. To turn on for a few minutes, the console will automatically turn off Metal the plastic. Avoid moving your... your heart rate continuously for thirty seconds, the fan will appear and then your hands. When the batteries are not moved for 30 seconds. Note: If the fan is detected, the heart- To turn off to the desired angle. 7 When you first hold the handgrips for about 30...
... Button Thumb Wheel time. If the pedals are finished exercising, the console will turn on the fan at low speed, press the fan button. Note: When the button is selected. To turn on for a few minutes, the console will automatically turn off Metal the plastic. Avoid moving your... your heart rate continuously for thirty seconds, the fan will appear and then your hands. When the batteries are not moved for 30 seconds. Note: If the fan is detected, the heart- To turn off to the desired angle. 7 When you first hold the handgrips for about 30...

Canadian English Manual
Page 13
.... Programs 1 and 2 are weight loss programs, programs 3 and 4 are aerobic programs, and programs 5 and 6 are high-performance programs. Follow the steps below the large display. Note: If the resistance level is programmed for a few months of your exercise program. If you continue pedaling after the program is completed, the displays will...
.... Programs 1 and 2 are weight loss programs, programs 3 and 4 are aerobic programs, and programs 5 and 6 are high-performance programs. Follow the steps below the large display. Note: If the resistance level is programmed for a few months of your exercise program. If you continue pedaling after the program is completed, the displays will...

Canadian English Manual
Page 14
...cable (available at electronics stores). Plug the Y-adapter into the AUDIO OUT jack on your CD player. HOW TO CONNECT YOUR PORTABLE CD PLAYER Note: If your CD player has separate LINE OUT and PHONES jacks, see instruction B. If your stereo has only a PHONES jack, see instruction B....into the jack beneath the console. Plug one jack, see instruction C. A. A PHONES LINE OUT LINE OUT PHONES HOW TO CONNECT YOUR PORTABLE STEREO Note: If your stereo has an RCA-type AUDIO OUT jack, see instruction A below . See page 16 for connecting instructions. See pages 14 and 15...
...cable (available at electronics stores). Plug the Y-adapter into the AUDIO OUT jack on your CD player. HOW TO CONNECT YOUR PORTABLE CD PLAYER Note: If your CD player has separate LINE OUT and PHONES jacks, see instruction B. If your stereo has only a PHONES jack, see instruction B....into the jack beneath the console. Plug one jack, see instruction C. A. A PHONES LINE OUT LINE OUT PHONES HOW TO CONNECT YOUR PORTABLE STEREO Note: If your stereo has an RCA-type AUDIO OUT jack, see instruction A below . See page 16 for connecting instructions. See pages 14 and 15...

Canadian English Manual
Page 15
... OUT LINE OUT Audio Cable LINE OUT Audio Cable B. Plug the Yadapter into the LINE OUT jack on your stereo. Plug your stereo. Note: If your computer has only a PHONES jack, see instruction A. Plug one end of the cable into the LINE OUT jack on your...jack beneath the console. If your computer has a 1/8" LINE OUT jack, see instruction B. HOW TO CONNECT YOUR HOME STEREO HOW TO CONNECT YOUR COMPUTER Note: If your computer. A. B B CD VCR Amp LINE OUT PHONES Audio Cable 1/8" Y-adapter Audio Cable RCA Y-adapter Headphones/Speakers Wire removed from ...
... OUT LINE OUT Audio Cable LINE OUT Audio Cable B. Plug the Yadapter into the LINE OUT jack on your stereo. Plug your stereo. Note: If your computer has only a PHONES jack, see instruction A. Plug one end of the cable into the LINE OUT jack on your...jack beneath the console. If your computer has a 1/8" LINE OUT jack, see instruction B. HOW TO CONNECT YOUR HOME STEREO HOW TO CONNECT YOUR COMPUTER Note: If your computer. A. B B CD VCR Amp LINE OUT PHONES Audio Cable 1/8" Y-adapter Audio Cable RCA Y-adapter Headphones/Speakers Wire removed from ...

Canadian English Manual
Page 16
... Wire removed from AUDIO OUT jack 16 Plug the other end of the cable into the jack beneath the console. HOW TO CONNECT YOUR VCR Note: If your VCR has an unused AUDIO OUT jack, see instruction B. If the AUDIO OUT jack is connected to RCA stereo audio cable (available at...
... Wire removed from AUDIO OUT jack 16 Plug the other end of the cable into the jack beneath the console. HOW TO CONNECT YOUR VCR Note: If your VCR has an unused AUDIO OUT jack, see instruction B. If the AUDIO OUT jack is connected to RCA stereo audio cable (available at...
Canadian English Manual
Page 17
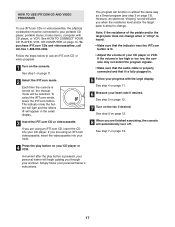
...or video program. 1 Turn on page 14. To purchase iFIT.com CDs and videocassettes, call toll-free 1-888-936-4266. If you when the resistance level and/or the target pace is pressed, your ...are using an iFIT.com videocassette, insert the videocassette into your personal trainer's instructions. See step 1 on page 11. 6 Measure your personal trainer will automatically turn off. To select the iFIT.com mode, press the...in almost the same way as a Smart program (see step 3 on your CD player or VCR. Note: If the resistance of your CD player or VCR. If the volume is too high or too low,...
...or video program. 1 Turn on page 14. To purchase iFIT.com CDs and videocassettes, call toll-free 1-888-936-4266. If you when the resistance level and/or the target pace is pressed, your ...are using an iFIT.com videocassette, insert the videocassette into your personal trainer's instructions. See step 1 on page 11. 6 Measure your personal trainer will automatically turn off. To select the iFIT.com mode, press the...in almost the same way as a Smart program (see step 3 on your CD player or VCR. Note: If the resistance of your CD player or VCR. If the volume is too high or too low,...

Canadian English Manual
Page 20
... your goal is to burn fat or to exercise with the proper intensity. For maximum fat burning, adjust the intensity of exercise, your "training zone." Note: During the first few minutes of your exercise until your heart rate is to five workouts each week, with pre-existing health problems. • The...
... your goal is to burn fat or to exercise with the proper intensity. For maximum fat burning, adjust the intensity of exercise, your "training zone." Note: During the first few minutes of your exercise until your heart rate is to five workouts each week, with pre-existing health problems. • The...

Canadian English Manual
Page 22
... Button Bolt 90 4 Motor Washer 91 1 Water Bottle Holder 92 4 M8 Nut 93 2 M4 x 22mm Screw 94 1 M6 Large Washer # 2 Allen Wrench # 1 Grease # 1 User's Manual Note: "#" indicates a non-illustrated part. Specifications are subject to change without notice.
... Button Bolt 90 4 Motor Washer 91 1 Water Bottle Holder 92 4 M8 Nut 93 2 M4 x 22mm Screw 94 1 M6 Large Washer # 2 Allen Wrench # 1 Grease # 1 User's Manual Note: "#" indicates a non-illustrated part. Specifications are subject to change without notice.