
Owners Manual
Page 1
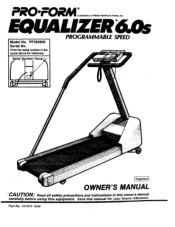
Write the serial number in the space above for reference. PF350900 Serial No. Serial Number Decal •V..e.V8V:"";:irsP INN • t v•-yf I Patented I OWNER'S MANUAL 'CAUTION: carefully before Ruseiandgatlhl issaefeqtuyipprmeecanut.tioSnasveanthdisinmstaruncutaiol fnosriynotuhrisfuotwurneerre'sfemreanncuea.l Part No. 101070 6/90 EQUALIZER6.0s PROGRAMMABLE SPEED Model No. PRO•FORM O A Subsidiary of Weider Health andFitness,Inc.
Write the serial number in the space above for reference. PF350900 Serial No. Serial Number Decal •V..e.V8V:"";:irsP INN • t v•-yf I Patented I OWNER'S MANUAL 'CAUTION: carefully before Ruseiandgatlhl issaefeqtuyipprmeecanut.tioSnasveanthdisinmstaruncutaiol fnosriynotuhrisfuotwurneerre'sfemreanncuea.l Part No. 101070 6/90 EQUALIZER6.0s PROGRAMMABLE SPEED Model No. PRO•FORM O A Subsidiary of Weider Health andFitness,Inc.
Owners Manual
Page 2
... USE, COSTS OF. Pro Form's obligation under normal use and service conditions, for commercial or rental purposes. REMOVAL, INSTALLATION OR OTHER CONSEQUENTIAL DAMAGES OF WHATSOEVER NATURE. TIES AND ANY IMPLIED WARRANTIES OF MERCHANTABILITY OR FITNESS FOR A PAR- SOME STATES DO NOT ALLOW LIMITATIONS ON HOW LONG AN IMPLIED WARRANTY LASTS. 0 PRO FORM Fitness Products, Inc. 1990 LIMITED WARRANTY Pro Form Fitness Products, Inc. ("Pro Form") warrants this Warranty is limited to replacing or repairing, at Pro Form...
... USE, COSTS OF. Pro Form's obligation under normal use and service conditions, for commercial or rental purposes. REMOVAL, INSTALLATION OR OTHER CONSEQUENTIAL DAMAGES OF WHATSOEVER NATURE. TIES AND ANY IMPLIED WARRANTIES OF MERCHANTABILITY OR FITNESS FOR A PAR- SOME STATES DO NOT ALLOW LIMITATIONS ON HOW LONG AN IMPLIED WARRANTY LASTS. 0 PRO FORM Fitness Products, Inc. 1990 LIMITED WARRANTY Pro Form Fitness Products, Inc. ("Pro Form") warrants this Warranty is limited to replacing or repairing, at Pro Form...

Owners Manual
Page 3
... or any exercise program consult your physician. sonal injury or property damage sustained by or through the use of 35 or persons with pre-existing health problems. Read all instructions before using. PRO•FORM® . EQUALIZER6As PROGRAMMABLE SPEED TABLE-OF CONTENTS Warranty 2 Safety Precautions 4 Before You Begin 5 Assembly 6 Operation and Adjustment 7 Maintenance and Storage 10 Conditioning Guidelines 11 Part List 14 Exploded Drawing 15 Ordering Replacement Parts 16...
... or any exercise program consult your physician. sonal injury or property damage sustained by or through the use of 35 or persons with pre-existing health problems. Read all instructions before using. PRO•FORM® . EQUALIZER6As PROGRAMMABLE SPEED TABLE-OF CONTENTS Warranty 2 Safety Precautions 4 Before You Begin 5 Assembly 6 Operation and Adjustment 7 Maintenance and Storage 10 Conditioning Guidelines 11 Part List 14 Exploded Drawing 15 Ordering Replacement Parts 16...
Owners Manual
Page 4
... the procedures described in this manual. 10. Use this treadmill only as described in this manual for proper grounding instructions.) Keep the power cord away from the treadmill during operation. Always hold the handrail when walking or running or aerobic shoes. Always wear running on the walking belt. Athletic support clothes are standing on the treadmill. 5. Plug the power cord directly into any opening. 8. Servicing other appliance should be...
... the procedures described in this manual. 10. Use this treadmill only as described in this manual for proper grounding instructions.) Keep the power cord away from the treadmill during operation. Always hold the handrail when walking or running or aerobic shoes. Always wear running on the walking belt. Athletic support clothes are standing on the treadmill. 5. Plug the power cord directly into any opening. 8. Servicing other appliance should be...
Owners Manual
Page 5
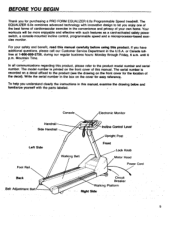
... location of your safety and benefit, read this manual carefully before using this product, please refer to let you understand clearly the instructions in this manual. Write the serial number in the box on the cover for purchasing a PRO FORM EQUALIZER 6.0s Programmable Speed treadmill. Console Electronic Monitor Handrail Side Handrail Left Side Foot Rail Walking Belt Incline Control Lever Upright Post Front Lock Knob Motor Hood Power Cord Sack Belt Adjustment Bolt Circuit Breaker Walking Platform Right Side 5 The EQUALIZER 6.0s...
... location of your safety and benefit, read this manual carefully before using this product, please refer to let you understand clearly the instructions in this manual. Write the serial number in the box on the cover for purchasing a PRO FORM EQUALIZER 6.0s Programmable Speed treadmill. Console Electronic Monitor Handrail Side Handrail Left Side Foot Rail Walking Belt Incline Control Lever Upright Post Front Lock Knob Motor Hood Power Cord Sack Belt Adjustment Bolt Circuit Breaker Walking Platform Right Side 5 The EQUALIZER 6.0s...

Owners Manual
Page 6
... using the treadmill. 6 Tighten the Lock Knob (see step 1). 56 66 espe 67 68 20 Make sure that all instructions before beginning assembly. Insert the Lock Knob (4) with the Long Handrail Bolt (66), Formed Washer (67) and Flat Washer (68). Slide the upper end of the Console (73). Insert the Short Handrail Bolt (75) through the metal plate under the Console, and tighten the Bolt...
... using the treadmill. 6 Tighten the Lock Knob (see step 1). 56 66 espe 67 68 20 Make sure that all instructions before beginning assembly. Insert the Lock Knob (4) with the Long Handrail Bolt (66), Formed Washer (67) and Flat Washer (68). Slide the upper end of the Console (73). Insert the Short Handrail Bolt (75) through the metal plate under the Console, and tighten the Bolt...
Owners Manual
Page 7
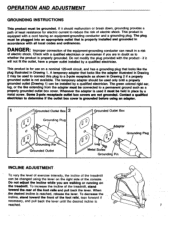
... current to determine if the outlet box cover is grounded before using the lever.on the treadmill. OPERATION AND ADJUSTMENT GROUNDING INSTRUCTIONS This product must be held in place by a metal screw. If it should be used it will not fit the outlet, have a proper outlet installed by a qualified electrician. The plug must be plugged into an appropriate outlet that looks...
... current to determine if the outlet box cover is grounded before using the lever.on the treadmill. OPERATION AND ADJUSTMENT GROUNDING INSTRUCTIONS This product must be held in place by a metal screw. If it should be used it will not fit the outlet, have a proper outlet installed by a qualified electrician. The plug must be plugged into an appropriate outlet that looks...
Owners Manual
Page 8
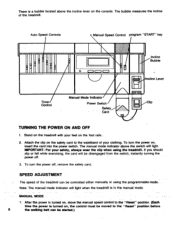
... exercising, the card will be •controlled either manually or using the treadmill. The manual mode indicator above the incline lever on the foot rails.. 2. IMPORTANT: For your feet on the console. SPEED ADJUSTMENT The speed of the treadmill can be started.) Auto Speed Controls Manual Speed Control program "START" key 7 7 11 O 1:73 0 0 Incline Bubble ncline Lever Manual Mode Indicator Timer Control Power Switch / lip Safety Card TURNING THE POWER ON AND OFF 1. MANUAL MODE 1. The bubble measures the incline of your clothing. To turn the power...
... exercising, the card will be •controlled either manually or using the treadmill. The manual mode indicator above the incline lever on the foot rails.. 2. IMPORTANT: For your feet on the console. SPEED ADJUSTMENT The speed of the treadmill can be started.) Auto Speed Controls Manual Speed Control program "START" key 7 7 11 O 1:73 0 0 Incline Bubble ncline Lever Manual Mode Indicator Timer Control Power Switch / lip Safety Card TURNING THE POWER ON AND OFF 1. MANUAL MODE 1. The bubble measures the incline of your clothing. To turn the power...
Owners Manual
Page 9
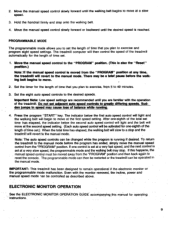
... GUIDE accompanying this happens, the manual speed control must be activated for the length of the treadmill automatically for one control is set at a very fast speed, and the next control is moved from the "PROGRAM" position and then back again to exercise and program eight speed settings. Move the manual speed control slowly forward until the walking belt begins to move. 2. PROGRAMMABLE MODE The programmable mode allows you are familiar with the monitor removed, the incline, power...
... GUIDE accompanying this happens, the manual speed control must be activated for the length of the treadmill automatically for one control is set at a very fast speed, and the next control is moved from the "PROGRAM" position and then back again to exercise and program eight speed settings. Move the manual speed control slowly forward until the walking belt begins to move. 2. PROGRAMMABLE MODE The programmable mode allows you are familiar with the monitor removed, the incline, power...
Owners Manual
Page 10
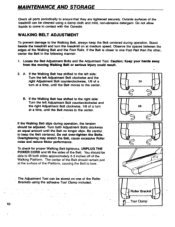
... the other, center the Belt in contact with the Console. A. Check all parts periodically to bow. Stand beside the treadmill and turn 2B at medium speed. Turn both sides approximately 2-3 inches off of the Platform, causing the Belt to ensure that they are tightened securely. WALKING BELT ADJUSTMENT To prevent damage to lift both Adjustment Bolts clockwise an equal amount until the Belt moves to come in the...
... the other, center the Belt in contact with the Console. A. Check all parts periodically to bow. Stand beside the treadmill and turn 2B at medium speed. Turn both sides approximately 2-3 inches off of the Platform, causing the Belt to ensure that they are tightened securely. WALKING BELT ADJUSTMENT To prevent damage to lift both Adjustment Bolts clockwise an equal amount until the Belt moves to come in the...

Owners Manual
Page 11
... storage position, first remove the Bolts and Washers from exercising, your "Training Zone." 11 To convert the treadmill to protect the electrical system. The treadmill can be determined using the heart rate as shown. Remember that .adequate rest and good nutrition are also essential to the success of the Frame and pushing or pulling the machine on the front of the Walking Belt...
... storage position, first remove the Bolts and Washers from exercising, your "Training Zone." 11 To convert the treadmill to protect the electrical system. The treadmill can be determined using the heart rate as shown. Remember that .adequate rest and good nutrition are also essential to the success of the Frame and pushing or pulling the machine on the front of the Walking Belt...
Owners Manual
Page 12
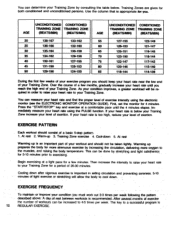
... allow the body to a successful program is too high, reduce your level of a basic 5-step pattern. 1. If your heart rate is below . Training- First, set the monitor for a period of 20-30 minutes. Immediately measure your heart rate using the electronic monitor (see the ELECTRONIC MONITOR OPERATION GUIDE). EXERCISE FREQUENCY To Maintain or improve•your heart rate to the muscles, and raising the body temperature. Training Zones are...
... allow the body to a successful program is too high, reduce your level of a basic 5-step pattern. 1. If your heart rate is below . Training- First, set the monitor for a period of 20-30 minutes. Immediately measure your heart rate using the electronic monitor (see the ELECTRONIC MONITOR OPERATION GUIDE). EXERCISE FREQUENCY To Maintain or improve•your heart rate to the muscles, and raising the body temperature. Training Zones are...
Owners Manual
Page 13
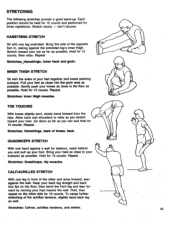
...Hamstrings, lower back and groin. Gently push your knees as close to relax as you stretch toward the wall. Stretches: Inner thigh muscles. CALF/ACHILLES STRETCH With one leg in , resting against the extended leg's inner ... Stretches: Hamstrings, back of your back leg straight and back foot flat on the other and arms forward, lean against a wall for 15 counts. QUADRICEPS STRETCH With one leg extended. Hold for balance, reach behind ...15 counts.-To cause further stretching as possible. I-fold, then repeat on the floor; ward by moving your buttocks as well.
...Hamstrings, lower back and groin. Gently push your knees as close to relax as you stretch toward the wall. Stretches: Inner thigh muscles. CALF/ACHILLES STRETCH With one leg in , resting against the extended leg's inner ... Stretches: Hamstrings, back of your back leg straight and back foot flat on the other and arms forward, lean against a wall for 15 counts. QUADRICEPS STRETCH With one leg extended. Hold for balance, reach behind ...15 counts.-To cause further stretching as possible. I-fold, then repeat on the floor; ward by moving your buttocks as well.
Owners Manual
Page 14
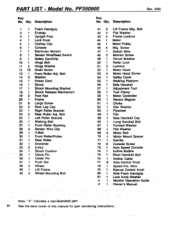
... Screw 22 2 Rear Leg Cap 23 1 Right Roller Bracket 24 2 Rear Roller Adj. Motor Bolt 70 1. Operation Guide # 1 Owner's Manual Note: -#" indicates a non-illustrated part 14 See the back cover of this manual for part reordering instructions. Qty. Description 1 1 Foam Handgrip 2 1 Endcap 3 1 Upright Post 4 1 Lock Knob 5 1 Clothes Clip 6 1 Console 7 1 Electronic Monitor 8 1 Sensor Wire/Reed Switch 9 1 Safety Card/Clip 10 .1 Hinge Bolt 11 2 Hinge Washer 12 19 Small Screw 13 1 Front Roller Adj. Bolt 25 1 Left Roller Bracket 26 1 Walking Belt 27 1 Front Roller...
... Screw 22 2 Rear Leg Cap 23 1 Right Roller Bracket 24 2 Rear Roller Adj. Motor Bolt 70 1. Operation Guide # 1 Owner's Manual Note: -#" indicates a non-illustrated part 14 See the back cover of this manual for part reordering instructions. Qty. Description 1 1 Foam Handgrip 2 1 Endcap 3 1 Upright Post 4 1 Lock Knob 5 1 Clothes Clip 6 1 Console 7 1 Electronic Monitor 8 1 Sensor Wire/Reed Switch 9 1 Safety Card/Clip 10 .1 Hinge Bolt 11 2 Hinge Washer 12 19 Small Screw 13 1 Front Roller Adj. Bolt 25 1 Left Roller Bracket 26 1 Walking Belt 27 1 Front Roller...

Owners Manual
Page 15
PF350900 Rev. 6/90 - ,37 *Specifications are subject to change without notice. 34 32 17 / 76 O' ,„ 16 35 lj n, 36 41--iL 77 M 80 76 73 79 INCLINE SHOCK ASSEMBLY 4> 72 5 9 6 45 \ ) 74 48 64 44 72 3 56 666;AfL- 68 69 4 70 11 19 21 12 47 46 29 2 MI% JL49 7-40- -al 11% 1562 z 60 30 42 214 • 13 61 1 59 130 51 78 26 33-O 20 • 9 40 2_441 4 19 57 22 . 24 - 23 2 15 Model No. EXPLODED DRAWING -
PF350900 Rev. 6/90 - ,37 *Specifications are subject to change without notice. 34 32 17 / 76 O' ,„ 16 35 lj n, 36 41--iL 77 M 80 76 73 79 INCLINE SHOCK ASSEMBLY 4> 72 5 9 6 45 \ ) 74 48 64 44 72 3 56 666;AfL- 68 69 4 70 11 19 21 12 47 46 29 2 MI% JL49 7-40- -al 11% 1562 z 60 30 42 214 • 13 61 1 59 130 51 78 26 33-O 20 • 9 40 2_441 4 19 57 22 . 24 - 23 2 15 Model No. EXPLODED DRAWING -
Owners Manual
Page 16
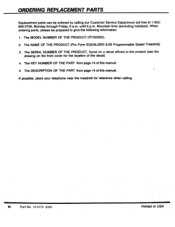
... information. 1. If possible, place your telephone near the treadmill for the location of the decal). 4. The NAME OF THE PRODUCT (Pro Form EQUALIZER 6.0S Programmable Speed Treadmill). 3. The DESCRIPTION OF THE PART from page 14 of this manual. 5. When ordering parts, please be ordered by calling our Customer Service Department toll-free at 1-800999-3756, Monday through Friday, 6 a.m. The MODEL NUMBER OF THE PRODUCT (PF350900). 2. ORDERING REPLACEMENT PARTS Replacement parts...
... information. 1. If possible, place your telephone near the treadmill for the location of the decal). 4. The NAME OF THE PRODUCT (Pro Form EQUALIZER 6.0S Programmable Speed Treadmill). 3. The DESCRIPTION OF THE PART from page 14 of this manual. 5. When ordering parts, please be ordered by calling our Customer Service Department toll-free at 1-800999-3756, Monday through Friday, 6 a.m. The MODEL NUMBER OF THE PRODUCT (PF350900). 2. ORDERING REPLACEMENT PARTS Replacement parts...


