

Instruction Manual
Page 2
... of Wi-Fi Alliance. Apply the decal in the location shown. PROFORM is a registered trademark of the warning decal(s). TABLE OF CONTENTS WARNING DECAL PLACEMENT 2 IMPORTANT PRECAUTIONS 3 BEFORE YOU BEGIN 5 PART IDENTIFICATION CHART 6 ASSEMBLY 7 THE CHEST HEART RATE MONITOR 16 HOW TO USE THE ELLIPTICAL 17 MAINTENANCE AND TROUBLESHOOTING 35 EXERCISE GUIDELINES 37...
... of Wi-Fi Alliance. Apply the decal in the location shown. PROFORM is a registered trademark of the warning decal(s). TABLE OF CONTENTS WARNING DECAL PLACEMENT 2 IMPORTANT PRECAUTIONS 3 BEFORE YOU BEGIN 5 PART IDENTIFICATION CHART 6 ASSEMBLY 7 THE CHEST HEART RATE MONITOR 16 HOW TO USE THE ELLIPTICAL 17 MAINTENANCE AND TROUBLESHOOTING 35 EXERCISE GUIDELINES 37...

Instruction Manual
Page 3
... could become caught on the elliptical. It is the responsibility of the owner to persons, read all parts each side. The elliptical is especially important for use by or through the use and before using the elliptical. 8. Do not put the elliptical in this manual should be...13. Inspect and properly tighten all important precautions and instructions in the front and rear of the elliptical are given supervision or instruction about use only. Before beginning any worn parts immediately. 9. Servicing other than 330 lbs. (150 kg). 15. do not wear loose clothes...
... could become caught on the elliptical. It is the responsibility of the owner to persons, read all parts each side. The elliptical is especially important for use by or through the use and before using the elliptical. 8. Do not put the elliptical in this manual should be...13. Inspect and properly tighten all important precautions and instructions in the front and rear of the elliptical are given supervision or instruction about use only. Before beginning any worn parts immediately. 9. Servicing other than 330 lbs. (150 kg). 15. do not wear loose clothes...

Instruction Manual
Page 5
...Cord Power Switch Wheel Ramp Roller Length: 5 ft. 9 in. (175 cm) Width: 2 ft. 2 in the drawing below. The ENDURANCE 920 E elliptical provides an impressive selection of this manual. The model number and the location of this manual. BEFORE YOU BEGIN Thank you have questions after ...Before reading further, please familiarize yourself with the parts that are shown on the front cover of the serial number decal are labeled in . (66 cm) Weight: 190 lbs. (86 kg) 5 If you for selecting the revolutionary PROFORM® ENDURANCE 920 E elliptical. To help us .
...Cord Power Switch Wheel Ramp Roller Length: 5 ft. 9 in. (175 cm) Width: 2 ft. 2 in the drawing below. The ENDURANCE 920 E elliptical provides an impressive selection of this manual. The model number and the location of this manual. BEFORE YOU BEGIN Thank you have questions after ...Before reading further, please familiarize yourself with the parts that are shown on the front cover of the serial number decal are labeled in . (66 cm) Weight: 190 lbs. (86 kg) 5 If you for selecting the revolutionary PROFORM® ENDURANCE 920 E elliptical. To help us .
Instruction Manual
Page 12
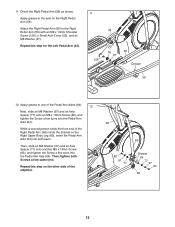
... a few turns into the Pedal Arm Axle (64). While a second person holds the front end of the elliptical. 46 60 82 97 77 Grease 64 77 97 82 58 12 Then, tighten both parts. Attach the Right Pedal Arm (58) to the axle on the Right Upper Body Leg (60), insert the...
... a few turns into the Pedal Arm Axle (64). While a second person holds the front end of the elliptical. 46 60 82 97 77 Grease 64 77 97 82 58 12 Then, tighten both parts. Attach the Right Pedal Arm (58) to the axle on the Right Upper Body Leg (60), insert the...
Instruction Manual
Page 15
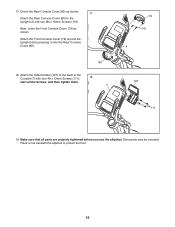
... (80) as shown. Attach the Tablet Holder (127) to the Upright (4) with four #8 x 12mm Screws (111); 18 start all parts are properly tightened before you use the elliptical. Place a mat beneath the elliptical to protect the floor. 15 Make sure that all the Screws, and then tighten them. 7 79 101 4 127 111 19...
... (80) as shown. Attach the Tablet Holder (127) to the Upright (4) with four #8 x 12mm Screws (111); 18 start all parts are properly tightened before you use the elliptical. Place a mat beneath the elliptical to protect the floor. 15 Make sure that all the Screws, and then tighten them. 7 79 101 4 127 111 19...
Instruction Manual
Page 35
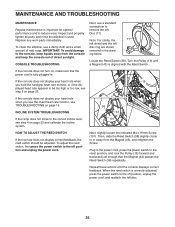
...to the console, keep liquids away from the Magnet (43), and retighten the Screw. Inspect and properly tighten all parts each time the elliptical is used. To clean the elliptical, use a standard screwdriver to remove the left Disc (71). played heart rate appears to the correct incline level...) passes the Reed Switch (38) repeatedly. CONSOLE TROUBLESHOOTING Next, use a damp cloth and a small amount of direct sunlight. Replace any worn parts immediately. Note: For clarity, the 71 left shield and the left disc. 35 Turn the Pulley (19) until the console displays correct feedback...
...to the console, keep liquids away from the Magnet (43), and retighten the Screw. Inspect and properly tighten all parts each time the elliptical is used. To clean the elliptical, use a standard screwdriver to remove the left Disc (71). played heart rate appears to the correct incline level...) passes the Reed Switch (38) repeatedly. CONSOLE TROUBLESHOOTING Next, use a damp cloth and a small amount of direct sunlight. Replace any worn parts immediately. Note: For clarity, the 71 left shield and the left disc. 35 Turn the Pulley (19) until the console displays correct feedback...
Instruction Manual
Page 36
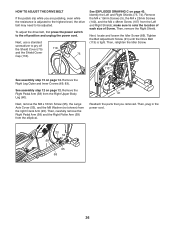
... power cord. Then, retighten the Idler Screw. 113 See assembly step 15 on page 12. Remove the Right Pedal Arm (58) from the elliptical. 89 91 Reattach the parts that you are pedaling, even while the resistance is tight. make sure to be adjusted. HOW TO ADJUST THE DRIVE BELT If the...
... power cord. Then, retighten the Idler Screw. 113 See assembly step 15 on page 12. Remove the Right Pedal Arm (58) from the elliptical. 89 91 Reattach the parts that you are pedaling, even while the resistance is tight. make sure to be adjusted. HOW TO ADJUST THE DRIVE BELT If the...


