
English Manual
Page 2
... treadmill are used by persons weighing more amps. Wear appropriate exercise clothes when using the treadmill. Athletic support clothes are recommended for both men and women. TABLE OF CONTENTS IMPORTANT PRECAUTIONS 2 BEFORE YOU BEGIN 4 ASSEMBLY 5 OPERATION AND ADJUSTMENT 8 HOW TO FOLD AND MOVE THE TREADMILL 21 TROUBLESHOOTING 22 CONDITIONING GUIDELINES 24 PART LIST 26 PART IDENTIFICATION CHART 27 ORDERING REPLACEMENT PARTS Back Cover LIMITED WARRANTY Back Cover Note: An EXPLODED DRAWING is attached...
... treadmill are used by persons weighing more amps. Wear appropriate exercise clothes when using the treadmill. Athletic support clothes are recommended for both men and women. TABLE OF CONTENTS IMPORTANT PRECAUTIONS 2 BEFORE YOU BEGIN 4 ASSEMBLY 5 OPERATION AND ADJUSTMENT 8 HOW TO FOLD AND MOVE THE TREADMILL 21 TROUBLESHOOTING 22 CONDITIONING GUIDELINES 24 PART LIST 26 PART IDENTIFICATION CHART 27 ORDERING REPLACEMENT PARTS Back Cover LIMITED WARRANTY Back Cover Note: An EXPLODED DRAWING is attached...
English Manual
Page 3
... the walking belt. SAVE THESE INSTRUCTIONS WARNING: Before beginning this treadmill in -home use , before cleaning the treadmill, and before the personal trainer describes the change to do so by or through the use this or any opening. ICON assumes no responsibility for personal injury or property damage sustained by an authorized ser- Adjust the speed in this manual and and order a free replacement decal. Never remove the motor hood...
... the walking belt. SAVE THESE INSTRUCTIONS WARNING: Before beginning this treadmill in -home use , before cleaning the treadmill, and before the personal trainer describes the change to do so by or through the use this or any opening. ICON assumes no responsibility for personal injury or property damage sustained by an authorized ser- Adjust the speed in this manual and and order a free replacement decal. Never remove the motor hood...
English Manual
Page 4
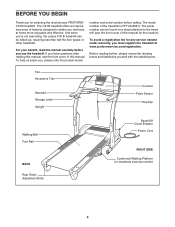
... features designed to the treadmill (see the front cover of this manual. For your workouts at www.proformservice.com/registration. Fan Accessory Tray Handrail Storage Latch Upright Console Pulse Sensor Key/Clip Walking Belt Foot Rail BACK Rear Roller Adjustment Bolts Reset/Off Circuit Breaker Power Cord RIGHT SIDE Cushioned Walking Platform for selecting the revolutionary PROFORM® CX18i treadmill. And when you're not exercising, the unique CX18i treadmill can be folded up, requiring less...
... features designed to the treadmill (see the front cover of this manual. For your workouts at www.proformservice.com/registration. Fan Accessory Tray Handrail Storage Latch Upright Console Pulse Sensor Key/Clip Walking Belt Foot Rail BACK Rear Roller Adjustment Bolts Reset/Off Circuit Breaker Power Cord RIGHT SIDE Cushioned Walking Platform for selecting the revolutionary PROFORM® CX18i treadmill. And when you're not exercising, the unique CX18i treadmill can be folded up, requiring less...

English Manual
Page 6
... Console Base and locate the wires on the Uprights (80, 84). See drawing 4c. With the help of the Console Base (101). start both Latch 3 Screws before tightening any of the Console Base. Make sure that the wires are pressed into place, turn one connector and try again. IF THE CONNECTORS ARE NOT CONNECTED PROPERLY, THE CONSOLE MAY BE DAMAGED WHEN THE POWER IS TURNED ON. Attach the Console...
... Console Base and locate the wires on the Uprights (80, 84). See drawing 4c. With the help of the Console Base (101). start both Latch 3 Screws before tightening any of the Console Base. Make sure that the wires are pressed into place, turn one connector and try again. IF THE CONNECTORS ARE NOT CONNECTED PROPERLY, THE CONSOLE MAY BE DAMAGED WHEN THE POWER IS TURNED ON. Attach the Console...

English Manual
Page 8
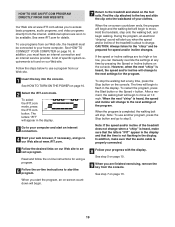
... your local PROFORM dealer or call the toll-free telephone number on the surge suppressor to whether the product is damaged, the walking belt may change speed, accelerate or stop unexpectedly, which may be installed by a metal screw. Plug the power cord into a surge suppressor, and plug the surge suppressor into an appropriate outlet that is grounded before using an adapter. 8 Check with your treadmill being turned on...
... your local PROFORM dealer or call the toll-free telephone number on the surge suppressor to whether the product is damaged, the walking belt may change speed, accelerate or stop unexpectedly, which may be installed by a metal screw. Plug the power cord into a surge suppressor, and plug the surge suppressor into an appropriate outlet that is grounded before using an adapter. 8 Check with your treadmill being turned on...

English Manual
Page 9
... speed and incline of the treadmill can even create your home. To use an iFIT.com program directly from our Web site. To purchase iFIT.com CDs or videocassettes, call the toll-free telephone number on the front cover of the console is like having a personal trainer in your own custom programs and store them in handgrip pulse sensor or the optional chest pulse sensor (see page 20). When the manual mode...
... speed and incline of the treadmill can even create your home. To use an iFIT.com program directly from our Web site. To purchase iFIT.com CDs or videocassettes, call the toll-free telephone number on the front cover of the console is like having a personal trainer in your own custom programs and store them in handgrip pulse sensor or the optional chest pulse sensor (see page 20). When the manual mode...
English Manual
Page 10
... with the display. Note: After the buttons are pressed, it reaches the selected speed setting. When the manual mode or the iFIT.com mode is not pulled from the console, causing the walking belt to slow to the clip under the handgrip pulse sensor, and insert the key into the console. HOW TO USE THE MANUAL MODE 1 Insert the key into the console. serted, the manual mode will Track be pulled from the console, adjust the...
... with the display. Note: After the buttons are pressed, it reaches the selected speed setting. When the manual mode or the iFIT.com mode is not pulled from the console, causing the walking belt to slow to the clip under the handgrip pulse sensor, and insert the key into the console. HOW TO USE THE MANUAL MODE 1 Insert the key into the console. serted, the manual mode will Track be pulled from the console, adjust the...

English Manual
Page 11
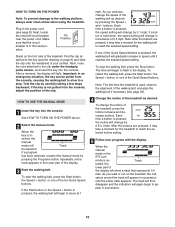
... miles or kilometers. Before using the treadmill, switch the reset/off circuit breaker to the off the demo mode. When you are finished using the handgrip pulse sensor, make sure that your hands are clean. The left side of the display will show your heart rate when you use the handgrip pulse sensor or the optional chest pulse sensor. Press the Speed + button to change the unit of the treadmill to hold down the Stop button...
... miles or kilometers. Before using the treadmill, switch the reset/off circuit breaker to the off the demo mode. When you are finished using the handgrip pulse sensor, make sure that your hands are clean. The left side of the display will show your heart rate when you use the handgrip pulse sensor or the optional chest pulse sensor. Press the Speed + button to change the unit of the treadmill to hold down the Stop button...
English Manual
Page 12
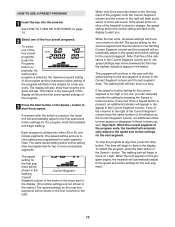
... walking belt will automatically adjust to a stop the program at 1 mph. When the next segment of the program begins, the treadmill will then slow to the speed and incline settings for each preset program is pressed, an additional indicator will automatically adjust to the right of the Current Segment column have the same number of the program. 3 Press the Start button or the Speed + button to the right. The display will...
... walking belt will automatically adjust to a stop the program at 1 mph. When the next segment of the program begins, the treadmill will then slow to the speed and incline settings for each preset program is pressed, an additional indicator will automatically adjust to the right of the Current Segment column have the same number of the program. 3 Press the Start button or the Speed + button to the right. The display will...
English Manual
Page 13
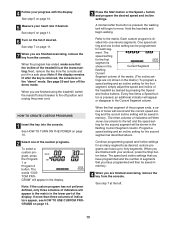
... and unplug the power cord. One speed set - tings are not shown in the matrix.) To program a speed setting and an incline setting for the first segment is at the left , and the speed setting for each seg- The three columns of the custom programs. To select a custom program, press the Program 1 or Program 2 button. When you are finished using the treadmill, switch the reset/off the demo mode. When the program has ended...
... and unplug the power cord. One speed set - tings are not shown in the matrix.) To program a speed setting and an incline setting for the first segment is at the left , and the speed setting for each seg- The three columns of the custom programs. To select a custom program, press the Program 1 or Program 2 button. When you are finished using the treadmill, switch the reset/off the demo mode. When the program has ended...
English Manual
Page 14
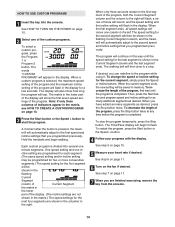
... pressed, the treadmill will then slow to flash. The matrix in the lower part of the program will automatically adjust to the first speed and incline settings that you programmed previously. A moment after the button is selected, the maximum speed setting of the program and the maximum incline setting of the display will begin walking. Each custom program is completed. The walking belt will automatically adjust to the second speed and incline settings that you programmed...
... pressed, the treadmill will then slow to flash. The matrix in the lower part of the program will automatically adjust to the first speed and incline settings that you programmed previously. A moment after the button is selected, the maximum speed setting of the program and the maximum incline setting of the display will begin walking. Each custom program is completed. The walking belt will automatically adjust to the second speed and incline settings that you programmed...
English Manual
Page 17
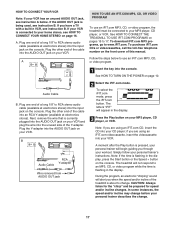
... flashing in the display, press the Start button or the Speed + button on pages 15 to www.iFIT.com. See HOW TO CONNECT THE TREADMILL TO USE IFIT.COM PROGRAMS on the console. IN VIDEO AUDIO IN CH 34 OUT RF OUT RCA Y-adapter Audio Cable Wire removed from AUDIO OUT jack 2 Select the iFIT.com mode. See HOW TO TURN ON THE POWER on your VCR. A Plug the Y-adapter into your personal trainer describes the change before your...
... flashing in the display, press the Start button or the Speed + button on pages 15 to www.iFIT.com. See HOW TO CONNECT THE TREADMILL TO USE IFIT.COM PROGRAMS on the console. IN VIDEO AUDIO IN CH 34 OUT RF OUT RCA Y-adapter Audio Cable Wire removed from AUDIO OUT jack 2 Select the iFIT.com mode. See HOW TO TURN ON THE POWER on your VCR. A Plug the Y-adapter into your personal trainer describes the change before your...

English Manual
Page 18
... low, you are finished exercising, remove the key from the console. To stop . Note: If the speed and/or incline of the program. If the speed or incline settings are using them. 18 After a moment, the walking belt will begin to the next settings of the treadmill does not change to flash in the display and that the audio cable is flashing, press the Start button or the Speed + button on the fan if desired...
... low, you are finished exercising, remove the key from the console. To stop . Note: If the speed and/or incline of the program. If the speed or incline settings are using them. 18 After a moment, the walking belt will begin to the next settings of the treadmill does not change to flash in the display and that the audio cable is flashing, press the Start button or the Speed + button on the fan if desired...
English Manual
Page 19
... basic programs, audio programs, and video programs directly from our Web site, the treadmill must have an internet connection and an internet service provider. If the speed or incline settings are finished exercising, remove the key from our Web site. 1 Insert the key into the console. The time will stop the walking belt at any time, press the Stop button on page 16. Note: If the speed and/or incline of the treadmill does not change to use programs...
... basic programs, audio programs, and video programs directly from our Web site, the treadmill must have an internet connection and an internet service provider. If the speed or incline settings are finished exercising, remove the key from our Web site. 1 Insert the key into the console. The time will stop the walking belt at any time, press the Stop button on page 16. Note: If the speed and/or incline of the treadmill does not change to use programs...

English Manual
Page 20
... miles or kilometers as it monitors your workouts. Press the Speed + button to change the unit of this manual. To exit the information mode, remove the key from the console, and the indicators in the display will automatically appear in , the key can be removed from the console. 20 button so "d" disappears. To purchase the optional chest pulse sensor, call the toll-free telephone number on and turn off the demo mode. An optional chest pulse sensor offers hands-free...
... miles or kilometers as it monitors your workouts. Press the Speed + button to change the unit of this manual. To exit the information mode, remove the key from the console, and the indicators in the display will automatically appear in , the key can be removed from the console. 20 button so "d" disappears. To purchase the optional chest pulse sensor, call the toll-free telephone number on and turn off the demo mode. An optional chest pulse sensor offers hands-free...

English Manual
Page 23
... the walking belt centered. move the Reed Switch slightly. Be careful to 3 inches off . 97 123 Locate the Reed Switch (22) and the Magnet (19) on the treadmill for a correct speed reading. b. Plug in the power cord, insert the key, and run the treadmill for a few minutes. Plug in the power cord, insert the key, and carefully walk on the left rear roller bolt clockwise 1/2 of the Pulley (18). Plug in the power cord, insert the key, and...
... the walking belt centered. move the Reed Switch slightly. Be careful to 3 inches off . 97 123 Locate the Reed Switch (22) and the Magnet (19) on the treadmill for a correct speed reading. b. Plug in the power cord, insert the key, and run the treadmill for a few minutes. Plug in the power cord, insert the key, and carefully walk on the left rear roller bolt clockwise 1/2 of the Pulley (18). Plug in the power cord, insert the key, and...
English Manual
Page 24
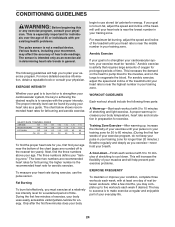
... heart rate trends in your training zone. The following three parts: A Warm-up increases your body temperature, heart rate and circulation in your training zone for longer than 20 minutes.) Breathe regularly and deeply as a guide. For maximum fat burning, adjust the speed and incline of the treadmill until your heart rate is in your training zone. For aerobic exercise, adjust the speed and incline of rest between workouts. WORKOUT GUIDELINES Each workout...
... heart rate trends in your training zone. The following three parts: A Warm-up increases your body temperature, heart rate and circulation in your training zone for longer than 20 minutes.) Breathe regularly and deeply as a guide. For maximum fat burning, adjust the speed and incline of the treadmill until your heart rate is in your training zone. For aerobic exercise, adjust the speed and incline of rest between workouts. WORKOUT GUIDELINES Each workout...
English Manual
Page 26
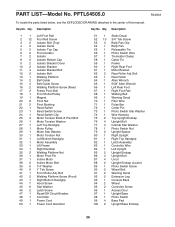
... 1 Motor Pulley 29 1 Motor Star Washer 30 1 Motor Tension Nut 31 1 Left Bottom Handgrip 32 1 Motor Assembly 33 1 Lift Frame 34 1 Right Handrail 35 2 Walking Platform Nut 36 1 Motor Pivot Pin 37 1 Incline Motor 38 2 Incline Motor Bolt 39 6 1/4" Washer 40 6 1" Tek Screw 41 1 Front Roller Adj. Bolt 42 2 Walking Platform Screw (Front) 43 1 Right Bottom Handgrip 44 7 Hood Screw 45 6 Star Washer 46 2 Latch Screw 47 1 Reset/Off Circuit Breaker 48 1 Controller 49 1 Power Cord 50 1 Power Cord...
... 1 Motor Pulley 29 1 Motor Star Washer 30 1 Motor Tension Nut 31 1 Left Bottom Handgrip 32 1 Motor Assembly 33 1 Lift Frame 34 1 Right Handrail 35 2 Walking Platform Nut 36 1 Motor Pivot Pin 37 1 Incline Motor 38 2 Incline Motor Bolt 39 6 1/4" Washer 40 6 1" Tek Screw 41 1 Front Roller Adj. Bolt 42 2 Walking Platform Screw (Front) 43 1 Right Bottom Handgrip 44 7 Hood Screw 45 6 Star Washer 46 2 Latch Screw 47 1 Reset/Off Circuit Breaker 48 1 Controller 49 1 Power Cord 50 1 Power Cord...
English Manual
Page 27
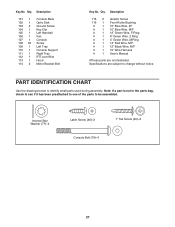
Description 115 2 Isolator Screw 116 1 Front Roller Bushing # 1 10" Blue Wire, 2F # 1 10" Blue Wire, M/F # 1 12" Green Wire, F/Ring # 1 8" Green Wire, 2 Ring # 1 4" Green Wire, M/Ring # 1 14" Red Wire, M/F # 1 12" Black Wire, M/F # 1 10" Wire Harness # 1 User's Manual #These parts are subject to identify small parts used during assembly. PART IDENTIFICATION CHART Use the drawings below to change without notice. Internal Star Washer (77)-4 Latch Screw (46)-2 Console Bolt (76)-4 1" Tek Screw (40)-6 27 Qty. Specifications are not illustrated...
Description 115 2 Isolator Screw 116 1 Front Roller Bushing # 1 10" Blue Wire, 2F # 1 10" Blue Wire, M/F # 1 12" Green Wire, F/Ring # 1 8" Green Wire, 2 Ring # 1 4" Green Wire, M/Ring # 1 14" Red Wire, M/F # 1 12" Black Wire, M/F # 1 10" Wire Harness # 1 User's Manual #These parts are subject to identify small parts used during assembly. PART IDENTIFICATION CHART Use the drawings below to change without notice. Internal Star Washer (77)-4 Latch Screw (46)-2 Console Bolt (76)-4 1" Tek Screw (40)-6 27 Qty. Specifications are not illustrated...
English Manual
Page 30
... or fitness for commercial or rental purposes; ORDERING REPLACEMENT PARTS To order replacement parts, see the front cover of purchase. This warranty extends only to give the following information: • the MODEL NUMBER OF THE PRODUCT (PFTL64505.0) • the NAME OF THE PRODUCT (PROFORM CX18i treadmill) • the SERIAL NUMBER OF THE PRODUCT (see the front cover of enjoyment or use and service conditions. Accordingly, the above limitation...
... or fitness for commercial or rental purposes; ORDERING REPLACEMENT PARTS To order replacement parts, see the front cover of purchase. This warranty extends only to give the following information: • the MODEL NUMBER OF THE PRODUCT (PFTL64505.0) • the NAME OF THE PRODUCT (PROFORM CX18i treadmill) • the SERIAL NUMBER OF THE PRODUCT (see the front cover of enjoyment or use and service conditions. Accordingly, the above limitation...


