
English Manual
Page 2
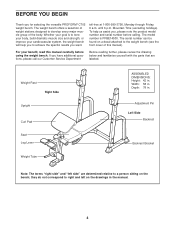
If a decal is a registered trademark of this manual. PROFORM is missing or illegible, please call our Customer Service Department toll-free at 1-800-999-3756, Monday through Friday, 6 a.m. Remove the PART IDENTIFICATION CHART and ... CHART and a PART LIST/EXPLODED DRAWING is attached in the location shown. WARNING DECAL PLACEMENT The decals shown here have been placed on the weight bench.
If a decal is a registered trademark of this manual. PROFORM is missing or illegible, please call our Customer Service Department toll-free at 1-800-999-3756, Monday through Friday, 6 a.m. Remove the PART IDENTIFICATION CHART and ... CHART and a PART LIST/EXPLODED DRAWING is attached in the location shown. WARNING DECAL PLACEMENT The decals shown here have been placed on the weight bench.

English Manual
Page 3
...the front leg before beginning any exercise. 10. Always exercise with the leg lever. 8. WARNING: Before beginning this product. 3 The weight bench is the responsibility of the owner to ensure that you are adequately informed of all users of 35 or persons with pre-existing health problems...the following important precautions before using the leg lever, place a barbell with the same amount of weight on the weight rests to balance the bench. 14. Replace any time while exercising, stop immediately and begin cooling down. Keep children under 12 and pets away from tipping. 12....
...the front leg before beginning any exercise. 10. Always exercise with the leg lever. 8. WARNING: Before beginning this product. 3 The weight bench is the responsibility of the owner to ensure that you are adequately informed of all users of 35 or persons with pre-existing health problems...the following important precautions before using the leg lever, place a barbell with the same amount of weight on the weight rests to balance the bench. 14. Replace any time while exercising, stop immediately and begin cooling down. Keep children under 12 and pets away from tipping. 12....
English Manual
Page 4
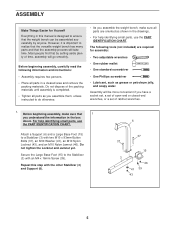
...read this manual). BEFORE YOU BEGIN Thank you want. The weight bench offers a selection of weight stations designed to develop every major .... Width: 58 in . The model number is to the weight bench (see the front cover of the body. The serial number can ...: The terms "right side" and "left on the bench; Whether your cardiovascular system, the weight bench will help us assist you to a person sitting on ...please note the product model number and serial number before using the weight bench. If you have additional questions, please call our Customer Service Department Before ...
...read this manual). BEFORE YOU BEGIN Thank you want. The weight bench offers a selection of weight stations designed to develop every major .... Width: 58 in . The model number is to the weight bench (see the front cover of the body. The serial number can ...: The terms "right side" and "left on the bench; Whether your cardiovascular system, the weight bench will help us assist you to a person sitting on ...please note the product model number and serial number before using the weight bench. If you have additional questions, please call our Customer Service Department Before ...
English Manual
Page 5
... standard screwdriver • One Phillips screwdriver • Lubricant, such as you assemble them, unless instructed to realize that the versatile weight bench has many parts and that the weight bench can be more convenient if you understand the information in the box above. However, it is important to do otherwise. • As...
... standard screwdriver • One Phillips screwdriver • Lubricant, such as you assemble them, unless instructed to realize that the versatile weight bench has many parts and that the weight bench can be more convenient if you understand the information in the box above. However, it is important to do otherwise. • As...
English Manual
Page 7
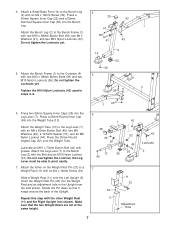
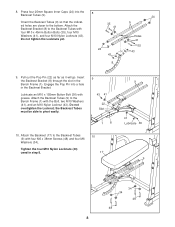
... (44). Insert the Weight Rest Pin (23) into the Weight Tube (13). Press two 50mm Square Inner Caps (25) into the Bench Leg. 1 41 Attach the Bench Leg (2) to the Bench Leg 4 (2) with the Bolt and an M10 Nylon Locknut (43). Do not overtighten the Locknut; Press the 25mm Round Angled Cap (32... (56). the Leg Lever must be able to a Weight Rest (11) with the other Weight Rest (11) and the Right Upright (not shown). Attach the Bench Frame (1) to the Leg Lever (7) with two M10 x 68mm Button Bolt (38), two M10 Washers (41), and two M10 Nylon Locknuts (43). Attach the Weight...
... (44). Insert the Weight Rest Pin (23) into the Weight Tube (13). Press two 50mm Square Inner Caps (25) into the Bench Leg. 1 41 Attach the Bench Leg (2) to the Bench Leg 4 (2) with the Bolt and an M10 Nylon Locknut (43). Do not overtighten the Locknut; Press the 25mm Round Angled Cap (32... (56). the Leg Lever must be able to a Weight Rest (11) with the other Weight Rest (11) and the Right Upright (not shown). Attach the Bench Frame (1) to the Leg Lever (7) with two M10 x 68mm Button Bolt (38), two M10 Washers (41), and two M10 Nylon Locknuts (43). Attach the Weight...
English Manual
Page 8
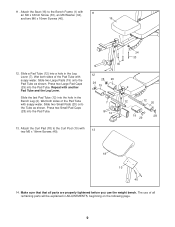
...Backrest Tubes (9) with grease. Do not tighten the Locknuts yet. 35 41 24 43 8 24 9 Holes 41 35 43 9. Attach the Backrest Bracket (8) to the Bench Frame (1) with four M10 x 45mm Button Bolts (35), four M10 Washers (41), and four M10 Nylon Locknuts (43). Orient the Backrest Tubes (9) so that ... the bottom. Insert the Backrest Bracket (8) through the slot in the Backrest Bracket. 8. Press four 25mm Square Inner Caps (24) into a hole in the Bench Frame (1). Pull out the Pop Pin (22) as far as it will go. Tighten the four M10 Nylon Locknuts (43) used in step 8. 10 17...
...Backrest Tubes (9) with grease. Do not tighten the Locknuts yet. 35 41 24 43 8 24 9 Holes 41 35 43 9. Attach the Backrest Bracket (8) to the Bench Frame (1) with four M10 x 45mm Button Bolts (35), four M10 Washers (41), and four M10 Nylon Locknuts (43). Orient the Backrest Tubes (9) so that ... the bottom. Insert the Backrest Bracket (8) through the slot in the Backrest Bracket. 8. Press four 25mm Square Inner Caps (24) into a hole in the Bench Frame (1). Pull out the Pop Pin (22) as far as it will go. Tighten the four M10 Nylon Locknuts (43) used in step 8. 10 17...
English Manual
Page 9
...as shown. Slide two Small Pads (20) onto the Tube as shown. Attach the Curl Pad (18) to the Bench Frame (1) with 11 an M6 x 63mm Screw (33), an M6 Washer (34), and two M6 x 16mm Screws ...(40). 16 1 12. Make sure that that all remaining parts will be explained in the Bench Leg (2). 11. Wet both sides of the Pad Tube with soapy water. Wet both sides of all parts ...are properly tightened before you use of the Pad Tube with soapy water. The use the weight bench. Attach the Seat (16) to the Curl Post (10) with another Pad Tube and the Leg Lever...
...as shown. Slide two Small Pads (20) onto the Tube as shown. Attach the Curl Pad (18) to the Bench Frame (1) with 11 an M6 x 63mm Screw (33), an M6 Washer (34), and two M6 x 16mm Screws ...(40). 16 1 12. Make sure that that all remaining parts will be explained in the Bench Leg (2). 11. Wet both sides of the Pad Tube with soapy water. Wet both sides of all parts ...are properly tightened before you use of the Pad Tube with soapy water. The use the weight bench. Attach the Seat (16) to the Curl Post (10) with another Pad Tube and the Leg Lever...
English Manual
Page 10
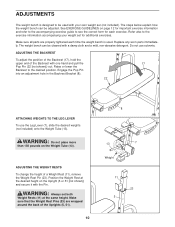
... 11 23 5 Make sure that the Weight Rest Pins (23) are properly tightened each exercise. Replace any worn parts immediately. The weight bench can be cleaned with your weight set for important exercise information and refer to the accompanying exercise guide to the desired position. Do not use... desired weights (not included) onto the Weight Tube (13). WARNING: Always set (not included). The steps below explain how the weight bench can be adjusted. Position the Weight Rest at the same height. Raise or lower the Backrest to see the correct form for each time...
... 11 23 5 Make sure that the Weight Rest Pins (23) are properly tightened each exercise. Replace any worn parts immediately. The weight bench can be cleaned with your weight set for important exercise information and refer to the accompanying exercise guide to the desired position. Do not use... desired weights (not included) onto the Weight Tube (13). WARNING: Always set (not included). The steps below explain how the weight bench can be adjusted. Position the Weight Rest at the same height. Raise or lower the Backrest to see the correct form for each time...

English Manual
Page 11
Slide the Curl Post into the Bench Leg. Tighten the Curl Knob (27) into the bench Leg (2). Remove the 50mm Square Inner Cap (25). Align the adjustment holes in the Curl Post with the adjustment hole in the Bench Leg. Fully tighten the Knob. 10 25 2 27 11 ATTACHING THE CURL POST For some exercises, the Curl Post (10) must be attached to the weight bench.
Slide the Curl Post into the Bench Leg. Tighten the Curl Knob (27) into the bench Leg (2). Remove the 50mm Square Inner Cap (25). Align the adjustment holes in the Curl Post with the adjustment hole in the Bench Leg. Fully tighten the Knob. 10 25 2 27 11 ATTACHING THE CURL POST For some exercises, the Curl Post (10) must be attached to the weight bench.
English Manual
Page 16
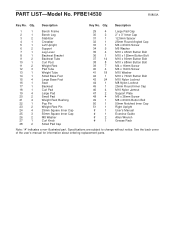
Qty. Description 1 1 Bench Frame 2 1 Bench Leg 3 2 Stabilizer 4 1 Crossbar 5 1 Left Upright 6 2 Support 7 1 Leg Lever 8 1 Backrest Bracket 9 2 Backrest Tube 10 1 Curl Post 11 2 Weight Rest 12 3 Pad Tube 13 1 Weight Tube 14 1 ...
Qty. Description 1 1 Bench Frame 2 1 Bench Leg 3 2 Stabilizer 4 1 Crossbar 5 1 Left Upright 6 2 Support 7 1 Leg Lever 8 1 Backrest Bracket 9 2 Backrest Tube 10 1 Curl Post 11 2 Weight Rest 12 3 Pad Tube 13 1 Weight Tube 14 1 ...
English Manual
Page 18
...-3756, Monday through one of this manual) LIMITED WARRANTY ICON Health & Fitness, Inc. (ICON), warrants this manual) 4. The MODEL NUMBER of the product (PROFORM® C705 weight bench) 3. The SERIAL NUMBER of the product (see the PART LIST and EXPLODED DRAWING at the center of its scope and duration to give the...
...-3756, Monday through one of this manual) LIMITED WARRANTY ICON Health & Fitness, Inc. (ICON), warrants this manual) 4. The MODEL NUMBER of the product (PROFORM® C705 weight bench) 3. The SERIAL NUMBER of the product (see the PART LIST and EXPLODED DRAWING at the center of its scope and duration to give the...
