
English Manual
Page 1
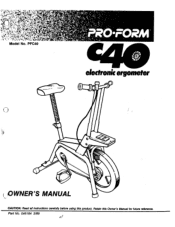
Part No. 046184 3/89 • • •FORM electronic ergometer 40/ ( OWNER'S MANUAL CAUTION: Read all instructions carefully before using this Owner's Manual for future reference. Retain this product.
Part No. 046184 3/89 • • •FORM electronic ergometer 40/ ( OWNER'S MANUAL CAUTION: Read all instructions carefully before using this Owner's Manual for future reference. Retain this product.
English Manual
Page 2
This warranty extends only to replacing or repairing, at Pro Form's option, the product at one of purchase. Pre-authorization may also have other warranty beyond that specifically set forth above is authorized by calling Pro Form's Customer Service Department at one of its authorized service centers with all freight and other transportation charges prepaid, accompanied by a Pro Form authorized service center or for products used for...
This warranty extends only to replacing or repairing, at Pro Form's option, the product at one of purchase. Pre-authorization may also have other warranty beyond that specifically set forth above is authorized by calling Pro Form's Customer Service Department at one of its authorized service centers with all freight and other transportation charges prepaid, accompanied by a Pro Form authorized service center or for products used for...

English Manual
Page 3
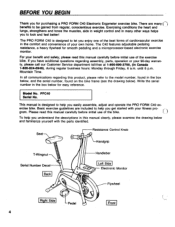
... CONTENTS Warranty 2 Before You Begin 4 Assembly 5 Adjustment 6 Maintenance and Storage 6 Conditioning Guidelines 6 Exploded Drawing 10 Part List 11 Part Ordering Information 12 WARNING: Before beginning this Pro Form product. 3 sonal injury or property damage sustained by or through the use of 35 or persons with pre-existing health problems. Read all instructions before using. Pro Form assumes no responsibility for individuals over the age of this or any exercise program...
... CONTENTS Warranty 2 Before You Begin 4 Assembly 5 Adjustment 6 Maintenance and Storage 6 Conditioning Guidelines 6 Exploded Drawing 10 Part List 11 Part Ordering Information 12 WARNING: Before beginning this Pro Form product. 3 sonal injury or property damage sustained by or through the use of 35 or persons with pre-existing health problems. Read all instructions before using. Pro Form assumes no responsibility for individuals over the age of this or any exercise program...
English Manual
Page 4
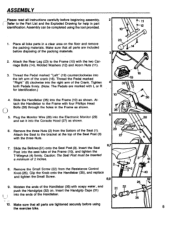
... the model number, found on the bike frame (see the drawing below and familiarize yourself with your fitness program. Seat Resistance Control Knob 0 Handgrip T-Wingnut Serial Number Decal Back Handlebar Left Side Electronic Monitor Flywheel Right Side Pedal 4 Front until 6 p.m. To help you for smooth pedaling and a microprocessor-based electronic exercise monitor. For your own home. Mountain Time. BEFORE YOU BEGIN Thank you easily assemble, adjust and operate the PRO FORM C40 exercise bike.
... the model number, found on the bike frame (see the drawing below and familiarize yourself with your fitness program. Seat Resistance Control Knob 0 Handgrip T-Wingnut Serial Number Decal Back Handlebar Left Side Electronic Monitor Flywheel Right Side Pedal 4 Front until 6 p.m. To help you for smooth pedaling and a microprocessor-based electronic exercise monitor. For your own home. Mountain Time. BEFORE YOU BEGIN Thank you easily assemble, adjust and operate the PRO FORM C40 exercise bike.
English Manual
Page 5
... assembly. 2 - 11 )efer to the Part List and the Exploded Drawing for identification.) 4. Place all bike parts in a clear area on . Thread the Pedal marked "Left" (19) counterclockwise into the seat tube of the crank (18). Insert the Seat Post into the left arm of the Frame (10), and tighten the z T-Wingnut (4) firmly. Caution: The Seat Post must be completed using the exercise bike. 5 Attach the Rear Leg...
... assembly. 2 - 11 )efer to the Part List and the Exploded Drawing for identification.) 4. Place all bike parts in a clear area on . Thread the Pedal marked "Left" (19) counterclockwise into the seat tube of the crank (18). Insert the Seat Post into the left arm of the Frame (10), and tighten the z T-Wingnut (4) firmly. Caution: The Seat Post must be completed using the exercise bike. 5 Attach the Rear Leg...
English Manual
Page 6
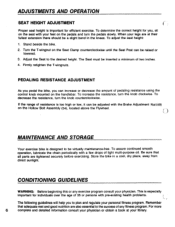
... or lowered. 3. PEDALING RESISTANCE ADJUSTMENT As you pedal the bike, you can be a slight bend in a cool, dry place, away from direct sunlight. To increase the resistance, turn the knob counterclockwise. Be sure that adequate rest and good nutrition are tightened securely before exercising. CONDITIONING GUIDELINES WARNING: Before beginning this or any fitness program. To adjust the seat height: 1. The Seat must be virtually maintenance-free. Remember that all parts...
... or lowered. 3. PEDALING RESISTANCE ADJUSTMENT As you pedal the bike, you can be a slight bend in a cool, dry place, away from direct sunlight. To increase the resistance, turn the knob counterclockwise. Be sure that adequate rest and good nutrition are tightened securely before exercising. CONDITIONING GUIDELINES WARNING: Before beginning this or any fitness program. To adjust the seat height: 1. The Seat must be virtually maintenance-free. Remember that all parts...

English Manual
Page 7
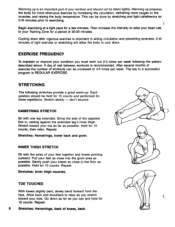
... workload will drop rapidly after you stop exercising.) Compare your heart rate to place two fingers on your Training Zone. 'f__JEXERCISE PATTERN Each workout should keep your heart rate near the low end of your level of exertion. Training Zone exercise 4. The easiest way to your wrist where you feel a pulse. If your heart rate is above your Training Zone decrease your level of...
... workload will drop rapidly after you stop exercising.) Compare your heart rate to place two fingers on your Training Zone. 'f__JEXERCISE PATTERN Each workout should keep your heart rate near the low end of your level of exertion. Training Zone exercise 4. The easiest way to your wrist where you feel a pulse. If your heart rate is above your Training Zone decrease your level of...
English Manual
Page 8
...day of rest between workouts is REGULAR EXERCISE. The key to a successful program is recommended. don't bounce. Bring the sole of the opposite foot in aiding circulation and preventing soreness. 5-10 minutes of light exercise or stretching will allow the body to cool down as ...Training Zone for 15 counts, then relax. Stretch slowly - Stretch toward your feet as close to exercising. Repeat. Stretches: Hamstrings, lower back and groin. Stretches: Inner thigh muscles. Warming up is an important part of your toe as far as possible. Then increase the intensity to raise your heart rate...
...day of rest between workouts is REGULAR EXERCISE. The key to a successful program is recommended. don't bounce. Bring the sole of the opposite foot in aiding circulation and preventing soreness. 5-10 minutes of light exercise or stretching will allow the body to cool down as ...Training Zone for 15 counts, then relax. Stretch slowly - Stretch toward your feet as close to exercising. Repeat. Stretches: Hamstrings, lower back and groin. Stretches: Inner thigh muscles. Warming up is an important part of your toe as far as possible. Then increase the intensity to raise your heart rate...

English Manual
Page 9
...CALF/ACHILLES STRETCH With one hand against the wall. To cause further stretching of the other and arms forward, lean against a wall for balance, reach behind t )you and pull up your back leg straight and back foot flat on the other side for 15 counts. Stretches: Calves, achilles tendons..., and ankles. then bend the front leg and lean forward by moving your buttocks as possible. Stretches: Quadriceps, hip muscles. Bring your heel as well. Hold, then repeat on the floor; Keep your foot...
...CALF/ACHILLES STRETCH With one hand against the wall. To cause further stretching of the other and arms forward, lean against a wall for balance, reach behind t )you and pull up your back leg straight and back foot flat on the other side for 15 counts. Stretches: Calves, achilles tendons..., and ankles. then bend the front leg and lean forward by moving your buttocks as possible. Stretches: Quadriceps, hip muscles. Bring your heel as well. Hold, then repeat on the floor; Keep your foot...
English Manual
Page 10
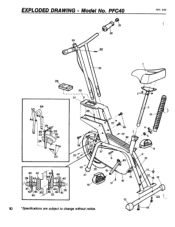
PFC40 31 32 25 52 REV. 3/89 2 O • • 2 27 • 28 2 49 24 53 26 34 50 40 47 39 43 40 1143 40 41 42 45 20 40 44 46 42 139 5 7 50 36 22 )1"117 37 ,zor 6 22 21 19 18 A 17 38 8 15 16 13 10 *Specifications are subject to change without notice. 3 51 4 5 8 9 10 11 12 13 23 (s., 14 EXPLODED DRAWING - Model No.
PFC40 31 32 25 52 REV. 3/89 2 O • • 2 27 • 28 2 49 24 53 26 34 50 40 47 39 43 40 1143 40 41 42 45 20 40 44 46 42 139 5 7 50 36 22 )1"117 37 ,zor 6 22 21 19 18 A 17 38 8 15 16 13 10 *Specifications are subject to change without notice. 3 51 4 5 8 9 10 11 12 13 23 (s., 14 EXPLODED DRAWING - Model No.
English Manual
Page 11
... 1 Frame 11 2 Acorn Nut 12 2 Molded Washer 13 2 Leg Cap 14 2 Carriage Bolt 15 1 Right Chain Guard 16 1 Left Chain Guard Set 17 4 Chain Guard Bolt 18 1 Crank Assembly 19 1 Left Pedal 20 1 Flywheel 21 2 Front Leg Cap 22 4 Small Chain Guard Screw 23 1 Rear Leg 24 1 Left Brake Pad 25 1 Resistance Control/Cable 26 1 Right Control Bar 27 1 Console Hood 28 1 Monitor Wire w/Drive 29 1 Electronic Monitor Key No. Qty. PART LIST - Qty. Model No.
... 1 Frame 11 2 Acorn Nut 12 2 Molded Washer 13 2 Leg Cap 14 2 Carriage Bolt 15 1 Right Chain Guard 16 1 Left Chain Guard Set 17 4 Chain Guard Bolt 18 1 Crank Assembly 19 1 Left Pedal 20 1 Flywheel 21 2 Front Leg Cap 22 4 Small Chain Guard Screw 23 1 Rear Leg 24 1 Left Brake Pad 25 1 Resistance Control/Cable 26 1 Right Control Bar 27 1 Console Hood 28 1 Monitor Wire w/Drive 29 1 Electronic Monitor Key No. Qty. PART LIST - Qty. Model No.
English Manual
Page 12
... Part List found in Canada at 1-800-999-3756, (in this manual. ORDERING REPLACEMENT PARTS Replacement parts can be prepared to give the following information: 1. When ordering parts, please be ordered by calling our Customer Service Department toll-free at 1-800-824-8949) during regular business hours: Monday - The KEY NUMBER OF THE PART from the Part List found in this manual). 4. The NAME OF PRODUCT (PRO FORM C40). 3. The SERIAL NUMBER...
... Part List found in Canada at 1-800-999-3756, (in this manual. ORDERING REPLACEMENT PARTS Replacement parts can be prepared to give the following information: 1. When ordering parts, please be ordered by calling our Customer Service Department toll-free at 1-800-824-8949) during regular business hours: Monday - The KEY NUMBER OF THE PART from the Part List found in this manual). 4. The NAME OF PRODUCT (PRO FORM C40). 3. The SERIAL NUMBER...

