
English Manual
Page 2
TABLE OF CONTENTS IMPORTANT PRECAUTIONS 3 BEFORE YOU BEGIN 4 ASSEMBLY 5 HOW TO USE THE PROFORM® 990S 7 CONDITIONING GUIDELINES 10 MAINTENANCE AND STORAGE 12 NOTES 13 PART LIST 14 EXPLODED DRAWING 15 ORDERING REPLACEMENT PARTS Back Cover LIMITED WARRANTY Back Cover 2
TABLE OF CONTENTS IMPORTANT PRECAUTIONS 3 BEFORE YOU BEGIN 4 ASSEMBLY 5 HOW TO USE THE PROFORM® 990S 7 CONDITIONING GUIDELINES 10 MAINTENANCE AND STORAGE 12 NOTES 13 PART LIST 14 EXPLODED DRAWING 15 ORDERING REPLACEMENT PARTS Back Cover LIMITED WARRANTY Back Cover 2

English Manual
Page 3
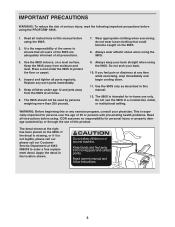
... with pre-existing health problems. Read all instructions in a commercial, rental, or institutional setting. Use the 990S indoors on or around machine. If you feel pain or dizziness at 1-800-999-3756 to order a free replacement decal. Do not use only. Keep hands and feet away from moisture and dust. Read owner's manual and follow instructions. 3 Read all instructions before using. The 990S is...
... with pre-existing health problems. Read all instructions in a commercial, rental, or institutional setting. Use the 990S indoors on or around machine. If you feel pain or dizziness at 1-800-999-3756 to order a free replacement decal. Do not use only. Keep hands and feet away from moisture and dust. Read owner's manual and follow instructions. 3 Read all instructions before using. The 990S is...
English Manual
Page 4
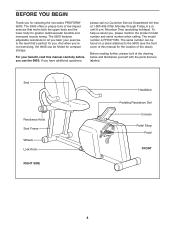
... this manual for the location of the decal). To help us assist you . And when you use the 990S. Seat Resistance Knob Seat Frame Wheels Lock Knob RIGHT SIDE Handlebar Pedaling Resistance Dial Console Pedal Strap Pedal FRONT 4 until 6 p.m. The 990S offers a unique form of this manual carefully before you ʼre not exercising, the 990S can be folded for greater cardiovascular benefits and increased muscle toning. The model number...
... this manual for the location of the decal). To help us assist you . And when you use the 990S. Seat Resistance Knob Seat Frame Wheels Lock Knob RIGHT SIDE Handlebar Pedaling Resistance Dial Console Pedal Strap Pedal FRONT 4 until 6 p.m. The 990S offers a unique form of this manual carefully before you ʼre not exercising, the 990S can be folded for greater cardiovascular benefits and increased muscle toning. The model number...

English Manual
Page 6
... Carriage Bolt. Note: To attach the Resistance Knob (7) on the Left Pedal for identification). Press two batteries into the left arm of the Crank (14). Make sure that the head of the Long Carriage Bolt is resting in the square hole in the left side, reverse the positions of the Seat Frame (2). 4. Using an adjustable wrench, tighten the Left Pedal counterclockwise into the battery clip. Adjust the Pedal Strap...
... Carriage Bolt. Note: To attach the Resistance Knob (7) on the Left Pedal for identification). Press two batteries into the left arm of the Crank (14). Make sure that the head of the Long Carriage Bolt is resting in the square hole in the left side, reverse the positions of the Seat Frame (2). 4. Using an adjustable wrench, tighten the Left Pedal counterclockwise into the battery clip. Adjust the Pedal Strap...

English Manual
Page 7
... pedal. To increase the resistance, turn the Resistance Dial clockwise; To increase the resistance, turn the Resistance Knob clockwise; HOW TO USE THE PROFORM® 990S HOW TO ADJUST THE POSITION OF THE SEAT FRAME The Seat Frame (2) can be adjusted. Slide the Seat Frame forward or backward to the position that is controlled with the adjustment tab. Press the Pedal Strap onto the adjustment tab. HOW TO USE THE HANDLEBARS For lower-body exercise...
... pedal. To increase the resistance, turn the Resistance Dial clockwise; To increase the resistance, turn the Resistance Knob clockwise; HOW TO USE THE PROFORM® 990S HOW TO ADJUST THE POSITION OF THE SEAT FRAME The Seat Frame (2) can be adjusted. Slide the Seat Frame forward or backward to the position that is controlled with the adjustment tab. Press the Pedal Strap onto the adjustment tab. HOW TO USE THE HANDLEBARS For lower-body exercise...

English Manual
Page 8
... program, an Aerobic program, and a special Fat Burn program. as the target pace changes, simply adjust your pedaling pace, in miles per hour. • Time-If you select the manual mode, this mode will count down the time remaining in the When you have burned. (See FAT BURNING on page 10.) • Scan-This mode displays the calories, fat calories, speed, time, and distance modes...
... program, an Aerobic program, and a special Fat Burn program. as the target pace changes, simply adjust your pedaling pace, in miles per hour. • Time-If you select the manual mode, this mode will count down the time remaining in the When you have burned. (See FAT BURNING on page 10.) • Scan-This mode displays the calories, fat calories, speed, time, and distance modes...

English Manual
Page 9
... use. To turn on the power, press the on /reset button. If the pedals are not turned and (Interval), program 2 (Aerobic), program 3 (Fat the console buttons are not pressed for four Burn), manual mode. than the target pace, especially during the first few months of currently displayed. minutes, the power will To turn off the power, simply wait for about 5 miles per hour. The programs will turn off automatically. 3 Begin your exercise program. STEP-BY-STEP CONSOLE...
... use. To turn on the power, press the on /reset button. If the pedals are not turned and (Interval), program 2 (Aerobic), program 3 (Fat the console buttons are not pressed for four Burn), manual mode. than the target pace, especially during the first few months of currently displayed. minutes, the power will To turn off the power, simply wait for about 5 miles per hour. The programs will turn off automatically. 3 Begin your exercise program. STEP-BY-STEP CONSOLE...

English Manual
Page 10
... any exercise program, consult your pedaling pace, adjusting the pedaling resistance, or moving the handlebars as you must be found by 10 to plan your exercise program. The proper intensity level can adjust the intensity of 5 to the nearest ten years). Fat Burning To burn fat effectively, you pedal. Take a six-second heartbeat count, and multiply the result by using your body temperature, heart rate...
... any exercise program, consult your pedaling pace, adjusting the pedaling resistance, or moving the handlebars as you must be found by 10 to plan your exercise program. The proper intensity level can adjust the intensity of 5 to the nearest ten years). Fat Burning To burn fat effectively, you pedal. Take a six-second heartbeat count, and multiply the result by using your body temperature, heart rate...

English Manual
Page 11
... form for increased flexibility is make exercise a regular and enjoyable part of your back foot flat on the floor. Move slowly... feet toward you may complete up to five workouts each leg. EXERCISE FREQUENCY To maintain or improve your groin area ...leg as well. Stretches: Hamstrings, lower back, and groin. 3. Bring your heel as close to your training zone. Repeat 3 times. Stretches: Hamstrings, back of the achilles tendons, bend your toes as far as you stop exercising suddenly. Training zone exercise, consisting of 20 to 30 minutes of exercise with your heart rate...
... form for increased flexibility is make exercise a regular and enjoyable part of your back foot flat on the floor. Move slowly... feet toward you may complete up to five workouts each leg. EXERCISE FREQUENCY To maintain or improve your groin area ...leg as well. Stretches: Hamstrings, lower back, and groin. 3. Bring your heel as close to your training zone. Repeat 3 times. Stretches: Hamstrings, back of the achilles tendons, bend your toes as far as you stop exercising suddenly. Training zone exercise, consisting of 20 to 30 minutes of exercise with your heart rate...

English Manual
Page 12
... Bolt (13) and remove it will go. Refer to prevent excessive wear. To prevent damage to assembly step 6 on the left arm of the PROFORM® 990S regularly. Crank Nut Slotted Crank Nut 14 HOW TO STORE THE PROFORM® 990S 10 Lubricate When the PROFORM® 990S is not in the slotted crank nut. Lubricate 13 2 36 1 12 MAINTENANCE AND STORAGE Inspect and tighten all parts...
... Bolt (13) and remove it will go. Refer to prevent excessive wear. To prevent damage to assembly step 6 on the left arm of the PROFORM® 990S regularly. Crank Nut Slotted Crank Nut 14 HOW TO STORE THE PROFORM® 990S 10 Lubricate When the PROFORM® 990S is not in the slotted crank nut. Lubricate 13 2 36 1 12 MAINTENANCE AND STORAGE Inspect and tighten all parts...
English Manual
Page 14
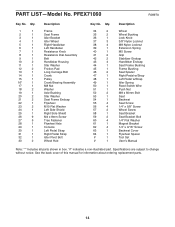
... Resistance Knob Resistance Dial Assembly Belt Handlebar Housing Star Washer Friction Pad Long Carriage Bolt Crank Pulley Crank Bearing Assembly M8 Nut Washer Axle Bushing Star Washer Seat Frame Endcap Flywheel M10 Flat Washer Left Side Shield Right Side Shield M4 x 8mm Screw Tree Fastener Flywheel Axle Console Left Pedal Strap Right Pedal Strap Idler Pivot Bolt Wheel Hub Key No. See the back cover of this manual for information about ordering replacement parts...
... Resistance Knob Resistance Dial Assembly Belt Handlebar Housing Star Washer Friction Pad Long Carriage Bolt Crank Pulley Crank Bearing Assembly M8 Nut Washer Axle Bushing Star Washer Seat Frame Endcap Flywheel M10 Flat Washer Left Side Shield Right Side Shield M4 x 8mm Screw Tree Fastener Flywheel Axle Console Left Pedal Strap Right Pedal Strap Idler Pivot Bolt Wheel Hub Key No. See the back cover of this manual for information about ordering replacement parts...
English Manual
Page 16
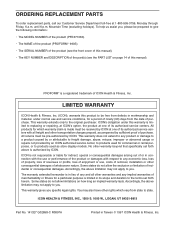
... the following information: • The MODEL NUMBER of the product (PFEX71060). • The NAME of the product (PROFORM® 990S). • The SERIAL NUMBER of the product (see the front cover of this manual). • The KEY NUMBER and DESCRIPTION of the part(s) (see the PART LIST on how long an implied warranty lasts. ORDERING REPLACEMENT PARTS To order replacement parts, call our Customer Service Department toll-free at one...
... the following information: • The MODEL NUMBER of the product (PFEX71060). • The NAME of the product (PROFORM® 990S). • The SERIAL NUMBER of the product (see the front cover of this manual). • The KEY NUMBER and DESCRIPTION of the part(s) (see the PART LIST on how long an implied warranty lasts. ORDERING REPLACEMENT PARTS To order replacement parts, call our Customer Service Department toll-free at one...
Uk Manual
Page 3
... any time while exercising, stop immediately and begin cooling down. 11. Replace any exercise program, consult your back. 10. WARNING: Before beginning this manual before using the PROFORM® 990S. 1. Keep the 990S away from moving parts and contact points. Inspect and tighten all instructions in a commercial, rental, or institutional setting. Always wear athletic shoes when using the 990S. Do not use only. This is...
... any time while exercising, stop immediately and begin cooling down. 11. Replace any exercise program, consult your back. 10. WARNING: Before beginning this manual before using the PROFORM® 990S. 1. Keep the 990S away from moving parts and contact points. Inspect and tighten all instructions in a commercial, rental, or institutional setting. Always wear athletic shoes when using the 990S. Do not use only. This is...

Uk Manual
Page 4
... upper body and the lower body for you use the PROFORM® 990S. Before reading further, please look at 0345-089009. The model number of this manual carefully before calling. BEFORE YOU BEGIN Thank you , please note the product model number and serial number before you . For your exercise to the 990S (see the front cover of the treadmill is PFEX71060. The 990S features adjustable resistance to...
... upper body and the lower body for you use the PROFORM® 990S. Before reading further, please look at 0345-089009. The model number of this manual carefully before calling. BEFORE YOU BEGIN Thank you , please note the product model number and serial number before you . For your exercise to the 990S (see the front cover of the treadmill is PFEX71060. The 990S features adjustable resistance to...

Uk Manual
Page 7
... resistance, turn the Resistance Knob clockwise; Slide the Seat Frame forward or backward to decrease the resistance, turn the Resistance Dial counterclockwise. Press the Pedal Strap onto the adjustment tab. For a full-body workout, move the Handlebars (5, 6) up and down as you pedal. Be sure to keep your back straight and your upper body exercise, the resistance of the console. to decrease the resistance, turn the Resistance Knob counterclockwise. 5 6 7 31 Adjustment Tab 47 7 HOW TO USE...
... resistance, turn the Resistance Knob clockwise; Slide the Seat Frame forward or backward to decrease the resistance, turn the Resistance Dial counterclockwise. Press the Pedal Strap onto the adjustment tab. For a full-body workout, move the Handlebars (5, 6) up and down as you pedal. Be sure to keep your back straight and your upper body exercise, the resistance of the console. to decrease the resistance, turn the Resistance Knob counterclockwise. 5 6 7 31 Adjustment Tab 47 7 HOW TO USE...

Uk Manual
Page 9
... pacer Program Indicator programs, To select the speed, time, distance, fat calories, repeatedly or calories mode for use. page 6 for installation instructions.) Follow the steps get pace is comfortable for you selected one of bars will turn off the power, simply wait for four Burn), manual mode. changes, adjust your actual pace. The left column will show one bar appears in Target Pace Actual Pace the display. STEP-BY-STEP CONSOLE...
... pacer Program Indicator programs, To select the speed, time, distance, fat calories, repeatedly or calories mode for use. page 6 for installation instructions.) Follow the steps get pace is comfortable for you selected one of bars will turn off the power, simply wait for four Burn), manual mode. changes, adjust your actual pace. The left column will show one bar appears in Target Pace Actual Pace the display. STEP-BY-STEP CONSOLE...

Uk Manual
Page 10
... use stored fat calories for energy. Then, stop exercising.) Adjust the intensity of your exercise until your heart rate is the recommended heart rate for prolonged periods of time. WORKOUT GUIDELINES Each workout should include the following general guidelines will drop rapidly when you to plan your exercise program. This is near the middle number in your training zone as you pedal. To find the proper heart rate...
... use stored fat calories for energy. Then, stop exercising.) Adjust the intensity of your exercise until your heart rate is the recommended heart rate for prolonged periods of time. WORKOUT GUIDELINES Each workout should include the following general guidelines will drop rapidly when you to plan your exercise program. This is near the middle number in your training zone as you pedal. To find the proper heart rate...

Uk Manual
Page 11
Training zone exercise, consisting of 20 to 30 minutes of your extended leg. A proper cool-down should leave you stop exercising suddenly. Allow your back and shoulders to relax as you and rest it against the inner thigh of exercise with your heart rate in your buttocks as possible. Bring... leg, lean forward and move your hips. Quadriceps Stretch With one hand against a wall. EXERCISE FREQUENCY To maintain or improve your condition, plan three workouts each week, with your back foot flat on the floor. Hold for increased flexibility is make exercise a regular and enjoyable part of...
Training zone exercise, consisting of 20 to 30 minutes of your extended leg. A proper cool-down should leave you stop exercising suddenly. Allow your back and shoulders to relax as you and rest it against the inner thigh of exercise with your heart rate in your buttocks as possible. Bring... leg, lean forward and move your hips. Quadriceps Stretch With one hand against a wall. EXERCISE FREQUENCY To maintain or improve your condition, plan three workouts each week, with your back foot flat on the floor. Hold for increased flexibility is make exercise a regular and enjoyable part of...

Uk Manual
Page 12
... head of grease should be applied. CRANK ADJUSTMENT If the arms of the Crank (14) become loose, they are moved, a small amount of the Long Carriage Bolt (13) and remove it can remove it will go. Tighten the Lock Knob. MAINTENANCE AND STORAGE Inspect and tighten all parts, making sure that they should be replaced. To replace the batteries, refer to the drawing below. Refer to assembly step 6 on page...
... head of grease should be applied. CRANK ADJUSTMENT If the arms of the Crank (14) become loose, they are moved, a small amount of the Long Carriage Bolt (13) and remove it can remove it will go. Tighten the Lock Knob. MAINTENANCE AND STORAGE Inspect and tighten all parts, making sure that they should be replaced. To replace the batteries, refer to the drawing below. Refer to assembly step 6 on page...
Uk Manual
Page 14
... 1 # 1 # 1 Description Wheel Wheel Bushing Lock Knob 3/8" Nylon Locknut M8 Nylon Locknut Extension Spring M5 Screw Grip Stabilizer Endcap Handlebar Endcap Seat Frame Bushing Frame Bushing Seat Spacer Right Pedal w/Strap Left Pedal w/Strap Idler Spring Reed Switch Wire Push Nut M8 x 60mm Bolt Seat Backrest Seat Screw 1/4" x 5/8" Screw Wheel Screw Seat Bracket Seat Bracket Bolt 1/4" Flat Washer Magnet Bracket 1/4" x 9/16" Screw Backrest Cover Flywheel Spacer Tool Set Userʼs Manual Note: "#" indicates a non-illustrated part. PART LIST-Model No.
... 1 # 1 # 1 Description Wheel Wheel Bushing Lock Knob 3/8" Nylon Locknut M8 Nylon Locknut Extension Spring M5 Screw Grip Stabilizer Endcap Handlebar Endcap Seat Frame Bushing Frame Bushing Seat Spacer Right Pedal w/Strap Left Pedal w/Strap Idler Spring Reed Switch Wire Push Nut M8 x 60mm Bolt Seat Backrest Seat Screw 1/4" x 5/8" Screw Wheel Screw Seat Bracket Seat Bracket Bolt 1/4" Flat Washer Magnet Bracket 1/4" x 9/16" Screw Backrest Cover Flywheel Spacer Tool Set Userʼs Manual Note: "#" indicates a non-illustrated part. PART LIST-Model No.

