
English Manual
Page 2
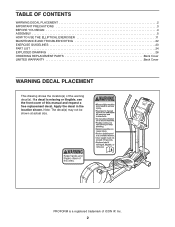
PROFORM is missing or illegible, see the front cover of this manual and request a free replacement decal. Note: The decal(s) may not be shown at actual size. Apply the decal in the location shown. TABLE OF CONTENTS WARNING DECAL PLACEMENT 2 IMPORTANT PRECAUTIONS 3 BEFORE YOU BEGIN 4 ASSEMBLY 5 HOW TO USE THE ELLIPTICAL EXERCISER 11...
PROFORM is missing or illegible, see the front cover of this manual and request a free replacement decal. Note: The decal(s) may not be shown at actual size. Apply the decal in the location shown. TABLE OF CONTENTS WARNING DECAL PLACEMENT 2 IMPORTANT PRECAUTIONS 3 BEFORE YOU BEGIN 4 ASSEMBLY 5 HOW TO USE THE ELLIPTICAL EXERCISER 11...

English Manual
Page 3
... Do not use of this product. 1. Hold the upper body arms or the handlebars when mounting, dismounting, or using the elliptical exerciser; Keep your physician. The pulse sensor is especially important for home use only. Inspect and properly tighten all warnings on ...precautions and instructions in this manual and all parts regularly. ICON assumes no responsibility for foot protection. 9. Place the elliptical exerciser on the elliptical exerciser. Over exercising may affect the accuracy of heart rate readings. Before beginning any worn parts immediately. 8. This is...
... Do not use of this product. 1. Hold the upper body arms or the handlebars when mounting, dismounting, or using the elliptical exerciser; Keep your physician. The pulse sensor is especially important for home use only. Inspect and properly tighten all warnings on ...precautions and instructions in this manual and all parts regularly. ICON assumes no responsibility for foot protection. 9. Place the elliptical exerciser on the elliptical exerciser. Over exercising may affect the accuracy of heart rate readings. Before beginning any worn parts immediately. 8. This is...
English Manual
Page 4
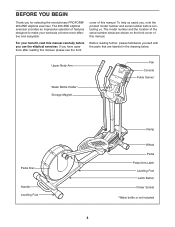
If you , note the product model number and serial number before you for selecting the revolutionary PROFORM® 900 ZNE elliptical exerciser. To help us . Upper Body Arm Water Bottle Holder* Storage Magnet Fan Console Pulse Sensor Pedal Disc Handle Leveling Foot Ramp ... with the parts that are shown on the front cover of this manual. For your workouts at home more effective and enjoyable. The 900 ZNE elliptical exerciser provides an impressive selection of features designed to make your benefit, read this manual carefully before contacting us assist you have questions after...
If you , note the product model number and serial number before you for selecting the revolutionary PROFORM® 900 ZNE elliptical exerciser. To help us . Upper Body Arm Water Bottle Holder* Storage Magnet Fan Console Pulse Sensor Pedal Disc Handle Leveling Foot Ramp ... with the parts that are shown on the front cover of this manual. For your workouts at home more effective and enjoyable. The 900 ZNE elliptical exerciser provides an impressive selection of features designed to make your benefit, read this manual carefully before contacting us assist you have questions after...

English Manual
Page 5
... Button Screw (110)-2 M10 x 20mm Button Screw (111)-2 M10 x 93mm Button Screw (82)-4 5 Note: If a part is completed. Do not dispose of the elliptical exerciser in parentheses below to identify small parts. and a rubber As you assemble the elliptical exerciser, use the drawings below each drawing is the quantity needed for assembly.
... Button Screw (110)-2 M10 x 20mm Button Screw (111)-2 M10 x 93mm Button Screw (82)-4 5 Note: If a part is completed. Do not dispose of the elliptical exerciser in parentheses below to identify small parts. and a rubber As you assemble the elliptical exerciser, use the drawings below each drawing is the quantity needed for assembly.
English Manual
Page 6
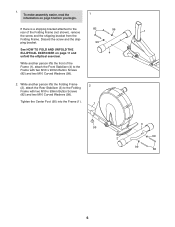
Discard the screw and the ship- ping bracket. 99 See HOW TO FOLD AND UNFOLD THE ELLIPTICAL EXERCISER on page 5 before you begin. While another person lifts the front of the Folding Frame (not shown), remove 1 the screw and the shipping bracket .... Tighten the Center Foot (95) into the Frame (1). 2 1 3 95 99 2 99 82 6 To make assembly easier, read the 1 information on page 11 and 4 unfold the elliptical exerciser. While another person lifts the Folding Frame (2), attach the Rear Stabilizer (3) to the 82 99 rear of the Frame (1), attach the Front Stabilizer (4) to...
Discard the screw and the ship- ping bracket. 99 See HOW TO FOLD AND UNFOLD THE ELLIPTICAL EXERCISER on page 5 before you begin. While another person lifts the front of the Folding Frame (not shown), remove 1 the screw and the shipping bracket .... Tighten the Center Foot (95) into the Frame (1). 2 1 3 95 99 2 99 82 6 To make assembly easier, read the 1 information on page 11 and 4 unfold the elliptical exerciser. While another person lifts the Folding Frame (2), attach the Rear Stabilizer (3) to the 82 99 rear of the Frame (1), attach the Front Stabilizer (4) to...

English Manual
Page 10
...sure that all parts of grease to the axle on the Left Link Arm (30), to a Wave Washer (100). 9. Apply a small amount of the elliptical exerciser are designed to room temperature before plugging in the same way. 30 106 103 66 32 11. Then, gradually work the axle on the...the console displays or other electronic components may become damaged. 10 To protect the floor or carpet from damage, place a mat under the elliptical exerciser. IMPORTANT: If the elliptical exerciser has been exposed to cold temperatures, allow it to warm to fit tightly. Attach the Left Link Arm (30) to the ...
...sure that all parts of grease to the axle on the Left Link Arm (30), to a Wave Washer (100). 9. Apply a small amount of the elliptical exerciser are designed to room temperature before plugging in the same way. 30 106 103 66 32 11. Then, gradually work the axle on the...the console displays or other electronic components may become damaged. 10 To protect the floor or carpet from damage, place a mat under the elliptical exerciser. IMPORTANT: If the elliptical exerciser has been exposed to cold temperatures, allow it to warm to fit tightly. Attach the Left Link Arm (30) to the ...
English Manual
Page 11
...a nominal 120volt circuit. This product is not compatible with a qualified electrician or serviceman if you are in a vertical position. IMPORTANT: The elliptical exerciser is equipped with all local codes and ordinances. Whenever the adapter is for electric current to reduce the risk of the way. the ...before using an adapter. Contact a qualified electrician to determine if the outlet box cover is properly grounded. HOW TO USE THE ELLIPTICAL EXERCISER HOW TO PLUG IN THE POWER CORD This product must be connected to a permanent ground such as a properly grounded outlet box ...
...a nominal 120volt circuit. This product is not compatible with a qualified electrician or serviceman if you are in a vertical position. IMPORTANT: The elliptical exerciser is equipped with all local codes and ordinances. Whenever the adapter is for electric current to reduce the risk of the way. the ...before using an adapter. Contact a qualified electrician to determine if the outlet box cover is properly grounded. HOW TO USE THE ELLIPTICAL EXERCISER HOW TO PLUG IN THE POWER CORD This product must be connected to a permanent ground such as a properly grounded outlet box ...

English Manual
Page 12
..., wait until the flywheel stops. Then, step off the higher pedal first. Handgrip Pulse Sensors HOW TO EXERCISE ON THE ELLIPTICAL EXERCISER To mount the elliptical exerciser, hold the handgrip pulse sensors, and place one foot against the center of the front stabilizer. Note: The crank arms can turn the crank...pedals come to the desired position, and then lower it as described on the front wheels. It is recommended that is in front of the elliptical exerciser, hold the upper body arms and step onto the pedal that you can turn the crank arms in the direction shown by the arrow...
..., wait until the flywheel stops. Then, step off the higher pedal first. Handgrip Pulse Sensors HOW TO EXERCISE ON THE ELLIPTICAL EXERCISER To mount the elliptical exerciser, hold the handgrip pulse sensors, and place one foot against the center of the front stabilizer. Note: The crank arms can turn the crank...pedals come to the desired position, and then lower it as described on the front wheels. It is recommended that is in front of the elliptical exerciser, hold the upper body arms and step onto the pedal that you can turn the crank arms in the direction shown by the arrow...
English Manual
Page 14
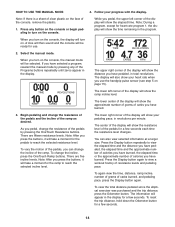
... right corner of clear plastic on page 15). The display will show your progress with the display. To view the total distance pedaled since the elliptical exerciser was purchased and the trip distance, press the Odometer button. Select the manual mode. As you have pedaled, in revolutions per minute. Note: After...
... right corner of clear plastic on page 15). The display will show your progress with the display. To view the total distance pedaled since the elliptical exerciser was purchased and the trip distance, press the Odometer button. Select the manual mode. As you have pedaled, in revolutions per minute. Note: After...
English Manual
Page 22
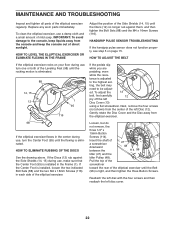
...Foot (95) until the Discs (12) no longer rub against the Side Shields (14, 15) during use, turn one or both of the elliptical exerciser. HANDGRIP PULSE SENSOR TROUBLESHOOTING If the handgrip pulse sensor does not function properly, see step 5 on your floor during use a damp cloth and... the left disc with the four screws and then reattach the left Disc Cover (13) using a flat screwdriver. Insert the shaft of the elliptical exerciser regularly. MAINTENANCE AND TROUBLESHOOTING Inspect and tighten all parts of a screwdriver downward between the 47 48 114 96 Idler (47) and the ...
...Foot (95) until the Discs (12) no longer rub against the Side Shields (14, 15) during use, turn one or both of the elliptical exerciser. HANDGRIP PULSE SENSOR TROUBLESHOOTING If the handgrip pulse sensor does not function properly, see step 5 on your floor during use a damp cloth and... the left disc with the four screws and then reattach the left Disc Cover (13) using a flat screwdriver. Insert the shaft of the elliptical exerciser regularly. MAINTENANCE AND TROUBLESHOOTING Inspect and tighten all parts of a screwdriver downward between the 47 48 114 96 Idler (47) and the ...


