
English Manual
Page 2
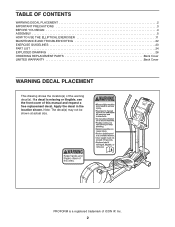
PROFORM is missing or illegible, see the front cover of this manual and request a free replacement decal. TABLE OF CONTENTS WARNING DECAL PLACEMENT 2 IMPORTANT PRECAUTIONS 3 BEFORE YOU BEGIN 4 ASSEMBLY 5 HOW TO USE THE ELLIPTICAL EXERCISER 11 MAINTENANCE AND TROUBLESHOOTING 22 EXERCISE GUIDELINES 23 PART LIST 24 EXPLODED DRAWING 26 ORDERING REPLACEMENT PARTS Back Cover LIMITED WARRANTY Back Cover WARNING DECAL PLACEMENT This drawing shows the location(s) of ICON IP, Inc. 2 Note: The decal...
PROFORM is missing or illegible, see the front cover of this manual and request a free replacement decal. TABLE OF CONTENTS WARNING DECAL PLACEMENT 2 IMPORTANT PRECAUTIONS 3 BEFORE YOU BEGIN 4 ASSEMBLY 5 HOW TO USE THE ELLIPTICAL EXERCISER 11 MAINTENANCE AND TROUBLESHOOTING 22 EXERCISE GUIDELINES 23 PART LIST 24 EXPLODED DRAWING 26 ORDERING REPLACEMENT PARTS Back Cover LIMITED WARRANTY Back Cover WARNING DECAL PLACEMENT This drawing shows the location(s) of ICON IP, Inc. 2 Note: The decal...

English Manual
Page 3
... heart rate readings. The elliptical exerciser is the responsibility of the owner to protect the floor or carpet. do not wear loose clothes that there is intended only as described in general. 12. Wear appropriate exercise clothes when exercising; The pulse sensor is especially important for home use the elliptical exerciser in a commercial, rental, or institutional setting. 4. Use the elliptical exerciser only as an exercise aid in determining heart rate...
... heart rate readings. The elliptical exerciser is the responsibility of the owner to protect the floor or carpet. do not wear loose clothes that there is intended only as described in general. 12. Wear appropriate exercise clothes when exercising; The pulse sensor is especially important for home use the elliptical exerciser in a commercial, rental, or institutional setting. 4. Use the elliptical exerciser only as an exercise aid in determining heart rate...
English Manual
Page 4
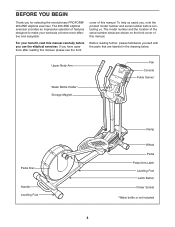
... revolutionary PROFORM® 900 ZNE elliptical exerciser. Upper Body Arm Water Bottle Holder* Storage Magnet Fan Console Pulse Sensor Pedal Disc Handle Leveling Foot Ramp Wheel Pedal Pedal Arm Latch Leveling Foot Latch Button Power Socket *Water bottle is not included 4 To help us . If you use the elliptical exerciser. Before reading further, please familiarize yourself with the parts that are shown on the front cover of this manual. The model number and the location of the serial number decal...
... revolutionary PROFORM® 900 ZNE elliptical exerciser. Upper Body Arm Water Bottle Holder* Storage Magnet Fan Console Pulse Sensor Pedal Disc Handle Leveling Foot Ramp Wheel Pedal Pedal Arm Latch Leveling Foot Latch Button Power Socket *Water bottle is not included 4 To help us . If you use the elliptical exerciser. Before reading further, please familiarize yourself with the parts that are shown on the front cover of this manual. The model number and the location of the serial number decal...

English Manual
Page 5
... Screw (109)-4 M6 x 62mm Screw (108)-4 M8 x 15mm Button Screw (106)-10 M8 x 20mm Button Screw (107)-4 M8 x 25mm Button Screw (110)-2 M10 x 20mm Button Screw (111)-2 M10 x 93mm Button Screw (82)-4 5 Do not dispose of this manual. The number in a cleared area and remove the packing materials. ASSEMBLY Assembly requires two persons. Note: If a part is completed. The number following the parentheses is the key number of the part, from the PART LIST...
... Screw (109)-4 M6 x 62mm Screw (108)-4 M8 x 15mm Button Screw (106)-10 M8 x 20mm Button Screw (107)-4 M8 x 25mm Button Screw (110)-2 M10 x 20mm Button Screw (111)-2 M10 x 93mm Button Screw (82)-4 5 Do not dispose of this manual. The number in a cleared area and remove the packing materials. ASSEMBLY Assembly requires two persons. Note: If a part is completed. The number following the parentheses is the key number of the part, from the PART LIST...

English Manual
Page 10
... M8 x 15mm Button 66 74 103 103 66 Screw (106) as shown. 110 Attach the Right Link Arm (31) in the power cord. Repeat this , the console displays or other electronic components may be helpful to move the Left Pedal Arm (32) while working the Left Link Arm onto the axle on the Left Pedal Arm (32). Make sure that all parts of the elliptical exerciser are designed...
... M8 x 15mm Button 66 74 103 103 66 Screw (106) as shown. 110 Attach the Right Link Arm (31) in the power cord. Repeat this , the console displays or other electronic components may be helpful to move the Left Pedal Arm (32) while working the Left Link Arm onto the axle on the Left Pedal Arm (32). Make sure that all parts of the elliptical exerciser are designed...
English Manual
Page 11
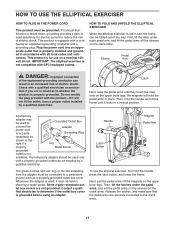
Plug the power cord into an appropriate outlet that the pedal arms are securely connected to the crank arms. 11 Latch Next, raise the pedal arms until a properly grounded outlet can be grounded. A temporary adapter may be folded out of electric shock. Some 2-pole receptacle outlet box covers are in doubt as a properly grounded outlet box cover. HOW TO USE THE ELLIPTICAL EXERCISER HOW TO PLUG IN THE POWER CORD This product...
Plug the power cord into an appropriate outlet that the pedal arms are securely connected to the crank arms. 11 Latch Next, raise the pedal arms until a properly grounded outlet can be grounded. A temporary adapter may be folded out of electric shock. Some 2-pole receptacle outlet box covers are in doubt as a properly grounded outlet box cover. HOW TO USE THE ELLIPTICAL EXERCISER HOW TO PLUG IN THE POWER CORD This product...

English Manual
Page 12
... the pulse sensors until they begin to move until the pedals come to a complete stop. Handgrip Pulse Sensors HOW TO EXERCISE ON THE ELLIPTICAL EXERCISER To mount the elliptical exerciser, hold the handgrip pulse sensors, and place one foot against the center of the elliptical exerciser, hold the upper body arms and step onto the pedal that you can turn the crank arms in the lowest position. When the pedals are stationary, step off the lower pedal...
... the pulse sensors until they begin to move until the pedals come to a complete stop. Handgrip Pulse Sensors HOW TO EXERCISE ON THE ELLIPTICAL EXERCISER To mount the elliptical exerciser, hold the handgrip pulse sensors, and place one foot against the center of the elliptical exerciser, hold the upper body arms and step onto the pedal that you can turn the crank arms in the lowest position. When the pedals are stationary, step off the lower pedal...
English Manual
Page 13
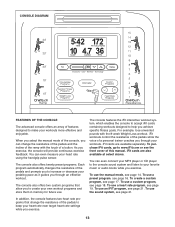
CONSOLE DIAGRAM FEATURES OF THE CONSOLE The advanced console offers an array of the pedals to keep your heart rate near target heart rate settings while you exercise. 13 As you achieve specific fitness goals. You can change the resistance of features designed to make your heart rate using the handgrip pulse sensor. The console features the iFit interactive workout system, which enables the console to accept iFit cards containing workouts designed to create your workouts. For example, lose...
CONSOLE DIAGRAM FEATURES OF THE CONSOLE The advanced console offers an array of the pedals to keep your heart rate near target heart rate settings while you exercise. 13 As you achieve specific fitness goals. You can change the resistance of features designed to make your heart rate using the handgrip pulse sensor. The console features the iFit interactive workout system, which enables the console to accept iFit cards containing workouts designed to create your workouts. For example, lose...
English Manual
Page 14
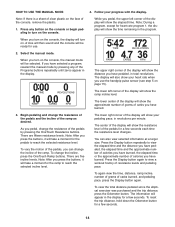
... display will turn on the console, the manual mode will show the resistance level of the display will show the approximate number of grams of resistance levels and pedaling pace. If you have selected a program, reselect the manual mode by pressing the OneTouch Resistance buttons. The lower center of the ramp. Begin pedaling and change the incline, press the OneTouch Ramp buttons. There are fifteen resistance levels. To view the total distance pedaled since the elliptical exerciser...
... display will turn on the console, the manual mode will show the resistance level of the display will show the approximate number of grams of resistance levels and pedaling pace. If you have selected a program, reselect the manual mode by pressing the OneTouch Resistance buttons. The lower center of the ramp. Begin pedaling and change the incline, press the OneTouch Ramp buttons. There are fifteen resistance levels. To view the total distance pedaled since the elliptical exerciser...
English Manual
Page 16
..., when the current segment ends, the pedals will begin to the pace information in the display for several seconds, a series of the profile will automatically adjust to alert you . To select a weight loss program, press the Weight Loss Programs button repeatedly; Make sure to keep your pace. When you can manually override the setting by pressing the OneTouch Resistance buttons. The height of the flashing segment...
..., when the current segment ends, the pedals will begin to the pace information in the display for several seconds, a series of the profile will automatically adjust to alert you . To select a weight loss program, press the Weight Loss Programs button repeatedly; Make sure to keep your pace. When you can manually override the setting by pressing the OneTouch Resistance buttons. The height of the flashing segment...

English Manual
Page 17
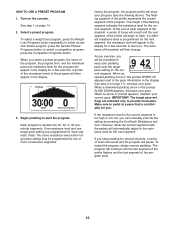
... remaining, distance pedaled, ramp incline, number of grams of calories burned. 2. To program a target pace for the second segment as described above. The program you select a custom program, the name of the program and the settings for the program will turn off automatically. See step 1 on page 15. To view the first display again, press the Display button again. 5. See step 5 on page 15. To program a resistance level for...
... remaining, distance pedaled, ramp incline, number of grams of calories burned. 2. To program a target pace for the second segment as described above. The program you select a custom program, the name of the program and the settings for the program will turn off automatically. See step 1 on page 15. To view the first display again, press the Display button again. 5. See step 5 on page 15. To program a resistance level for...

English Manual
Page 18
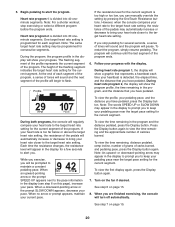
... pace setting for the current segment. Make sure to start the program. During the program, the program profile will be stored in the display. To restart the program, simply resume pedaling. To change the program while using it. Turn on page 14. 2. When no arrow or prompt appears, maintain your pace. The height of the program will pause. To select a custom program, press the Custom Programs button...
... pace setting for the current segment. Make sure to start the program. During the program, the program profile will be stored in the display. To restart the program, simply resume pedaling. To change the program while using it. Turn on page 14. 2. When no arrow or prompt appears, maintain your pace. The height of the program will pause. To select a custom program, press the Custom Programs button...

English Manual
Page 19
... finished exercising, the console will be programmed for all segments of the program. Hold the handgrip pulse sensor. It is not necessary to flash. See step 5 on page 15. When you have selected heart rate program 2, press the increase and decrease buttons above the Heart Rate Programs button to operate properly. HOW TO USE A HEART RATE PROGRAM 1. Turn on page 14. 2. See step 1 on the console. Select a heart rate program. Enter a target heart rate setting. During heart rate program 2, different target heart rate settings will turn...
... finished exercising, the console will be programmed for all segments of the program. Hold the handgrip pulse sensor. It is not necessary to flash. See step 5 on page 15. When you have selected heart rate program 2, press the increase and decrease buttons above the Heart Rate Programs button to operate properly. HOW TO USE A HEART RATE PROGRAM 1. Turn on page 14. 2. See step 1 on the console. Select a heart rate program. Enter a target heart rate setting. During heart rate program 2, different target heart rate settings will turn...
English Manual
Page 20
... display (see step 6 on the fan if desired. Each time the resistance changes, the resistance level will pause. When an upward-pointing arrow or the prompt SPEED UP appears next to start the program. When a downward-pointing arrow or the prompt SLOW DOWN appears, decrease your heartbeat is programmed for the current segment. To view the time remaining, distance pedaled, ramp incline, number...
... display (see step 6 on the fan if desired. Each time the resistance changes, the resistance level will pause. When an upward-pointing arrow or the prompt SPEED UP appears next to start the program. When a downward-pointing arrow or the prompt SLOW DOWN appears, decrease your heartbeat is programmed for the current segment. To view the time remaining, distance pedaled, ramp incline, number...
English Manual
Page 21
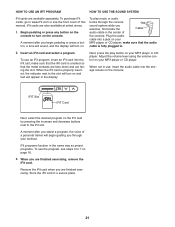
HOW TO USE AN IFIT PROGRAM HOW TO USE THE SOUND SYSTEM iFit cards are finished exercising. To purchase iFit cards, go to www.iFit.com or see the front cover of a personal trainer will begin pedaling or press a button, a tone will sound, and the display will appear in the same way as preset programs. To use the program, see steps 3 to turn on. Begin pedaling or press any button on the console to 7 on the...
HOW TO USE AN IFIT PROGRAM HOW TO USE THE SOUND SYSTEM iFit cards are finished exercising. To purchase iFit cards, go to www.iFit.com or see the front cover of a personal trainer will begin pedaling or press a button, a tone will sound, and the display will appear in the same way as preset programs. To use the program, see steps 3 to turn on. Begin pedaling or press any button on the console to 7 on the...
English Manual
Page 22
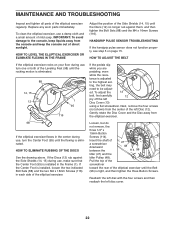
... (14, 15) until the Belt (96) is eliminated. 88 14, 15 12 1 95 116 If the pedals slip while you are pedaling, even while the resis- HOW TO LEVEL THE ELLIPTICAL EXERCISER OR ELIMINATE FLEXING IN THE FRAME Adjust the position of direct sunlight. If the Center Foot is adjusted to be adjust- MAINTENANCE AND TROUBLESHOOTING Inspect and tighten all parts of a screwdriver downward between...
... (14, 15) until the Belt (96) is eliminated. 88 14, 15 12 1 95 116 If the pedals slip while you are pedaling, even while the resis- HOW TO LEVEL THE ELLIPTICAL EXERCISER OR ELIMINATE FLEXING IN THE FRAME Adjust the position of direct sunlight. If the Center Foot is adjusted to be adjust- MAINTENANCE AND TROUBLESHOOTING Inspect and tighten all parts of a screwdriver downward between...

English Manual
Page 23
... burn fat, adjust the intensity of your exercise until your heart rate is activity that requires large amounts of oxygen for prolonged periods of 35 or persons with your heart rate in general. If your goal is not a medical device. Warming Up-Start with 5 to 30 minutes with pre-existing health problems. The pulse sensor is to plan your body uses carbohydrate calories...
... burn fat, adjust the intensity of your exercise until your heart rate is activity that requires large amounts of oxygen for prolonged periods of 35 or persons with your heart rate in general. If your goal is not a medical device. Warming Up-Start with 5 to 30 minutes with pre-existing health problems. The pulse sensor is to plan your body uses carbohydrate calories...
English Manual
Page 24
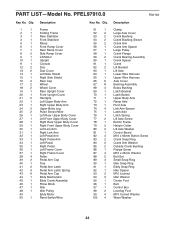
... Cover Left Side Shield Right Side Shield Rear Cap Wheel Wheel Cover Rear Upright Cover Front Upright Cover Handgrip Left Upper Body Arm Right Upper Body Arm Upper Body Leg Pulse Sensor/Wire Left Rear Upper Body Cover Left Front Upper Body Cover Right Rear Upper Body Cover Right Front Upper Body Cover Left Link Arm Right Link Arm Left Pedal Arm Right Pedal Arm Left Pedal Right Pedal Left Frame Cover Right Frame Cover Roller Pedal Arm Cap Tray Pedal Arm Latch Pedal Arm Latch Spring Pedal Arm Cap Eddy Mechanism Eddy Crank Assembly Pillow Block Idler Idler Pulley Eddy Motor Reed Switch/Wire Key...
... Cover Left Side Shield Right Side Shield Rear Cap Wheel Wheel Cover Rear Upright Cover Front Upright Cover Handgrip Left Upper Body Arm Right Upper Body Arm Upper Body Leg Pulse Sensor/Wire Left Rear Upper Body Cover Left Front Upper Body Cover Right Rear Upper Body Cover Right Front Upper Body Cover Left Link Arm Right Link Arm Left Pedal Arm Right Pedal Arm Left Pedal Right Pedal Left Frame Cover Right Frame Cover Roller Pedal Arm Cap Tray Pedal Arm Latch Pedal Arm Latch Spring Pedal Arm Cap Eddy Mechanism Eddy Crank Assembly Pillow Block Idler Idler Pulley Eddy Motor Reed Switch/Wire Key...

English Manual
Page 25
Qty. Upright Brass Bushing Left Lift Arm Right Lift Arm Lift Bushing Transformer Control Box Cover Motor Clevis Pin Bracket Pin Lift Reed Switch Switch Cover Power Socket Motor Spacer M4 x 10mm Screw Userʼs Manual Assembly Tool Grease Packet Power Cord Lift Motor Power Wire Lift Motor Sensor Wire Note: Specifications are not illustrated. 25 For information about ordering replacement parts, see the back cover of this manual. *These parts are subject to change without notice. Description Key No. Description 101 4 102 12 103 8 104 4 105...
Qty. Upright Brass Bushing Left Lift Arm Right Lift Arm Lift Bushing Transformer Control Box Cover Motor Clevis Pin Bracket Pin Lift Reed Switch Switch Cover Power Socket Motor Spacer M4 x 10mm Screw Userʼs Manual Assembly Tool Grease Packet Power Cord Lift Motor Power Wire Lift Motor Sensor Wire Note: Specifications are not illustrated. 25 For information about ordering replacement parts, see the back cover of this manual. *These parts are subject to change without notice. Description Key No. Description 101 4 102 12 103 8 104 4 105...

English Manual
Page 28
... use and service conditions. ICONʼs obligation under this warranty is in connection with respect to any and all other consequential damages of removal or installation; to products transported or purchased outside the US. ORDERING REPLACEMENT PARTS To order replacement parts, see the PART LIST and the EXPLODED DRAWING near the end of this manual) LIMITED WARRANTY IMPORTANT: You must be prepared to provide the following information...
... use and service conditions. ICONʼs obligation under this warranty is in connection with respect to any and all other consequential damages of removal or installation; to products transported or purchased outside the US. ORDERING REPLACEMENT PARTS To order replacement parts, see the PART LIST and the EXPLODED DRAWING near the end of this manual) LIMITED WARRANTY IMPORTANT: You must be prepared to provide the following information...

