
English Manual
Page 3
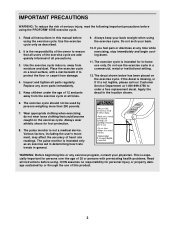
... order a free replacement decal. The exercise cycle should not be used by or through the use the exercise cycle in a commercial, rental or institutional setting. 12. Use the exercise cycle only as an exercise aid in determining heart rate trends in the location shown. 6. Always keep your back. 10. The pulse monitor is not legible, please call our Customer Service Department at any time while exercising, stop immediately...
... order a free replacement decal. The exercise cycle should not be used by or through the use the exercise cycle in a commercial, rental or institutional setting. 12. Use the exercise cycle only as an exercise aid in determining heart rate trends in the location shown. 6. Always keep your back. 10. The pulse monitor is not legible, please call our Customer Service Department at any time while exercising, stop immediately...
English Manual
Page 4
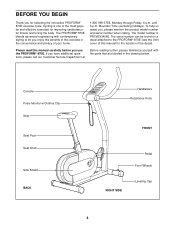
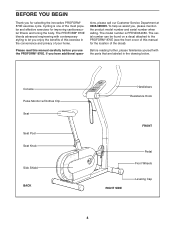
... additional questions, please call our Customer Service Department at Before reading further, please familiarize yourself with contemporary styling to the PROFORM® 870E (see the front cover of this manual for the location of your home. 1-800-999-3756, Monday through Friday, 6 a.m. until 6 p.m. Console Pulse Monitor w/Clothes Clip Seat Seat Post Seat Knob Side Shield BACK Handlebars Resistance Knob FRONT Pedal Front Wheels RIGHT SIDE Leveling Cap...
... additional questions, please call our Customer Service Department at Before reading further, please familiarize yourself with contemporary styling to the PROFORM® 870E (see the front cover of this manual for the location of your home. 1-800-999-3756, Monday through Friday, 6 a.m. until 6 p.m. Console Pulse Monitor w/Clothes Clip Seat Seat Post Seat Knob Side Shield BACK Handlebars Resistance Knob FRONT Pedal Front Wheels RIGHT SIDE Leveling Cap...
English Manual
Page 5
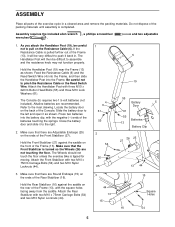
...). Attach the Rear Stabilizer with three M10 x 22mm Button Head Bolts (55) and three M10 Lock Washers (61). and two adjustable 1. Refer to pinch the Resistance Cable or the Reed Switch Wire. Attach the Front Stabilizer with the square holes facing away from the saddle. ASSEMBLY Place all parts of the exercise cycle in . Assembly requires the included allen wrench , a phillips screwdriver wrenches . Slide the battery...
...). Attach the Rear Stabilizer with three M10 x 22mm Button Head Bolts (55) and three M10 Lock Washers (61). and two adjustable 1. Refer to pinch the Resistance Cable or the Reed Switch Wire. Attach the Front Stabilizer with the square holes facing away from the saddle. ASSEMBLY Place all parts of the exercise cycle in . Assembly requires the included allen wrench , a phillips screwdriver wrenches . Slide the battery...
English Manual
Page 6
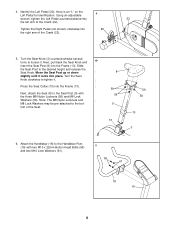
... the right arm of the Crank (22). Tighten the Right Pedal (not shown) clockwise into place. Move the Seat Post up or down slightly until it . 4. Turn the Seat Knob (3) counterclockwise several turns to the desired height and release the Seat Knob. Next, attach the Seat (8) to the bottom of the Seat. 8 59 56 9 13 59 56 10 3 6. Identify the Left Pedal (20); Press the Seat Collar (10...
... the right arm of the Crank (22). Tighten the Right Pedal (not shown) clockwise into place. Move the Seat Post up or down slightly until it . 4. Turn the Seat Knob (3) counterclockwise several turns to the desired height and release the Seat Knob. Next, attach the Seat (8) to the bottom of the Seat. 8 59 56 9 13 59 56 10 3 6. Identify the Left Pedal (20); Press the Seat Collar (10...
English Manual
Page 8
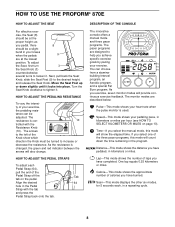
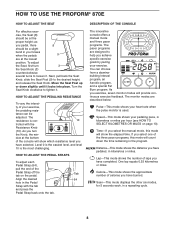
... Fat Burn program. The resistance is used. Time-If you achieve specific exercise goals by pacing your heart rate when the pulse monitor is con- 10 trolled with the tab and press the Pedal Strap back onto the tab. Next, pull back the Seat Knob, slide the Seat Post (9) to help you select the manual mode, this mode will show which direction the Knob must be adjusted. HOW TO ADJUST THE PEDALING RESISTANCE To...
... Fat Burn program. The resistance is used. Time-If you achieve specific exercise goals by pacing your heart rate when the pulse monitor is con- 10 trolled with the tab and press the Pedal Strap back onto the tab. Next, pull back the Seat Knob, slide the Seat Post (9) to help you select the manual mode, this mode will show which direction the Knob must be adjusted. HOW TO ADJUST THE PEDALING RESISTANCE To...
English Manual
Page 9
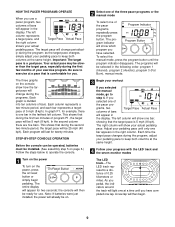
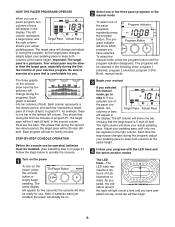
... your progress with the LED track and the seven monitor modes The LED track-The LED track represents a distance of 0.25 kilometers or miles. The right column will be selected in the right column. To select the manual mode, press the program button until you have selected. HOW THE PACER PROGRAMS OPERATE When you use . the console will then be installed. (See assembly step 5 on page 6.) Follow the...
... your progress with the LED track and the seven monitor modes The LED track-The LED track represents a distance of 0.25 kilometers or miles. The right column will be selected in the right column. To select the manual mode, press the program button until you have selected. HOW THE PACER PROGRAMS OPERATE When you use . the console will then be installed. (See assembly step 5 on page 6.) Follow the...
English Manual
Page 10
... small switch.) Slide the switch up or down to change the unit of measurement. The pulse mode-To use the pulse mode, the pulse monitor Pulse must be helpful to stop pedaling while you measure your pulse. If your pulse is selected, the console will be shown. Lift the con- Next, repeated- ly press the mode button until an arrow appears below the bat- After a few inches and turn off...
... small switch.) Slide the switch up or down to change the unit of measurement. The pulse mode-To use the pulse mode, the pulse monitor Pulse must be helpful to stop pedaling while you measure your pulse. If your pulse is selected, the console will be shown. Lift the con- Next, repeated- ly press the mode button until an arrow appears below the bat- After a few inches and turn off...

English Manual
Page 11
... aerobic exercise, adjust the intensity of the chart (ages are rounded off to the nearest ten years). A proper warm- AEROBIC MAX. The three numbers are essential for fat burning; the middle number is the heart rate for fat burning, maximum fat burning, and cardiovascular (aerobic) exercise. This will increase your flexibility and will help to prevent post-exercise problems. EXERCISE FREQUENCY To...
... aerobic exercise, adjust the intensity of the chart (ages are rounded off to the nearest ten years). A proper warm- AEROBIC MAX. The three numbers are essential for fat burning; the middle number is the heart rate for fat burning, maximum fat burning, and cardiovascular (aerobic) exercise. This will increase your flexibility and will help to prevent post-exercise problems. EXERCISE FREQUENCY To...
English Manual
Page 12
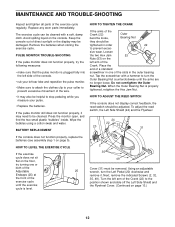
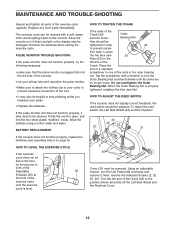
... Left Pedal (20) clockwise and remove it may need to be damaged. Press the monitor open, and find the two small plastic "bubbles" inside. To adjust the reed switch, the Left Side Shield (24) and the Flywheel 24 20 22 32 31 If the console does not function properly, replace the batteries (see assembly step 1 on the console. MAINTENANCE AND TROUBLE-SHOOTING Inspect and tighten all parts of the Crank...
... Left Pedal (20) clockwise and remove it may need to be damaged. Press the monitor open, and find the two small plastic "bubbles" inside. To adjust the reed switch, the Left Side Shield (24) and the Flywheel 24 20 22 32 31 If the console does not function properly, replace the batteries (see assembly step 1 on the console. MAINTENANCE AND TROUBLE-SHOOTING Inspect and tighten all parts of the Crank...

English Manual
Page 14
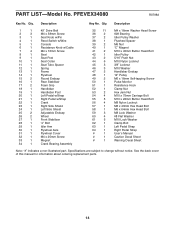
.... PART LIST-Model No. Qty. Description 1 1 2 3 3 1 4 1 5 1 6 1 7 4 8 1 9 1 10 1 11 1 12 1 13 1 14 1 15 2 16 1 17 2 18 1 19 1 20 1 21 1 22 1 23 1 24 1 25 2 26 2 27 1 28 1 29 1 30 1 31 1 32 1 33 1 34 1 49" Drive Belt M4 x 38mm Screw Seat Knob w/Pin Reed Switch w/Wire Console Resistance Knob w/Cable M4 x 16mm Screw Seat Seat Post Seat Collar Seat Tube Spacer Spring Frame Flywheel Round Endcap Rear Stabilizer Foam Grip Handlebar Handlebar Post Left Pedal w/Strap Right Pedal w/Strap Crank...
.... PART LIST-Model No. Qty. Description 1 1 2 3 3 1 4 1 5 1 6 1 7 4 8 1 9 1 10 1 11 1 12 1 13 1 14 1 15 2 16 1 17 2 18 1 19 1 20 1 21 1 22 1 23 1 24 1 25 2 26 2 27 1 28 1 29 1 30 1 31 1 32 1 33 1 34 1 49" Drive Belt M4 x 38mm Screw Seat Knob w/Pin Reed Switch w/Wire Console Resistance Knob w/Cable M4 x 16mm Screw Seat Seat Post Seat Collar Seat Tube Spacer Spring Frame Flywheel Round Endcap Rear Stabilizer Foam Grip Handlebar Handlebar Post Left Pedal w/Strap Right Pedal w/Strap Crank...
English Manual
Page 16
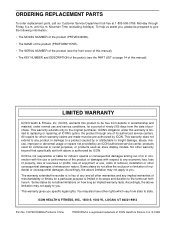
... of the product (PROFORM® 870E). • The SERIAL NUMBER of the product (see the front cover of this manual). • The KEY NUMBER and DESCRIPTION of the part(s) (see the PART LIST on how long an implied warranty lasts. ORDERING REPLACEMENT PARTS To order replacement parts, call our Customer Service Department toll-free at ICON's option, the product through Friday, 6 a.m. This warranty extends only to you specific legal rights. The...
... of the product (PROFORM® 870E). • The SERIAL NUMBER of the product (see the front cover of this manual). • The KEY NUMBER and DESCRIPTION of the part(s) (see the PART LIST on how long an implied warranty lasts. ORDERING REPLACEMENT PARTS To order replacement parts, call our Customer Service Department toll-free at ICON's option, the product through Friday, 6 a.m. This warranty extends only to you specific legal rights. The...
Uk Manual
Page 4
... 1 31 1 32 1 33 1 34 1 49" Drive Belt M4 x 38mm Screw Seat Knob w/Pin Reed Switch w/Wire Console Resistance Knob w/Cable M4 x 16mm Screw Seat Seat Post Seat Collar Seat Tube Spacer Spring Frame Flywheel Round Endcap Rear Stabiliser Foam Grip Handlebar Handlebar Post Left Pedal w/Strap Right Pedal w/Strap Crank Right Side Shield Left Side Shield Adjustable Endcap Wheel Front Stabiliser "J" Bolt Idler Arm Flywheel Axle Flywheel Cover M4 x 25mm Screw Magnet Crank Bearing Assembly 35 11 36 2 37 2 38 1 39...
... 1 31 1 32 1 33 1 34 1 49" Drive Belt M4 x 38mm Screw Seat Knob w/Pin Reed Switch w/Wire Console Resistance Knob w/Cable M4 x 16mm Screw Seat Seat Post Seat Collar Seat Tube Spacer Spring Frame Flywheel Round Endcap Rear Stabiliser Foam Grip Handlebar Handlebar Post Left Pedal w/Strap Right Pedal w/Strap Crank Right Side Shield Left Side Shield Adjustable Endcap Wheel Front Stabiliser "J" Bolt Idler Arm Flywheel Axle Flywheel Cover M4 x 25mm Screw Magnet Crank Bearing Assembly 35 11 36 2 37 2 38 1 39...
Uk Manual
Page 5
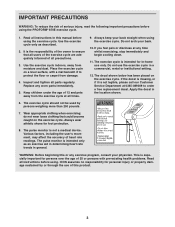
... health problems. Read all times. 9. Apply the decal in a commercial, rental or institutional setting. 12. ICON assumes no responsibility for foot protection. 8. Inspect and tighten all instructions in -home use the exercise cycle in the location shown. 6. Wear appropriate clothing when exercising; Always wear athletic shoes for personal injury or property damage sustained by persons weighing more than 250 pounds. 7. The pulse monitor...
... health problems. Read all times. 9. Apply the decal in a commercial, rental or institutional setting. 12. ICON assumes no responsibility for foot protection. 8. Inspect and tighten all instructions in -home use the exercise cycle in the location shown. 6. Wear appropriate clothing when exercising; Always wear athletic shoes for personal injury or property damage sustained by persons weighing more than 250 pounds. 7. The pulse monitor...
Uk Manual
Page 6
... the PROFORM® 870E (see the front cover of this manual for selecting the innovative PROFORM® 870E exercise cycle. Please read this manual carefully before you have additional ques- The serial number can be found on a decal attached to let you enjoy the benefits of the decal). If you use the PROFORM® 870E. Console Pulse Monitor w/Clothes Clip Seat Seat Post Seat Knob Side Shield BACK Handlebars Resistance Knob FRONT Pedal Front...
... the PROFORM® 870E (see the front cover of this manual for selecting the innovative PROFORM® 870E exercise cycle. Please read this manual carefully before you have additional ques- The serial number can be found on a decal attached to let you enjoy the benefits of the decal). If you use the PROFORM® 870E. Console Pulse Monitor w/Clothes Clip Seat Seat Post Seat Knob Side Shield BACK Handlebars Resistance Knob FRONT Pedal Front...
Uk Manual
Page 8
.... Turn the left arm of the slots in order 22 to prevent exces- Replace any worn parts immediately. HOW TO ADJUST THE REED SWITCH If the console does not display correct feedback, the reed switch should be adjusted. Next, remove the indicated Screws (2, 32, 35, 49). The exercise cycle can be damaged. PULSE MONITOR TROUBLE-SHOOTING If the pulse monitor does not function properly, try turning one of the Crank (22) to stop pedaling...
.... Turn the left arm of the slots in order 22 to prevent exces- Replace any worn parts immediately. HOW TO ADJUST THE REED SWITCH If the console does not display correct feedback, the reed switch should be adjusted. Next, remove the indicated Screws (2, 32, 35, 49). The exercise cycle can be damaged. PULSE MONITOR TROUBLE-SHOOTING If the pulse monitor does not function properly, try turning one of the Crank (22) to stop pedaling...
Uk Manual
Page 10
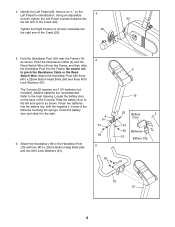
Using an adjustable 4 wrench, tighten the Left Pedal counterclockwise into the battery clip, with three M10 x 22mm Button Head Bolts (55) and three M10 Lock Washers (61). Feed the Resistance Cable (6) and the Reed Switch Wire (4) into the Frame, and then slide the Handlebar Post into 20 the right arm of the Console. Locate the battery door on the Left Pedal for identification. Attach the Handlebar (18) to pinch...
Using an adjustable 4 wrench, tighten the Left Pedal counterclockwise into the battery clip, with three M10 x 22mm Button Head Bolts (55) and three M10 Lock Washers (61). Feed the Resistance Cable (6) and the Reed Switch Wire (4) into the Frame, and then slide the Handlebar Post into 20 the right arm of the Console. Locate the battery door on the Left Pedal for identification. Attach the Handlebar (18) to pinch...
Uk Manual
Page 11
... exercise must exercise at your exercise program. Aerobic Exercise If your goal is to plan your own pace and avoid overdoing it. AGE utes of your body uses easily accessible carbohydrate calories for you to exercise with pre-existing health problems. EXERCISE INTENSITY Whether your goal is the heart rate for fat burning; FAT FAT BURN To find the three numbers below shows recommended heart rates...
... exercise must exercise at your exercise program. Aerobic Exercise If your goal is to plan your own pace and avoid overdoing it. AGE utes of your body uses easily accessible carbohydrate calories for you to exercise with pre-existing health problems. EXERCISE INTENSITY Whether your goal is the heart rate for fat burning; FAT FAT BURN To find the three numbers below shows recommended heart rates...
Uk Manual
Page 14
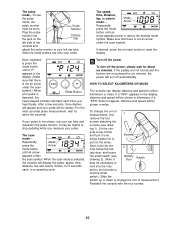
... pedaled, in your heart rate when the pulse monitor is the most challenging. Move the Seat Post up or down the time remaining in a repeating cycle. 8 ty of the Pedal Strap off the Tab tab on page 10). HOW TO ADJUST THE PEDAL STRAPS To adjust each , in the program. Speed-This mode shows your exercise. One lap equals 0.25 kilometres or miles. As you select the manual mode, this mode...
... pedaled, in your heart rate when the pulse monitor is the most challenging. Move the Seat Post up or down the time remaining in a repeating cycle. 8 ty of the Pedal Strap off the Tab tab on page 10). HOW TO ADJUST THE PEDAL STRAPS To adjust each , in the program. Speed-This mode shows your exercise. One lap equals 0.25 kilometres or miles. As you select the manual mode, this mode...
Uk Manual
Page 15
... right column shows your workout If you use . Each column represents a two-minute period, and each bar represents a target pace of the three pacer programs or the manual mode To select one bar in the display. The programs will be installed. (See assembly step 5 on page 6.) Follow the steps below to operate the console. 1 Turn on the power To turn on the power, press On/Reset Button the on . 2 Select one...
... right column shows your workout If you use . Each column represents a two-minute period, and each bar represents a target pace of the three pacer programs or the manual mode To select one bar in the display. The programs will be installed. (See assembly step 5 on page 6.) Follow the steps below to operate the console. 1 Turn on the power To turn on the power, press On/Reset Button the on . 2 Select one...
Uk Manual
Page 16
... Please provide the following information when calling or writing: • The MODEL NUMBER of the product (PFEVEX34080). • The NAME of the product (PROFORM® 870E). • The SERIAL NUMBER of the product (see the front cover of this manual). • The KEY NUMBER and DESCRIPTION of the part(s) (see the PART LIST on page 14 of ICON Health & Fitness, Inc. © 1998 Part No. 147749 R0798A Printed...
... Please provide the following information when calling or writing: • The MODEL NUMBER of the product (PFEVEX34080). • The NAME of the product (PROFORM® 870E). • The SERIAL NUMBER of the product (see the front cover of this manual). • The KEY NUMBER and DESCRIPTION of the part(s) (see the PART LIST on page 14 of ICON Health & Fitness, Inc. © 1998 Part No. 147749 R0798A Printed...

