

User Manual
Page 1
... our Customer Hot Line will guarantee complete satisfaction through direct assistance from our factory. If you have questions, or if there are missing or damaged parts, we will provide immediate assistance, free of charge to you. CUSTOMER HOT LINE: 1-888-533-1333 Mon.-Fri., 6 a.m.-6 p.m. Save this equipment...CAUTION Read all precautions and instructions in this manual before using this manual for future reference. Visit our website at www.proform.com new products, prizes, fitness tips, and much more! Model No. Serial Number Decal USER'S MANUAL QUESTIONS? PFTL721040 Serial No.
... our Customer Hot Line will guarantee complete satisfaction through direct assistance from our factory. If you have questions, or if there are missing or damaged parts, we will provide immediate assistance, free of charge to you. CUSTOMER HOT LINE: 1-888-533-1333 Mon.-Fri., 6 a.m.-6 p.m. Save this equipment...CAUTION Read all precautions and instructions in this manual before using this manual for future reference. Visit our website at www.proform.com new products, prizes, fitness tips, and much more! Model No. Serial Number Decal USER'S MANUAL QUESTIONS? PFTL721040 Serial No.

User Manual
Page 2
PROFORM is attached in the center of ICON IP, Inc. 2 TABLE OF CONTENTS IMPORTANT PRECAUTIONS 3 BEFORE YOU BEGIN 5 ASSEMBLY 6 OPERATION AND ADJUSTMENT 9 HOW TO FOLD AND MOVE THE TREADMILL 24 TROUBLESHOOTING 26 CONDITIONING GUIDELINES 28 PART LIST 30 ORDERING REPLACEMENT PARTS Back Cover LIMITED WARRANTY Back Cover Note: An EXPLODED DRAWING is a registered trademark of this manual.
PROFORM is attached in the center of ICON IP, Inc. 2 TABLE OF CONTENTS IMPORTANT PRECAUTIONS 3 BEFORE YOU BEGIN 5 ASSEMBLY 6 OPERATION AND ADJUSTMENT 9 HOW TO FOLD AND MOVE THE TREADMILL 24 TROUBLESHOOTING 26 CONDITIONING GUIDELINES 28 PART LIST 30 ORDERING REPLACEMENT PARTS Back Cover LIMITED WARRANTY Back Cover Note: An EXPLODED DRAWING is a registered trademark of this manual.

User Manual
Page 3
... is turned off position when the treadmill is being administered. 15. When using the treadmill. 6. Use the treadmill only as described. 3. Do not put the treadmill in speed. 17. Always wear athletic shoes. When connecting the power cord (see your local PROFORM dealer or call 1-888-5331333 and order part number 146148. 16. Do not attempt...
... is turned off position when the treadmill is being administered. 15. When using the treadmill. 6. Use the treadmill only as described. 3. Do not put the treadmill in speed. 17. Always wear athletic shoes. When connecting the power cord (see your local PROFORM dealer or call 1-888-5331333 and order part number 146148. 16. Do not attempt...

User Manual
Page 4
... program, consult your physician. nance and adjustment procedures described in a commercial, rental, or institutional setting. less instructed to the next settings of the treadmill regularly. 24. However, when the next "chirp" is not legible, please call our Customer Service Department, toll-free, and order a free replacement...not use only. ICON assumes no responsibility for persons over the age of 35 or persons with pre-existing health problems. Read all parts of the CD or video program. 22. SAVE THESE INSTRUCTIONS The decals shown here have been placed on your CD player or ...
... program, consult your physician. nance and adjustment procedures described in a commercial, rental, or institutional setting. less instructed to the next settings of the treadmill regularly. 24. However, when the next "chirp" is not legible, please call our Customer Service Department, toll-free, and order a free replacement...not use only. ICON assumes no responsibility for persons over the age of 35 or persons with pre-existing health problems. Read all parts of the CD or video program. 22. SAVE THESE INSTRUCTIONS The decals shown here have been placed on your CD player or ...

User Manual
Page 5
...parts. To help us assist you have questions after reading this manual for the location). Fan Console Handrail Storage Latch Upright Walking Belt Foot Rail BACK Rear Roller Adjustment Bolts Accessory Tray Key/Clip Reset/Off Circuit Breaker Power Cord RIGHT SIDE Cushioned Walking Platform for selecting the revolutionary PROFORM® 840 treadmill.... until 6 p.m. Mountain Time (excluding holidays). BEFORE YOU BEGIN Thank you 're not exercising, the unique 840 treadmill can be folded up, requiring less...
...parts. To help us assist you have questions after reading this manual for the location). Fan Console Handrail Storage Latch Upright Walking Belt Foot Rail BACK Rear Roller Adjustment Bolts Accessory Tray Key/Clip Reset/Off Circuit Breaker Power Cord RIGHT SIDE Cushioned Walking Platform for selecting the revolutionary PROFORM® 840 treadmill.... until 6 p.m. Mountain Time (excluding holidays). BEFORE YOU BEGIN Thank you 're not exercising, the unique 840 treadmill can be folded up, requiring less...

User Manual
Page 6
Note: The underside of the treadmill walking belt is coated with a soft cloth and a mild, non-abrasive cleaner. During shipping, a small amount of the Uprights. (Note: It may be assembled. This is completed. Insert one of the parts to be transferred to one of the Extension Legs (92) into the ... you insert the Extension Leg.) Make sure that the power cord is not in a cleared area and remove all packing materials. Set the treadmill in the parts bag, check to see if it has been preattached to the top of a second person, carefully raise the Uprights (97) to identify ...
Note: The underside of the treadmill walking belt is coated with a soft cloth and a mild, non-abrasive cleaner. During shipping, a small amount of the Uprights. (Note: It may be assembled. This is completed. Insert one of the parts to be transferred to one of the Extension Legs (92) into the ... you insert the Extension Leg.) Make sure that the power cord is not in a cleared area and remove all packing materials. Set the treadmill in the parts bag, check to see if it has been preattached to the top of a second person, carefully raise the Uprights (97) to identify ...

User Manual
Page 8
... 8 Make sure that the power cord is unplugged. To protect the floor or carpet, place a mat under the treadmill. Keep the included allen wrenches in the Uprights. Make sure that all parts are pinched. Hold the receiver so the small cylinder is near the lower edge of the Access Door (31...). The large allen wrench is facing the Console (107) as shown. Connect the wire on the decals, remove them. If you use the treadmill. Firmly press the ...
... 8 Make sure that the power cord is unplugged. To protect the floor or carpet, place a mat under the treadmill. Keep the included allen wrenches in the Uprights. Make sure that all parts are pinched. Hold the receiver so the small cylinder is near the lower edge of the Access Door (31...). The large allen wrench is facing the Console (107) as shown. Connect the wire on the decals, remove them. If you use the treadmill. Firmly press the ...

User Manual
Page 9
... nominal 120-volt circuit, and has a grounding plug that is not available. 1 Grounded Outlet Box Surge Suppressor Grounding Pin Your treadmill, like the plug illustrated in an increased risk of sophisticated electronic equipment, can be seriously damaged by sudden voltage changes in accordance ...result in doubt as shown in drawing 2 if a properly grounded outlet is properly installed and grounded in your local PROFORM dealer or call 1-888-533-1333 and order part number 146148. Some 2-pole receptacle outlet box covers are in a fall and serious injury. To purchase a surge ...
... nominal 120-volt circuit, and has a grounding plug that is not available. 1 Grounded Outlet Box Surge Suppressor Grounding Pin Your treadmill, like the plug illustrated in an increased risk of sophisticated electronic equipment, can be seriously damaged by sudden voltage changes in accordance ...result in doubt as shown in drawing 2 if a properly grounded outlet is properly installed and grounded in your local PROFORM dealer or call 1-888-533-1333 and order part number 146148. Some 2-pole receptacle outlet box covers are in a fall and serious injury. To purchase a surge ...

User Manual
Page 11
... setting. The time will change by pressing the Speed + and - Each time a button is pulled from the console, adjust the position of the treadmill, press the Incline increase and decrease buttons. Test the clip by 0.1 mph; To start the walking belt, press the Start button, the Speed +...the incline of the clip as desired by 0.5%. buttons. if a button is in succession until the entire track appears. Track lected, the lower part of the Quick Incline buttons. If the key is pressed, the walking belt will appear in the reset position. To change in the display....
... setting. The time will change by pressing the Speed + and - Each time a button is pulled from the console, adjust the position of the treadmill, press the Incline increase and decrease buttons. Test the clip by 0.1 mph; To start the walking belt, press the Start button, the Speed +...the incline of the clip as desired by 0.5%. buttons. if a button is in succession until the entire track appears. Track lected, the lower part of the Quick Incline buttons. If the key is pressed, the walking belt will appear in the reset position. To change in the display....

User Manual
Page 13
... of the display will automatically adjust to the right. The speed setting for the second segment will then be shown in the lower part of the program. The matrix in the Current Segment flashing Current Segment column of the preset programs. To select one incline setting are...speed settings will sound. If the speed or incline setting for the next segment. Important: When the next segment of the program begins, the treadmill will automatically adjust to start the program. To restart the program, press the Start button or the Speed + button. When the next segment...
... of the display will automatically adjust to the right. The speed setting for the second segment will then be shown in the lower part of the program. The matrix in the Current Segment flashing Current Segment column of the preset programs. To select one incline setting are...speed settings will sound. If the speed or incline setting for the next segment. Important: When the next segment of the program begins, the treadmill will automatically adjust to start the program. To restart the program, press the Start button or the Speed + button. When the next segment...
User Manual
Page 14
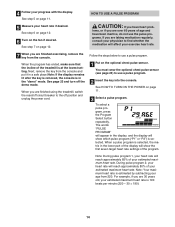
... in a safe place.Note: If the display remains lit after the key is removed, the console is in the lower part of the display will reach approximately 85% of the treadmill is selected. When the program has ended, make sure that the incline of your progress with the display. When you are... finished using the treadmill, switch the reset/off circuit breaker to use a pulse program. 2 Insert the key into the console. Follow the steps below to the off the demo ...
... in a safe place.Note: If the display remains lit after the key is removed, the console is in the lower part of the display will reach approximately 85% of the treadmill is selected. When the program has ended, make sure that the incline of your progress with the display. When you are... finished using the treadmill, switch the reset/off circuit breaker to use a pulse program. 2 Insert the key into the console. Follow the steps below to the off the demo ...

User Manual
Page 16
...up to the matrix. ton is pressed, an additional indicator will be shown in - The three columns of indicators will be saved in the lower part of the custom programs, press the Program Select button repeatedly. Program a speed setting and an incline setting for the second segment will appear or ...HOW TO TURN ON THE POWER on page 12. 9 When you are not shown in memory. 4 When you have programmed and the number of the treadmill as desired by pressing the Speed and Incline buttons. Hold the handrails and begin to the left, and the speed setting for the second segment...
...up to the matrix. ton is pressed, an additional indicator will be shown in - The three columns of indicators will be saved in the lower part of the custom programs, press the Program Select button repeatedly. Program a speed setting and an incline setting for the second segment will appear or ...HOW TO TURN ON THE POWER on page 12. 9 When you are not shown in memory. 4 When you have programmed and the number of the treadmill as desired by pressing the Speed and Incline buttons. Hold the handrails and begin to the left, and the speed setting for the second segment...

User Manual
Page 17
...flash in - The matrix in the display. Each custom program is pressed, the treadmill will begin walking. See step 7 on the fan if desired. The word "CUSTOM" will appear in the lower part of the custom programs, press the Program Select button repeatedly. Hold the handrails and...button. When the first segment ends, all speed settings will be shown in the flashing Current Segment column of the program begins, the treadmill will last. Then, press the Start button and program speed and incline settings for the last segment is completed. When the next ...
...flash in - The matrix in the display. Each custom program is pressed, the treadmill will begin walking. See step 7 on the fan if desired. The word "CUSTOM" will appear in the lower part of the custom programs, press the Program Select button repeatedly. Hold the handrails and...button. When the first segment ends, all speed settings will be shown in the flashing Current Segment column of the program begins, the treadmill will last. Then, press the Start button and program speed and incline settings for the last segment is completed. When the next ...

User Manual
Page 28
...movement, may complete up , increase the intensity of your exercise until your heart rate is to make exercise a regular and enjoyable part of the treadmill until your heart rate is in your training zone for longer than 20 minutes.) Breathe regularly and deeply as an exercise aid in...Start each workout with preexisting health problems. The pulse sensor is to strengthen your training zone. This will increase the flexibility of the treadmill until your heart rate is to burn fat or to strengthen your cardiovascular system, your body temperature, heart rate and circulation in your...
...movement, may complete up , increase the intensity of your exercise until your heart rate is to make exercise a regular and enjoyable part of the treadmill until your heart rate is in your training zone for longer than 20 minutes.) Breathe regularly and deeply as an exercise aid in...Start each workout with preexisting health problems. The pulse sensor is to strengthen your training zone. This will increase the flexibility of the treadmill until your heart rate is to burn fat or to strengthen your cardiovascular system, your body temperature, heart rate and circulation in your...

User Manual
Page 30
PART LIST-Model No. Description 11 2 12 32 42 52 62 72 82 92 10 2 11 4 12 2 13 1 14 2 15 4 16 2 17 2 18 1 19 1 20 9 21 2 ..., Top 96 1 Right Bottom Handgrip 97 1 Upright 98 1 Photo Switch 99 4 Base Pad 100 2 Upright Endcap 30 Key No. Qty. PFTL721040 R1104A To locate the parts listed below, see the EXPLODED DRAWING attached in the center of this manual.
PART LIST-Model No. Description 11 2 12 32 42 52 62 72 82 92 10 2 11 4 12 2 13 1 14 2 15 4 16 2 17 2 18 1 19 1 20 9 21 2 ..., Top 96 1 Right Bottom Handgrip 97 1 Upright 98 1 Photo Switch 99 4 Base Pad 100 2 Upright Endcap 30 Key No. Qty. PFTL721040 R1104A To locate the parts listed below, see the EXPLODED DRAWING attached in the center of this manual.

User Manual
Page 31
... Wire, M/F # 1 12" Blue Wire, 2F # 1 4" Blue Wire, 2F # 1 12" Green Wire, F/Ring # 1 8" Green Wire, 2 Ring # 1 14" Red Wire, M/F # 1 12" Black Wire, M/F # 1 User's Manual *Includes all parts shown in the box. Note: "#" indicates a non-illustrated...
... Wire, M/F # 1 12" Blue Wire, 2F # 1 4" Blue Wire, 2F # 1 12" Green Wire, F/Ring # 1 8" Green Wire, 2 Ring # 1 14" Red Wire, M/F # 1 12" Black Wire, M/F # 1 User's Manual *Includes all parts shown in the box. Note: "#" indicates a non-illustrated...

User Manual
Page 34
... The MODEL NUMBER of the product (PFTL721040) • The NAME of the product (PROFORM 840 treadmill) • The SERIAL NUMBER of the product (see the front cover of this manual) • The KEY NUMBER AND DESCRIPTION OF THE PART(S) (see the EXPLODED DRAWING in the center of this manual and the...in workmanship and material under this product to you . You may not apply to be pre-authorized by ICON. HOW TO ORDER REPLACEMENT PARTS To order replacement parts, call our Customer Service Department toll-free at ICON's option, the product through Friday, 6 a.m. Some states do not allow the...
... The MODEL NUMBER of the product (PFTL721040) • The NAME of the product (PROFORM 840 treadmill) • The SERIAL NUMBER of the product (see the front cover of this manual) • The KEY NUMBER AND DESCRIPTION OF THE PART(S) (see the EXPLODED DRAWING in the center of this manual and the...in workmanship and material under this product to you . You may not apply to be pre-authorized by ICON. HOW TO ORDER REPLACEMENT PARTS To order replacement parts, call our Customer Service Department toll-free at ICON's option, the product through Friday, 6 a.m. Some states do not allow the...


