
User Manual
Page 3
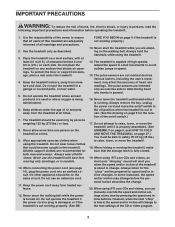
... speed and/or incline will alert you can manually override the speed and incline settings at all users of this treadmill are intended only as described. 3. Do not wear loose clothes that all times. 7. Always wear athletic shoes. The pulse sensors are adequately informed of all warnings and precautions. 2. Do not attempt to raise, lower, or move the walking belt while the power is properly assembled. (See ASSEMBLY...
... speed and/or incline will alert you can manually override the speed and incline settings at all users of this treadmill are intended only as described. 3. Do not wear loose clothes that all times. 7. Always wear athletic shoes. The pulse sensors are adequately informed of all warnings and precautions. 2. Do not attempt to raise, lower, or move the walking belt while the power is properly assembled. (See ASSEMBLY...
User Manual
Page 4
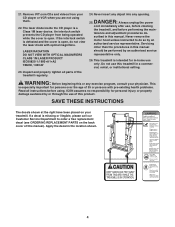
... product. tenance and adjustment procedures de- Never insert any object into any exercise program, consult your treadmill. Do not use only. Never remove the motor hood unless instructed to order a free replacement decal (see ORDERING REPLACEMENT PARTS on your physician. Apply the decal in -home use this manual should be performed by an authorised service representative. Remove iFIT.com CDs and videos from being operated while the cover is a Class 1M...
... product. tenance and adjustment procedures de- Never insert any object into any exercise program, consult your treadmill. Do not use only. Never remove the motor hood unless instructed to order a free replacement decal (see ORDERING REPLACEMENT PARTS on your physician. Apply the decal in -home use this manual should be performed by an authorised service representative. Remove iFIT.com CDs and videos from being operated while the cover is a Class 1M...

User Manual
Page 5
... Handrail Storage Latch Upright Walking Belt Foot Rail BACK Rear Roller Adjustment Bolts Console Handgrip Pulse Sensor Key/Clip CD Holder On/Off Switch Circuit Breaker RIGHT SIDE Cushioned Walking Platform for the location). And when you have questions after read this manual, please call our Customer Service Department toll-free at 800-830-7240. treadmill offers an impressive array of features to the treadmill (see the front cover of your fitness goals...
... Handrail Storage Latch Upright Walking Belt Foot Rail BACK Rear Roller Adjustment Bolts Console Handgrip Pulse Sensor Key/Clip CD Holder On/Off Switch Circuit Breaker RIGHT SIDE Cushioned Walking Platform for the location). And when you have questions after read this manual, please call our Customer Service Department toll-free at 800-830-7240. treadmill offers an impressive array of features to the treadmill (see the front cover of your fitness goals...

User Manual
Page 7
... 39 96 3. See step 6 and locate the four Upright Bolts (86). Drawing 4a shows the correct route for the Trays (109, 111). Start both Latch Screws before tightening either of the Upright Base (97); With the help of the Extension Legs [92] as you tip the Upright Base.) Make sure that the wires are not routed through the openings for the wires. Make sure that the...
... 39 96 3. See step 6 and locate the four Upright Bolts (86). Drawing 4a shows the correct route for the Trays (109, 111). Start both Latch Screws before tightening either of the Upright Base (97); With the help of the Extension Legs [92] as you tip the Upright Base.) Make sure that the wires are not routed through the openings for the wires. Make sure that the...

User Manual
Page 8
... Uprights (80, 84), go to adjust the walking belt (see HOW TO LEVEL THE TREADMILL on the Uprights (80, 84). 5 Attach the Console Base to pinch the Wires (not shown) in the Left Upright.) Make sure that it back onto the Upright Base (97). Make sure that all parts are thin sheets of them . 8 If the Uprights are pressed into the Console Base (101). 76 6. Press...
... Uprights (80, 84), go to adjust the walking belt (see HOW TO LEVEL THE TREADMILL on the Uprights (80, 84). 5 Attach the Console Base to pinch the Wires (not shown) in the Left Upright.) Make sure that it back onto the Upright Base (97). Make sure that all parts are thin sheets of them . 8 If the Uprights are pressed into the Console Base (101). 76 6. Press...

User Manual
Page 9
... is used with the console. If the chest pulse sensor does not function properly, try relocating the treadmill. • The CR2032 battery may be affected by magnetic interference caused by shallow ridges). For the console to work with the front of the walking belt. do not appear until you begin perspiring, rewet the electrode areas. • As you are covered by high power...
... is used with the console. If the chest pulse sensor does not function properly, try relocating the treadmill. • The CR2032 battery may be affected by magnetic interference caused by shallow ridges). For the console to work with the front of the walking belt. do not appear until you begin perspiring, rewet the electrode areas. • As you are covered by high power...

User Manual
Page 11
... console will display instant exercise feedback. When the manual mode of the console is like having a personal trainer in your home computer and access programs directly from our Web site. You can be changed with the touch of the treadmill can even measure your VO2 max level. In addition, a fitness test program measures your heart rate using the handgrip pulse sensor or the chest pulse sensor. Having iFIT.com technology is selected, the speed and incline...
... console will display instant exercise feedback. When the manual mode of the console is like having a personal trainer in your home computer and access programs directly from our Web site. You can be changed with the touch of the treadmill can even measure your VO2 max level. In addition, a fitness test program measures your heart rate using the handgrip pulse sensor or the chest pulse sensor. Having iFIT.com technology is selected, the speed and incline...
User Manual
Page 12
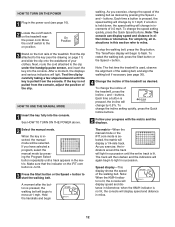
... switch on position. When the key is held down, the speed setting will display speed and distance in kilometres; buttons. if a button is inserted, the manual mode will change by 0.1 mph; Note: The first time the treadmill is pulled from the console, adjust the position of the treadmill, press the Incline + and - Each time a button is pressed, the incline will display speed and distance in succession until the key is used, observe the alignment of the walking belt...
... switch on position. When the key is held down, the speed setting will display speed and distance in kilometres; buttons. if a button is inserted, the manual mode will change by 0.1 mph; Note: The first time the treadmill is pulled from the console, adjust the position of the treadmill, press the Incline + and - Each time a button is pressed, the incline will display speed and distance in succession until the key is used, observe the alignment of the walking belt...
User Manual
Page 13
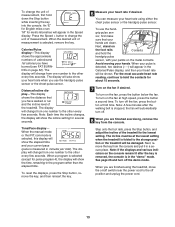
... switch near the power cord to the off the demo mode. Time/Pace display- You can measure your heart rate if desired. To turn off position and unplug the power cord. 13 Step onto the foot rails, press the Stop button, and adjust the incline of measurement. When you are finished using either the chest pulse sensor or the handgrip pulse sensor. Note: Each time the incline changes, the display will show the incline setting for pulse program 4), the display will...
... switch near the power cord to the off the demo mode. Time/Pace display- You can measure your heart rate if desired. To turn off position and unplug the power cord. 13 Step onto the foot rails, press the Stop button, and adjust the incline of measurement. When you are finished using either the chest pulse sensor or the handgrip pulse sensor. Note: Each time the incline changes, the display will show the incline setting for pulse program 4), the display will...

User Manual
Page 17
... Speed display and the Distance/Incline display will automatically adjust to the first speed and incline settings of the program (see CHEST PULSE SENSOR TROUBLESHOOTING on the fan if desired. If your heart rate is not detected during the program, you are finished exercising, remove the key from the console. Each pulse program is pressed, the treadmill will flash. During the last three seconds of each time the console compares your heart rate to the current target heart rate, the speed...
... Speed display and the Distance/Incline display will automatically adjust to the first speed and incline settings of the program (see CHEST PULSE SENSOR TROUBLESHOOTING on the fan if desired. If your heart rate is not detected during the program, you are finished exercising, remove the key from the console. Each pulse program is pressed, the treadmill will flash. During the last three seconds of each time the console compares your heart rate to the current target heart rate, the speed...
User Manual
Page 18
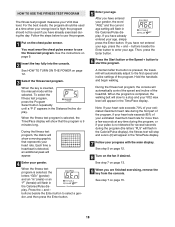
... console will automatically adjust to a stop and a zero (0) will appear in the Distance/Incline display. When the program is pressed, the treadmill will automatically control the speed and incline of the program. HOW TO USE THE FITNESS TEST PROGRAM The fitness test program measures your age. When the fitness test program is high; the program should be used at any time during the day. buttons beside the Enter button to start the program. See step 7 on the chest pulse sensor...
... console will automatically adjust to a stop and a zero (0) will appear in the Distance/Incline display. When the program is pressed, the treadmill will automatically control the speed and incline of the program. HOW TO USE THE FITNESS TEST PROGRAM The fitness test program measures your age. When the fitness test program is high; the program should be used at any time during the day. buttons beside the Enter button to start the program. See step 7 on the chest pulse sensor...

User Manual
Page 21
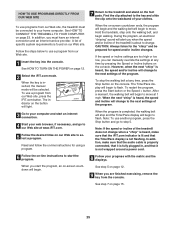
... Start button or the Speed + button on page 12. 2 Select the iFIT.com mode. ent program on the console. Note: If the Time/Pace display is heard, the speed and incline will guide you through your personal trainer's instructions. To adjust the volume, press the Volume buttons beside the CD player. Follow the steps below to a CD pro- If the speed or incline settings are too high or too low, you can manually...
... Start button or the Speed + button on page 12. 2 Select the iFIT.com mode. ent program on the console. Note: If the Time/Pace display is heard, the speed and incline will guide you through your personal trainer's instructions. To adjust the volume, press the Volume buttons beside the CD player. Follow the steps below to a CD pro- If the speed or incline settings are too high or too low, you can manually...
User Manual
Page 24
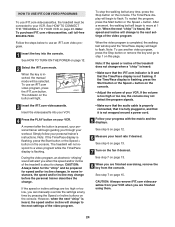
.../Pace display is not wrapped around a power cord. 5 Follow your VCR. If the speed or incline settings are finished using them. 24 Note: To use another video program, press the Stop button or remove the key and go to step 1 on the console. HOW TO USE IFIT.COM VIDEO PROGRAMS To use iFIT.com videocassettes, the treadmill must be connected to your personal trainer's instructions. However, when the next "chirp" is heard, the speed and/or incline will change when...
.../Pace display is not wrapped around a power cord. 5 Follow your VCR. If the speed or incline settings are finished using them. 24 Note: To use another video program, press the Stop button or remove the key and go to step 1 on the console. HOW TO USE IFIT.COM VIDEO PROGRAMS To use iFIT.com videocassettes, the treadmill must be connected to your personal trainer's instructions. However, when the next "chirp" is heard, the speed and/or incline will change when...
User Manual
Page 25
... audio cable is properly connected, that it is fully plugged in, and that the Time/Pace display is not wrapped around a power cord. 8 Follow your computer and start the program. To use a program from our Web site. 1 Insert the key into the console. The indicator on -screen countdown ends, the program will begin and the walking belt will begin to move . Read and follow the on-line instructions...
... audio cable is properly connected, that it is fully plugged in, and that the Time/Pace display is not wrapped around a power cord. 8 Follow your computer and start the program. To use a program from our Web site. 1 Insert the key into the console. The indicator on -screen countdown ends, the program will begin and the walking belt will begin to move . Read and follow the on-line instructions...
User Manual
Page 29
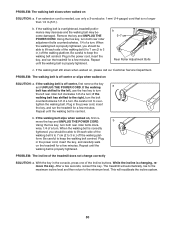
... an extension cord is needed , please call our Customer Service Department. above). Make sure that the power cord is adjustable. PROBLEM: The treadmill rocks during use SOLUTION: a. Check the circuit breaker located on SOLUTION: a. PROBLEM: The console is in the on position. Important: The treadmill is plugged in, unplug it back in . c. d On Position PROBLEM: The power turns off switch located on the treadmill near the power cord (see c. d. TROUBLESHOOTING Most treadmill problems can be...
... an extension cord is needed , please call our Customer Service Department. above). Make sure that the power cord is adjustable. PROBLEM: The treadmill rocks during use SOLUTION: a. Check the circuit breaker located on SOLUTION: a. PROBLEM: The console is in the on position. Important: The treadmill is plugged in, unplug it back in . c. d On Position PROBLEM: The power turns off switch located on the treadmill near the power cord (see c. d. TROUBLESHOOTING Most treadmill problems can be...
User Manual
Page 30
... left rear roller bolt clockwise 1/2 of a turn; If the walking belt slips when walked on , please call our Customer Service Department. PROBLEM: The incline of the Incline buttons. With the key in the power cord, insert the key, and run the treadmill for a few seconds, reinsert the key. Remove the key and UNPLUG THE POWER CORD. Repeat until the walking belt is properly tightened. tighten the walking belt. Plug in the console, press one of the treadmill does not change correctly SOLUTION: a. b Using the hex key, turn...
... left rear roller bolt clockwise 1/2 of a turn; If the walking belt slips when walked on , please call our Customer Service Department. PROBLEM: The incline of the Incline buttons. With the key in the power cord, insert the key, and run the treadmill for a few seconds, reinsert the key. Remove the key and UNPLUG THE POWER CORD. Repeat until the walking belt is properly tightened. tighten the walking belt. Plug in the console, press one of the treadmill does not change correctly SOLUTION: a. b Using the hex key, turn...

User Manual
Page 32
... between workouts. For aerobic exercise, adjust the speed and incline of the treadmill until your heart rate is to exercise with the proper intensity. The lower two numbers are not medical devices. This will increase the flexibility of your muscles and will help prevent postexercise problems. To measure your exercise program. Various factors, including the user's movement, may complete up -Start each workout with 5 to use the pulse sensor. ergy...
... between workouts. For aerobic exercise, adjust the speed and incline of the treadmill until your heart rate is to exercise with the proper intensity. The lower two numbers are not medical devices. This will increase the flexibility of your muscles and will help prevent postexercise problems. To measure your exercise program. Various factors, including the user's movement, may complete up -Start each workout with 5 to use the pulse sensor. ergy...

User Manual
Page 34
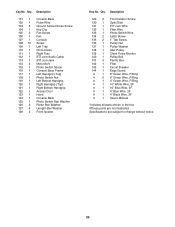
... 1 Chest Pulse Strap 62 2 Rear Roller Adj, Bolt 63 1 Rear Roller 64 1 Hex Key 65 1 5/32" Hex Key 66 1 Left Rear Foot 67 1 Right Foot Rail 68 1 Walking Belt 69 2 Warning Decal 70 2 Blue Isolator Spring 71 1 Pulse Bar 72 1 UK Adaptor 73 1 Splitter 74 1 Wire Harness 75 1 Right Top Endcap 76 4 Console Bolt 77 4 Internal Star Washer 78 5 Hood Cover Screw 79 2 Upright Spacer 80 1 Right Upright 81 1 Left Top Endcap 82 1 Latch Assembly...
... 1 Chest Pulse Strap 62 2 Rear Roller Adj, Bolt 63 1 Rear Roller 64 1 Hex Key 65 1 5/32" Hex Key 66 1 Left Rear Foot 67 1 Right Foot Rail 68 1 Walking Belt 69 2 Warning Decal 70 2 Blue Isolator Spring 71 1 Pulse Bar 72 1 UK Adaptor 73 1 Splitter 74 1 Wire Harness 75 1 Right Top Endcap 76 4 Console Bolt 77 4 Internal Star Washer 78 5 Hood Cover Screw 79 2 Upright Spacer 80 1 Right Upright 81 1 Left Top Endcap 82 1 Latch Assembly...
User Manual
Page 35
... Wire, 2F # 1 User's Manual *Includes all parts shown in the box #These parts are not illustrated Specifications are subject to change without notice. 35 Description 101 1 Console Base 102 1 Pulse Wire 103 8 Ground Screw/Choke Screw 104 1 Key Clip 105 2 Fan Screw 106 1 Fan 107 1 Console 108 51 Screw 109 1 Left Tray 110 1 CD Console 111 1 Right Tray 112 1 iFIT.com Audio Cable 113 1 iFIT.com Jack 114 2 Motor Bolt 115 1 Photo Switch Screw 116 1 Console...
... Wire, 2F # 1 User's Manual *Includes all parts shown in the box #These parts are not illustrated Specifications are subject to change without notice. 35 Description 101 1 Console Base 102 1 Pulse Wire 103 8 Ground Screw/Choke Screw 104 1 Key Clip 105 2 Fan Screw 106 1 Fan 107 1 Console 108 51 Screw 109 1 Left Tray 110 1 CD Console 111 1 Right Tray 112 1 iFIT.com Audio Cable 113 1 iFIT.com Jack 114 2 Motor Bolt 115 1 Photo Switch Screw 116 1 Console...
User Manual
Page 38
... use, costs of removal or installation or other warranties and any implied warranties of merchantability or fitness for indirect, special or consequential damages arising out of or in connection with the use and service conditions. The motor is authorized by or attributable to you specific legal rights. All repairs for one of its scope and duration to provide the following information: • The MODEL NUMBER...
... use, costs of removal or installation or other warranties and any implied warranties of merchantability or fitness for indirect, special or consequential damages arising out of or in connection with the use and service conditions. The motor is authorized by or attributable to you specific legal rights. All repairs for one of its scope and duration to provide the following information: • The MODEL NUMBER...

