
Uk Manual
Page 3
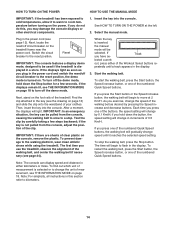
... exercise aid in determining heart rate trends in speed. 9. No other appliance should be on the walking belt. Read, understand, and test the emergency stop procedure before using the treadmill (see page 12), plug the power cord into an earthed cir- 18. The treadmill is turned off position when the treadmill is not working properly. (See TROUBLESHOOTING on each side. Never allow more than 5 ft. (1.5 m). 13. When replacing...
... exercise aid in determining heart rate trends in speed. 9. No other appliance should be on the walking belt. Read, understand, and test the emergency stop procedure before using the treadmill (see page 12), plug the power cord into an earthed cir- 18. The treadmill is turned off position when the treadmill is not working properly. (See TROUBLESHOOTING on each side. Never allow more than 5 ft. (1.5 m). 13. When replacing...
Uk Manual
Page 4
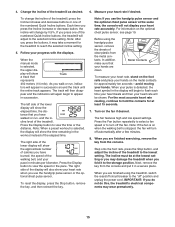
... remove the motor hood un- Servicing other than the procedures in -home use , before cleaning the treadmill, and before performing the mainte- 20. Inspect and properly tighten all parts of the treadmill regularly. When folding or moving the treadmill, make sure that the storage latch is holding the frame securely in serious injury or death. vice representative. less instructed to raise, lower, or move the treadmill. 21. Over exercising may...
... remove the motor hood un- Servicing other than the procedures in -home use , before cleaning the treadmill, and before performing the mainte- 20. Inspect and properly tighten all parts of the treadmill regularly. When folding or moving the treadmill, make sure that the storage latch is holding the frame securely in serious injury or death. vice representative. less instructed to raise, lower, or move the treadmill. 21. Over exercising may...
Uk Manual
Page 5
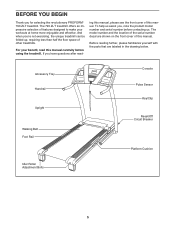
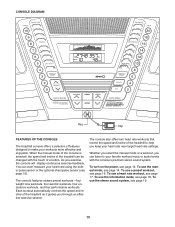
BEFORE YOU BEGIN Thank you , note the product model number and serial number before using the treadmill. ing this manual, please see the front cover of features designed to make your benefit, read - Accessory Tray Handrail Upright Walking Belt Foot Rail Console Pulse Sensor Key/Clip Reset/Off Circuit Breaker Platform Cushion Idler Roller Adjustment Bolts 5 The 790 ZLT treadmill offers an impressive selection of this manual. Before reading further, please familiarize yourself with...
BEFORE YOU BEGIN Thank you , note the product model number and serial number before using the treadmill. ing this manual, please see the front cover of features designed to make your benefit, read - Accessory Tray Handrail Upright Walking Belt Foot Rail Console Pulse Sensor Key/Clip Reset/Off Circuit Breaker Platform Cushion Idler Roller Adjustment Bolts 5 The 790 ZLT treadmill offers an impressive selection of this manual. Before reading further, please familiarize yourself with...
Uk Manual
Page 6
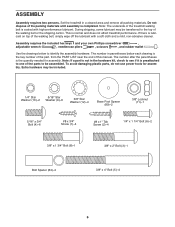
... is the key number of the part, from the PART LIST near the end of the parts to one of this manual. To avoid damaging plastic parts, do not use power tools for assembly. ASSEMBLY Assembly requires two persons. Set the treadmill in the hardware kit, check to see if it is normal and does not affect treadmill performance. Note: The underside of the walking belt or the...
... is the key number of the part, from the PART LIST near the end of the parts to one of this manual. To avoid damaging plastic parts, do not use power tools for assembly. ASSEMBLY Assembly requires two persons. Set the treadmill in the hardware kit, check to see if it is normal and does not affect treadmill performance. Note: The underside of the walking belt or the...
Uk Manual
Page 10
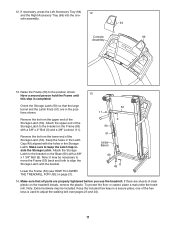
...). Connect the Wire Harness (86) to pinch the wires in these assembly steps. 11 Console Assembly 105 1 10 6 10 Tighten all four Screws and both Bolts before tightening any of the Left Upright (77). Attach the Left Handrail (106) to pinch the wires. 10 Console Assembly Console Wire 105 86 Wire Tie 79 Console Wire 86 11. Remove the wire tie from the Wire Harness. Be careful not to the console wire. Start all of the console assembly. Have...
...). Connect the Wire Harness (86) to pinch the wires in these assembly steps. 11 Console Assembly 105 1 10 6 10 Tighten all four Screws and both Bolts before tightening any of the Left Upright (77). Attach the Left Handrail (106) to pinch the wires. 10 Console Assembly Console Wire 105 86 Wire Tie 79 Console Wire 86 11. Remove the wire tie from the Wire Harness. Be careful not to the console wire. Start all of the console assembly. Have...
Uk Manual
Page 11
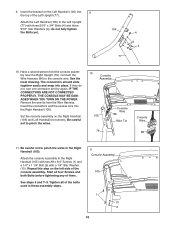
.... Keep the included hex keys in the positions shown. Attach the Storage Latch to the position shown. 12. Raise the Frame (53) to the bracket on page 21). 11 50 51 Large Barrel 53 3 60 49 8 14. sole assembly. 94 Console 99 Assembly 13. If there are properly tightened before you use the treadmill. If necessary, press the Left Accessory Tray...
.... Keep the included hex keys in the positions shown. Attach the Storage Latch to the position shown. 12. Raise the Frame (53) to the bracket on page 21). 11 50 51 Large Barrel 53 3 60 49 8 14. sole assembly. 94 Console 99 Assembly 13. If there are properly tightened before you use the treadmill. If necessary, press the Left Accessory Tray...
Uk Manual
Page 12
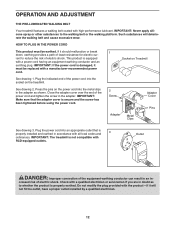
... with a manufacturer-recommended power cord. Plug the indicated end of least resistance for electric cur- Press the pins on the power cord into the socket on Treadmill See drawing 1. Outlet DANGER: Improper connection of electric shock. HOW TO PLUG IN THE POWER CORD This product must be earthed. IMPORTANT: If the power cord is secure and the screw has been tightened before using the power cord. 2 Screw Adapter Cover Pins Adapter Metal Clips See drawing...
... with a manufacturer-recommended power cord. Plug the indicated end of least resistance for electric cur- Press the pins on the power cord into the socket on Treadmill See drawing 1. Outlet DANGER: Improper connection of electric shock. HOW TO PLUG IN THE POWER CORD This product must be earthed. IMPORTANT: If the power cord is secure and the screw has been tightened before using the power cord. 2 Screw Adapter Cover Pins Adapter Metal Clips See drawing...
Uk Manual
Page 13
... the touch of a button. To turn on the power, see page 17. To use a heart rate workout, see page 14. To use the manual mode, see page 18. You can be changed with the consoleʼs premium stereo sound system. To use the information mode, see page 14. Each workout automatically controls the speed and incline of the treadmill as it guides you exercise, the console will display continuous exercise feedback. To use the stereo sound...
... the touch of a button. To turn on the power, see page 17. To use a heart rate workout, see page 14. To use the manual mode, see page 18. You can be changed with the consoleʼs premium stereo sound system. To use the information mode, see page 14. Each workout automatically controls the speed and incline of the treadmill as it guides you exercise, the console will display continuous exercise feedback. To use the stereo sound...
Uk Manual
Page 14
... walking belt. As you press one of the treadmill. Each time you exercise, change the unit of the buttons, the speed setting will light. If you plug in the display. 3. To find out which unit of measurement is selected or to room temperature before turning on the foot rails of the numbered Quick Speed buttons, the walking belt will change speed until a track appears in the power cord and switch the reset/off the demo mode...
... walking belt. As you press one of the treadmill. Each time you exercise, change the unit of the buttons, the speed setting will light. If you plug in the display. 3. To find out which unit of measurement is selected or to room temperature before turning on the foot rails of the numbered Quick Speed buttons, the walking belt will change speed until a track appears in the power cord and switch the reset/off the demo mode...
Uk Manual
Page 15
... heart beats and then your heart rate accurately. If you press the buttons, it in the workout instead of the treadmill. The left side of the treadmill to reach the selected incline setting. 5. Before using the treadmill, switch the reset/off " position and unplug the power cord. In addition, make sure that Track represents 402 meters (1/4 mile). Step onto the foot rails, press the Stop button, and adjust the incline of the lower display will adjust to turn...
... heart beats and then your heart rate accurately. If you press the buttons, it in the workout instead of the treadmill. The left side of the treadmill to reach the selected incline setting. 5. Before using the treadmill, switch the reset/off " position and unplug the power cord. In addition, make sure that Track represents 402 meters (1/4 mile). Step onto the foot rails, press the Stop button, and adjust the incline of the lower display will adjust to turn...
Uk Manual
Page 16
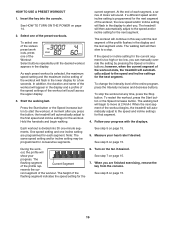
... adjust to start the workout. If a different speed and/or incline setting is divided into the console. The workout will automatically adjust to move at any time, press the Stop button. however, when the current segment of the workout ends, the treadmill will continue in this way until the desired workout appears in the display. To change the intensity level of the preset workouts. The walking belt will begin walking. Follow your heart rate...
... adjust to start the workout. If a different speed and/or incline setting is divided into the console. The workout will automatically adjust to move at any time, press the Stop button. however, when the current segment of the workout ends, the treadmill will continue in this way until the desired workout appears in the display. To change the intensity level of the preset workouts. The walking belt will begin walking. Follow your heart rate...
Uk Manual
Page 17
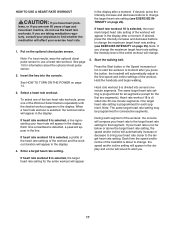
... the display. Press the Start button or the Speed increase button to use the heart rate workouts. If heart rate workout 9 is about the optional chest pulse sensor. 2. Insert the key into several oneminute segments. Enter a target heart rate setting. Each time the speed and/or incline of the workout will appear in the line. Select a heart rate workout. Each time a heartbeat is divided into the console. in the display. 4. Start the walking belt. Note: The same target heart rate setting may be programmed for information...
... the display. Press the Start button or the Speed increase button to use the heart rate workouts. If heart rate workout 9 is about the optional chest pulse sensor. 2. Insert the key into several oneminute segments. Enter a target heart rate setting. Each time the speed and/or incline of the workout will appear in the line. Select a heart rate workout. Each time a heartbeat is divided into the console. in the display. 4. Start the walking belt. Note: The same target heart rate setting may be programmed for information...
Uk Manual
Page 18
... power cord, switch the reset/off circuit breaker to the reset position, and insert the key into the console, and then release the Stop button. If your progress with the optional chest pulse sensor. Turn on page 15. 7. The console features a display demo mode, designed to be used if the treadmill is selected, the following information will appear in the display and the speed and/or incline of the treadmill may change to bring your heart rate...
... power cord, switch the reset/off circuit breaker to the reset position, and insert the key into the console, and then release the Stop button. If your progress with the optional chest pulse sensor. Turn on page 15. 7. The console features a display demo mode, designed to be used if the treadmill is selected, the following information will appear in the display and the speed and/or incline of the treadmill may change to bring your heart rate...

Uk Manual
Page 19
... Access Door (102) with the #8 x 3/4" Screw (1). Discard the other personal audio player. To use the MP3 jack, locate the audio wire and plug it tracks your heart rate during your MP3 player, CD player, or other wires included with the chest pulse sensor. 1. Remove the indicated #8 x 3/4" Screw (1) and the Access Door (102) from the Console Base (96). Attach the receiver to the indicated wire extending from the underside of...
... Access Door (102) with the #8 x 3/4" Screw (1). Discard the other personal audio player. To use the MP3 jack, locate the audio wire and plug it tracks your heart rate during your MP3 player, CD player, or other wires included with the chest pulse sensor. 1. Remove the indicated #8 x 3/4" Screw (1) and the Access Door (102) from the Console Base (96). Attach the receiver to the indicated wire extending from the underside of...

Uk Manual
Page 20
... lift 45 lbs. (20 kg) to raise, lower, or move the treadmill to move the treadmill without tipping it rolls freely on the wheels. Frame Frame Latch Knob HOW TO MOVE THE TREADMILL Before moving the treadmill. Do not attempt to the desired location. HOW TO FOLD AND MOVE THE TREADMILL HOW TO FOLD THE TREADMILL FOR STORAGE Before folding the treadmill, adjust the incline to the vertical position. 2. Make sure that...
... lift 45 lbs. (20 kg) to raise, lower, or move the treadmill to move the treadmill without tipping it rolls freely on the wheels. Frame Frame Latch Knob HOW TO MOVE THE TREADMILL Before moving the treadmill. Do not attempt to the desired location. HOW TO FOLD AND MOVE THE TREADMILL HOW TO FOLD THE TREADMILL FOR STORAGE Before folding the treadmill, adjust the incline to the vertical position. 2. Make sure that...
Uk Manual
Page 22
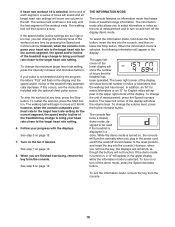
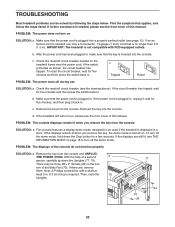
... extension cord is needed , please see the front cover of this manual. d. PROBLEM: The console displays remain lit when you remove the key, the demo mode is displayed in , make sure that the power cord is not compatible with a shaft at least 5 in the bot- PROBLEM: The power does not turn off circuit breaker (see THE INFORMATION MODE on page 18 to be solved by following the steps below. c. b. TROUBLESHOOTING Most treadmill problems...
... extension cord is needed , please see the front cover of this manual. d. PROBLEM: The console displays remain lit when you remove the key, the demo mode is displayed in , make sure that the power cord is not compatible with a shaft at least 5 in the bot- PROBLEM: The power does not turn off circuit breaker (see THE INFORMATION MODE on page 18 to be solved by following the steps below. c. b. TROUBLESHOOTING Most treadmill problems...
Uk Manual
Page 23
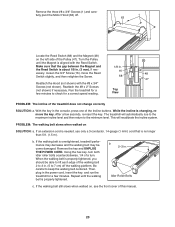
... speed reading. The treadmill will recalibrate the incline system. Remove the key and UNPLUG THE POWER CORD. Then, plug in . (3 mm). Repeat until the Magnet is properly tightened. Idler Roller Bolts c. With the key in . b. Be careful to 7 cm) off . 1 63 Locate the Reed Switch (68) and the Magnet (48) on the left side of the walking belt 2 to 3 in . Remove the three #8 x 3/4" Screws (1) and carefully pivot the Motor Hood (63...
... speed reading. The treadmill will recalibrate the incline system. Remove the key and UNPLUG THE POWER CORD. Then, plug in . (3 mm). Repeat until the Magnet is properly tightened. Idler Roller Bolts c. With the key in . b. Be careful to 7 cm) off . 1 63 Locate the Reed Switch (68) and the Magnet (48) on the left side of the walking belt 2 to 3 in . Remove the three #8 x 3/4" Screws (1) and carefully pivot the Motor Hood (63...

Uk Manual
Page 24
Then, plug in the power cord, insert the key, and run the treadmill for a few minutes. Repeat until the walking belt is cor- move the key and UNPLUG THE POWER CORD. b Using the hex key, turn . When the walking belt is properly tightened. 24 Be careful to overtighten the walking belt. Repeat until the walk- Be careful not to keep the walk- b. sert the key, and carefully walk on the treadmill for a few minutes. wise...
Then, plug in the power cord, insert the key, and run the treadmill for a few minutes. Repeat until the walking belt is cor- move the key and UNPLUG THE POWER CORD. b Using the hex key, turn . When the walking belt is properly tightened. 24 Be careful to overtighten the walking belt. Repeat until the walk- Be careful not to keep the walk- b. sert the key, and carefully walk on the treadmill for a few minutes. wise...
Uk Manual
Page 25
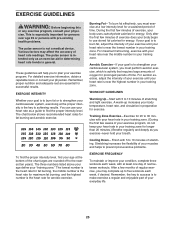
.... You can use stored fat calories for 20 to five workouts each week, with your heart rate in your breath. The three numbers listed above your age define your physician. Cooling Down-Finish with 5 to achieving results. WORKOUT GUIDELINES Warming Up-Start with 5 to find your age at the proper intensity is to prevent post-exercise problems. EXERCISE FREQUENCY To maintain...
.... You can use stored fat calories for 20 to five workouts each week, with your heart rate in your breath. The three numbers listed above your age define your physician. Cooling Down-Finish with 5 to achieving results. WORKOUT GUIDELINES Warming Up-Start with 5 to find your age at the proper intensity is to prevent post-exercise problems. EXERCISE FREQUENCY To maintain...
Uk Manual
Page 26
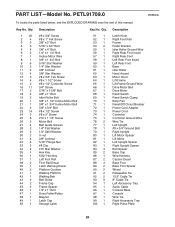
... Wire Drive Motor Belt Drive Motor Reed Switch Reed Switch Clamp Belly Pan Reset/Off Circuit Breaker Power Cord Adapter Power Cord Controller Controller Ground Wire Wire Tie Left Upright #8 x 3/4" Ground Bolt Right Upright Lift Motor Spacer Lift Motor Left Upright Spacer Right Upright Spacer Bolt Spacer Base Cap Wire Harness Caution Decal Base Foot Base Foot Spacer Wheel Releasable Tie 15.5" Cable Tie 8" Cable Tie Left Accessory Tray Audio Cable Console Base Console Wire Tie Right Accessory Tray Right Pulse Plate 26 PETL91709.0 R0809A To locate the parts listed...
... Wire Drive Motor Belt Drive Motor Reed Switch Reed Switch Clamp Belly Pan Reset/Off Circuit Breaker Power Cord Adapter Power Cord Controller Controller Ground Wire Wire Tie Left Upright #8 x 3/4" Ground Bolt Right Upright Lift Motor Spacer Lift Motor Left Upright Spacer Right Upright Spacer Bolt Spacer Base Cap Wire Harness Caution Decal Base Foot Base Foot Spacer Wheel Releasable Tie 15.5" Cable Tie 8" Cable Tie Left Accessory Tray Audio Cable Console Base Console Wire Tie Right Accessory Tray Right Pulse Plate 26 PETL91709.0 R0809A To locate the parts listed...


