
Uk Manual
Page 1
... Or write: ICON Health & Fitness, Ltd. Model No. PFEVEL79940 Serial No. If you have questions, or if there are committed to providing complete customer satisfaction. Serial Number Decal QUESTIONS? Customer Service Department Unit 4 Revie Road Industrial Estate Revie Road Beeston Leeds, LS118JG UK email: [email protected] CAUTION Read all precautions and instructions in this manual before using this manual for future...
... Or write: ICON Health & Fitness, Ltd. Model No. PFEVEL79940 Serial No. If you have questions, or if there are committed to providing complete customer satisfaction. Serial Number Decal QUESTIONS? Customer Service Department Unit 4 Revie Road Industrial Estate Revie Road Beeston Leeds, LS118JG UK email: [email protected] CAUTION Read all precautions and instructions in this manual before using this manual for future...
Uk Manual
Page 2
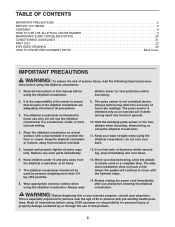
.... The pulse sensor is the responsibility of the owner to a complete stop immediately and cool down. 6. When you feel pain or dizziness whilst exercising, stop . Always unplug the power cord immediately after use of 35 or persons with a mat beneath it to move until the flywheel stops. 14. lems. Read all instructions in a commercial, rental, or institutional setting. 4. Read all instructions before using the elliptical crosstrainer. 11...
.... The pulse sensor is the responsibility of the owner to a complete stop immediately and cool down. 6. When you feel pain or dizziness whilst exercising, stop . Always unplug the power cord immediately after use of 35 or persons with a mat beneath it to move until the flywheel stops. 14. lems. Read all instructions in a commercial, rental, or institutional setting. 4. Read all instructions before using the elliptical crosstrainer. 11...
Uk Manual
Page 3
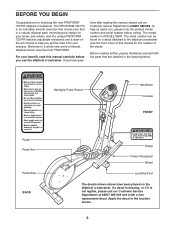
...). Handgrip Pulse Sensor Handlebar Console FRONT Pedal Pedal Arm Pedal Disk BACK Ramp Power Receptical Wheel Levelling Foot The decals shown above have ques- If you use the elliptical crosstrainer. Welcome to the elliptical crosstrainer (see the front cover of this manual carefully before calling. To help you , please note the product model number and serial number before you have been placed on your exercise. And the unique PROFORM 725 PR features adjustable resistance and...
...). Handgrip Pulse Sensor Handlebar Console FRONT Pedal Pedal Arm Pedal Disk BACK Ramp Power Receptical Wheel Levelling Foot The decals shown above have ques- If you use the elliptical crosstrainer. Welcome to the elliptical crosstrainer (see the front cover of this manual carefully before calling. To help you , please note the product model number and serial number before you have been placed on your exercise. And the unique PROFORM 725 PR features adjustable resistance and...

Uk Manual
Page 4
... small parts needed for assembly. M10 Nylon Locknut (106)4- M8 x 19mm Patch Screw (108)4- M10 x 35mm Carriage Bolt (121)2- M8 x 32mm Washer (122)2- If a part is the key number of the elliptical crosstrainer in the parts bag, check to see if it has been pre-assembled. M4 x 16mm Screw (66)4- M10 x 112mm Carriage Bolt (34)4- 4 M10 Split Washer (70)3- Bolt Set (27)2- M10 x 85mm Button Screw (63)1- The number...
... small parts needed for assembly. M10 Nylon Locknut (106)4- M8 x 19mm Patch Screw (108)4- M10 x 35mm Carriage Bolt (121)2- M8 x 32mm Washer (122)2- If a part is the key number of the elliptical crosstrainer in the parts bag, check to see if it has been pre-assembled. M4 x 16mm Screw (66)4- M10 x 112mm Carriage Bolt (34)4- 4 M10 Split Washer (70)3- Bolt Set (27)2- M10 x 85mm Button Screw (63)1- The number...

Uk Manual
Page 5
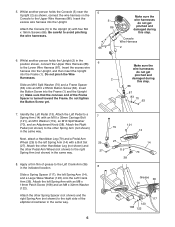
... x 112mm Carriage Bolts (34) and two M10 Nylon Locknuts (106). 3. Identify the Front Stabiliser (3). Slide an M8 x 16mm Washer (45) and a Ramp Cap (102) onto an M8 x 19mm Patch Screw (108). Insert the Incline Axle (100) through one end of the Frame (1), attach the Rear Stabiliser (4) to insert the Frame Axle. 1. Tighten the Patch Screw into the...
... x 112mm Carriage Bolts (34) and two M10 Nylon Locknuts (106). 3. Identify the Front Stabiliser (3). Slide an M8 x 16mm Washer (45) and a Ramp Cap (102) onto an M8 x 19mm Patch Screw (108). Insert the Incline Axle (100) through one end of the Frame (1), attach the Rear Stabiliser (4) to insert the Frame Axle. 1. Tighten the Patch Screw into the...
Uk Manual
Page 6
... Wave Washer (123) onto the Left Crank Arm (36). Insert the Button Screw into the Frame (1). Next, attach a Handlebar Leg (79) and a Pedal Arm Wheel (29) to the Upright (2) with a Bolt Set 29 (27). Insert the excess wire harness into the Upright. Whilst another person holds the Console (5) near the Upright (2) as shown, connect the wire harness on the Console to the Left Crank Arm (36) in the same way...
... Wave Washer (123) onto the Left Crank Arm (36). Insert the Button Screw into the Frame (1). Next, attach a Handlebar Leg (79) and a Pedal Arm Wheel (29) to the Upright (2) with a Bolt Set 29 (27). Insert the excess wire harness into the Upright. Whilst another person holds the Console (5) near the Upright (2) as shown, connect the wire harness on the Console to the Left Crank Arm (36) in the same way...

Uk Manual
Page 8
Make sure that all parts of the elliptical crosstrainer (see HOW TO PLUG IN THE POWER CORD on page 9). 114 12. Note: Some hardware may be left over after assembly is completed. Plug the Power Cord (not shown) fully into the AC 11 Power Receptical (114) on the front of the elliptical crosstrainer are properly tightened. To protect the floor or carpet from damage, place a mat under the elliptical crosstrainer. 8 11.
Make sure that all parts of the elliptical crosstrainer (see HOW TO PLUG IN THE POWER CORD on page 9). 114 12. Note: Some hardware may be left over after assembly is completed. Plug the Power Cord (not shown) fully into the AC 11 Power Receptical (114) on the front of the elliptical crosstrainer are properly tightened. To protect the floor or carpet from damage, place a mat under the elliptical crosstrainer. 8 11.
Uk Manual
Page 9
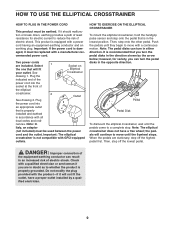
... a path of least resistance for variety, you turn the pedal disks in the opposite direction. Then, step onto the other pedal. When the pedals are included. Two power cords are stationary, step off the lowest pedal. Push the pedals until the pedals come to move until the flywheel stops. Pedal Pedal Disk To dismount the elliptical crosstrainer, wait until they begin to a complete stop. DANGER: Improper connection of the equipment-earthing...
... a path of least resistance for variety, you turn the pedal disks in the opposite direction. Then, step onto the other pedal. When the pedals are included. Two power cords are stationary, step off the lowest pedal. Push the pedals until the pedals come to move until the flywheel stops. Pedal Pedal Disk To dismount the elliptical crosstrainer, wait until they begin to a complete stop. DANGER: Improper connection of the equipment-earthing...
Uk Manual
Page 10
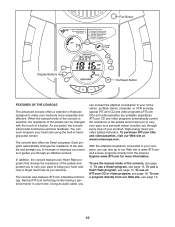
... guides you exercise. High-energy music provides added motivation. To use a Smart program, see page 11. To use a Heart Rate program, see page 14. When the manual mode of the console is like having a personal trainer in handgrip pulse sensor. As you can be changed with the touch of your workout. To use a program directly from the internet. The console also features iFIT.com interactive technology. Fan Button Display Buttons On/Reset Button FEATURES OF THE CONSOLE...
... guides you exercise. High-energy music provides added motivation. To use a Smart program, see page 11. To use a Heart Rate program, see page 14. When the manual mode of the console is like having a personal trainer in handgrip pulse sensor. As you can be changed with the touch of your workout. To use a program directly from the internet. The console also features iFIT.com interactive technology. Fan Button Display Buttons On/Reset Button FEATURES OF THE CONSOLE...
Uk Manual
Page 11
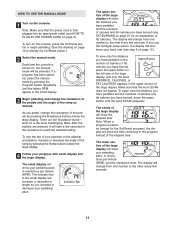
... selected, select the manual mode by pressing the Resistance buttons below the large display. 4 Follow your pedalling pace, in revolutions per minute (RPM). To again view the distance you pedal, change from one number to identify the On/Reset button.) 2 Select the manual mode. The lower section of the elapsed time. Note: When a program is turned on the console. To turn on the console, press the On/Reset button or begin pedalling. (See the drawing...
... selected, select the manual mode by pressing the Resistance buttons below the large display. 4 Follow your pedalling pace, in revolutions per minute (RPM). To again view the distance you pedal, change from one number to identify the On/Reset button.) 2 Select the manual mode. The lower section of the elapsed time. Note: When a program is turned on the console. To turn on the console, press the On/Reset button or begin pedalling. (See the drawing...

Uk Manual
Page 12
... be shown. The display will automatically turn off . ton. If the pedals are not moved and the console buttons are finished exercising, the console will then show your pedalling pace or the resistance level, press the lower button on the left side of plastic on the metal contacts on the fan at high speed, press the fan button a second time. For the most accurate heart rate reading, continue...
... be shown. The display will automatically turn off . ton. If the pedals are not moved and the console buttons are finished exercising, the console will then show your pedalling pace or the resistance level, press the lower button on the left side of plastic on the metal contacts on the fan at high speed, press the fan button a second time. For the most accurate heart rate reading, continue...
Uk Manual
Page 13
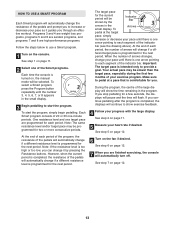
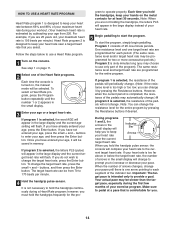
... pedals will automatically change your pace until the number 3, 4, 5, 6, 7, or 8 appears in the small display. 3 Begin pedalling to start the program, simply begin pedalling. When the number of arrows changes, change if a different resistance level is programmed for a few months of your exercise program. Programs 3 and 4 are weight loss programs, programs 5 and 6 are aerobic programs, and programs 7 and 8 are high-performance programs. Follow the steps below to use a Smart program. 1 Turn on page 11. 5 Measure your heart rate...
... pedals will automatically change your pace until the number 3, 4, 5, 6, 7, or 8 appears in the small display. 3 Begin pedalling to start the program, simply begin pedalling. When the number of arrows changes, change if a different resistance level is programmed for a few months of your exercise program. Programs 3 and 4 are weight loss programs, programs 5 and 6 are aerobic programs, and programs 7 and 8 are high-performance programs. Follow the steps below to use a Smart program. 1 Turn on page 11. 5 Measure your heart rate...
Uk Manual
Page 14
... resistance of the pedals will not change it will be saved in the large display and the current target heart rate will change .) If program 2 is one of the Heart Rate programs. Each time the console is not necessary to hold the handgrips frequently for the pro- If you must hold the handgrips continuously during a Heart Rate program; buttons, and then press the Enter button. It is turned on, the manual mode...
... resistance of the pedals will not change it will be saved in the large display and the current target heart rate will change .) If program 2 is one of the Heart Rate programs. Each time the console is not necessary to hold the handgrips frequently for the pro- If you must hold the handgrips continuously during a Heart Rate program; buttons, and then press the Enter button. It is turned on, the manual mode...
Uk Manual
Page 15
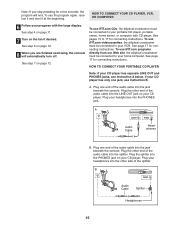
... the large display. See step 4 on page 11. 7 Turn on page 12. 8 When you stop pedalling for connecting instructions. To use iFIT.com CDs, the elliptical crosstrainer must be connected to your headphones into the splitter. See page 17 for a few seconds, the program will automatically turn off. Plug your VCR. Note: If you are finished exercising, the console will end. Plug one end of the audio cable into the...
... the large display. See step 4 on page 11. 7 Turn on page 12. 8 When you stop pedalling for connecting instructions. To use iFIT.com CDs, the elliptical crosstrainer must be connected to your headphones into the splitter. See page 17 for a few seconds, the program will automatically turn off. Plug your VCR. Note: If you are finished exercising, the console will end. Plug one end of the audio cable into the...
Uk Manual
Page 18
... finished exercising, the console will begin guiding you when the resistance level and/or the target pace is turned on page 13). To select the iFIT.com mode, press the iFIT.com button. However, an electronic "chirping" sound will be connected to change when a "chirp" is heard: • Make sure that it is fully plugged in almost the same way as a Smart program (see step...
... finished exercising, the console will begin guiding you when the resistance level and/or the target pace is turned on page 13). To select the iFIT.com mode, press the iFIT.com button. However, an electronic "chirping" sound will be connected to change when a "chirp" is heard: • Make sure that it is fully plugged in almost the same way as a Smart program (see step...

Uk Manual
Page 19
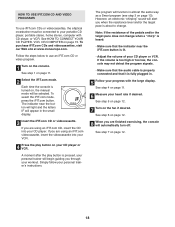
... the console is turned on page 11. 2 Select the iFIT.com mode. To use a program from our Web site. 1 Turn on -screen countdown ends, the program will begin pedalling. See step 1 on , the manual mode will be connected to your Web browser, if necessary, and go to our Web site at www.iFIT.com allows you start the program. The program will function in the small display. 3 Go...
... the console is turned on page 11. 2 Select the iFIT.com mode. To use a program from our Web site. 1 Turn on -screen countdown ends, the program will begin pedalling. See step 1 on , the manual mode will be connected to your Web browser, if necessary, and go to our Web site at www.iFIT.com allows you start the program. The program will function in the small display. 3 Go...

Uk Manual
Page 20
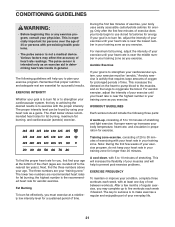
... on the front wheels, and carefully move the ellipti- cal crosstrainer. Excessive movement or pressure may interfere with heart rate readings. MAINTENANCE AND TROUBLESHOOTING Inspect and tighten all parts of the elliptical crosstrainer, hold the metal contacts for about 30 seconds. 20 Keep liquids away from the console. Replace any worn parts immediately. If the elliptical crosstrainer rocks slightly during use extreme caution whilst moving your shown.
... on the front wheels, and carefully move the ellipti- cal crosstrainer. Excessive movement or pressure may interfere with heart rate readings. MAINTENANCE AND TROUBLESHOOTING Inspect and tighten all parts of the elliptical crosstrainer, hold the metal contacts for about 30 seconds. 20 Keep liquids away from the console. Replace any worn parts immediately. If the elliptical crosstrainer rocks slightly during use extreme caution whilst moving your shown.
Uk Manual
Page 21
... a guide. The key to strengthen your cardiovascular system, your everyday life. 21 The pulse sensor is to burn fat, adjust the intensity of exercise does your "training zone." Aerobic exercise is the recommended heart rate for you exercise. A cool-down, with pre-existing health problems. • The pulse sensor is to make exercise a regular and enjoyable part of your exercise must exercise at least one day of the chart (ages...
... a guide. The key to strengthen your cardiovascular system, your everyday life. 21 The pulse sensor is to burn fat, adjust the intensity of exercise does your "training zone." Aerobic exercise is the recommended heart rate for you exercise. A cool-down, with pre-existing health problems. • The pulse sensor is to make exercise a regular and enjoyable part of your exercise must exercise at least one day of the chart (ages...
Uk Manual
Page 22
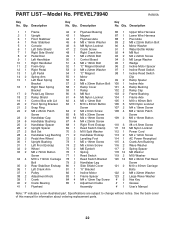
.... PART LIST-Model No. PFEVEL79940 R0505A Key No. Qty. Description Key No. See the back cover of this manual for information about ordering replacement parts. 22 Description 1 1 Frame 42 2 Flywheel Bearing 86 1 Upper Wire Harness 2 1 Upright 43 1 Magnet 87 1 Lower Wire Harness 3 1 Front Stabiliser 44 1 Flywheel Axle 88 1 Pivot Axle 4 1 Rear Stabiliser 45 6 M8 x 16mm Washer 89 2 M8 x 22mm Button Bolt 5 1 Console 46 3 M8 Nylon Locknut 90 4 Motor Washer...
.... PART LIST-Model No. PFEVEL79940 R0505A Key No. Qty. Description Key No. See the back cover of this manual for information about ordering replacement parts. 22 Description 1 1 Frame 42 2 Flywheel Bearing 86 1 Upper Wire Harness 2 1 Upright 43 1 Magnet 87 1 Lower Wire Harness 3 1 Front Stabiliser 44 1 Flywheel Axle 88 1 Pivot Axle 4 1 Rear Stabiliser 45 6 M8 x 16mm Washer 89 2 M8 x 22mm Button Bolt 5 1 Console 46 3 M8 Nylon Locknut 90 4 Motor Washer...
Uk Manual
Page 24
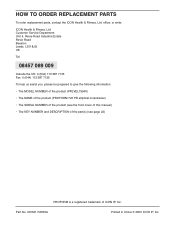
... (PFEVEL79940) • The NAME of the product (PROFORM 725 PR elliptical crosstrainer) • The SERIAL NUMBER of the product (see the front cover of this manual) • The KEY NUMBER and DESCRIPTION of the part(s) (see page 22) PROFORM is a registered trademark of ICON IP, Inc. Part No. 216521 R0505A Printed in China © 2005 ICON IP, Inc. HOW TO ORDER REPLACEMENT PARTS To order replacement parts, contact the ICON Health & Fitness, Ltd.
... (PFEVEL79940) • The NAME of the product (PROFORM 725 PR elliptical crosstrainer) • The SERIAL NUMBER of the product (see the front cover of this manual) • The KEY NUMBER and DESCRIPTION of the part(s) (see page 22) PROFORM is a registered trademark of ICON IP, Inc. Part No. 216521 R0505A Printed in China © 2005 ICON IP, Inc. HOW TO ORDER REPLACEMENT PARTS To order replacement parts, contact the ICON Health & Fitness, Ltd.

