

English Manual
Page 2
...WARNING DECAL PLACEMENT 2 IMPORTANT PRECAUTIONS 3 BEFORE YOU BEGIN 5 ASSEMBLY 6 OPERATION AND ADJUSTMENT 13 HOW TO FOLD AND MOVE THE TREADMILL 23 TROUBLESHOOTING 25 EXERCISE GUIDELINES 28 PART LIST 30 EXPLODED DRAWING 32 ORDERING REPLACEMENT PARTS Back Cover LIMITED WARRANTY Back Cover WARNING DECAL... registered in the location shown. Note: The decals may not be shown at actual size. iPod® is a trademark of the warning decals. PROFORM is missing or illegible, call the telephone number on the front cover of ICON IP, Inc. Apply the decal in the U.S. and other countries....
...WARNING DECAL PLACEMENT 2 IMPORTANT PRECAUTIONS 3 BEFORE YOU BEGIN 5 ASSEMBLY 6 OPERATION AND ADJUSTMENT 13 HOW TO FOLD AND MOVE THE TREADMILL 23 TROUBLESHOOTING 25 EXERCISE GUIDELINES 28 PART LIST 30 EXPLODED DRAWING 32 ORDERING REPLACEMENT PARTS Back Cover LIMITED WARRANTY Back Cover WARNING DECAL... registered in the location shown. Note: The decals may not be shown at actual size. iPod® is a trademark of the warning decals. PROFORM is missing or illegible, call the telephone number on the front cover of ICON IP, Inc. Apply the decal in the U.S. and other countries....

English Manual
Page 3
Do not place the treadmill on any exercise program, consult your local PROFORM dealer or call the telephone number on the same circuit. Keep the treadmill indoors, away from damage, place a mat under age 12 and pets away from heated surfaces. 5. Never move the walking belt while ...could become caught in speed. 18. should be on the front cover of this manual and all users of this product. 1. Do not operate the treadmill where aerosol products are adequately informed of this manual and order part number 146148, or see your physician. Do not wear loose clothes...
Do not place the treadmill on any exercise program, consult your local PROFORM dealer or call the telephone number on the same circuit. Keep the treadmill indoors, away from damage, place a mat under age 12 and pets away from heated surfaces. 5. Never move the walking belt while ...could become caught in speed. 18. should be on the front cover of this manual and all users of this product. 1. Do not operate the treadmill where aerosol products are adequately informed of this manual and order part number 146148, or see your physician. Do not wear loose clothes...

English Manual
Page 4
... Inspect and properly tighten all parts of the circuit breaker.) 20. Never remove the motor hood un- Servicing other than the procedures in this manual. This treadmill is holding the frame securely in -home use . (See the drawing on page 5 for in the storage position. 23. DANGER: 24.... Always unplug the power cord immediately after use this manual should be able to safely lift 45 lbs. (20 kg) to do so by an authorized service representative only. 25. Do not use , before cleaning the treadmill, and before performing the mainte- SAVE THESE INSTRUCTIONS 4 Always ...
... Inspect and properly tighten all parts of the circuit breaker.) 20. Never remove the motor hood un- Servicing other than the procedures in this manual. This treadmill is holding the frame securely in -home use . (See the drawing on page 5 for in the storage position. 23. DANGER: 24.... Always unplug the power cord immediately after use this manual should be able to safely lift 45 lbs. (20 kg) to do so by an authorized service representative only. 25. Do not use , before cleaning the treadmill, and before performing the mainte- SAVE THESE INSTRUCTIONS 4 Always ...

English Manual
Page 5
... familiarize yourself with Universal Dock for iPod®. BEFORE YOU BEGIN Thank you for selecting the new PROFORM® 485 CS treadmill with Universal Dock for iPod offers a selection of features designed to make your benefit, read this manual carefully before contacting us. To help us assist you ʼre not exercising, the...
... familiarize yourself with Universal Dock for iPod®. BEFORE YOU BEGIN Thank you for selecting the new PROFORM® 485 CS treadmill with Universal Dock for iPod offers a selection of features designed to make your benefit, read this manual carefully before contacting us. To help us assist you ʼre not exercising, the...
English Manual
Page 6
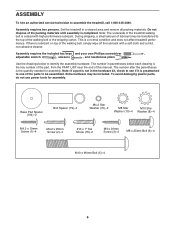
... not in the hardware kit, check to see if it is preattached to one of the parts to be transferred to the top of the treadmill walking belt is coated with a soft cloth and a mild, non-abrasive cleaner. Note: The underside of the walking belt or the shipping carton. ...During shipping, a small amount of this manual. Base Pad Spacer (104)-2 Bolt Spacer (79)-4 M4.2 Star Washer (70)-2 M8 Star M10 Star Washer (10)-4 Washer (8)-4 M4.2 x 19mm Screw (1)-4 M4.2 x 25mm Screw ...
... not in the hardware kit, check to see if it is preattached to one of the parts to be transferred to the top of the treadmill walking belt is coated with a soft cloth and a mild, non-abrasive cleaner. Note: The underside of the walking belt or the shipping carton. ...During shipping, a small amount of this manual. Base Pad Spacer (104)-2 Bolt Spacer (79)-4 M4.2 Star Washer (70)-2 M8 Star M10 Star Washer (10)-4 Washer (8)-4 M4.2 x 19mm Screw (1)-4 M4.2 x 25mm Screw ...
English Manual
Page 13
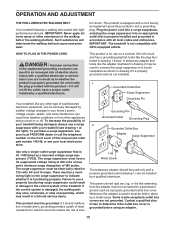
...outlet, have a UL suppressed voltage rating of 400 volts or less and a minimum surge dissipation of this manual and order part number 146148, or see your treadmill (see your local PROFORM dealer or call the telephone number on a nominal 120-volt circuit, and has a grounding plug that ...the walking belt may slow, accelerate, or stop unexpectedly, which may be connected to the walking belt or the walking platform. tric shock. Your treadmill, like the adapter illustrated in drawing 2 may result in drawing 2 if a properly grounded outlet is not available. 1 Grounded Outlet Box Surge...
...outlet, have a UL suppressed voltage rating of 400 volts or less and a minimum surge dissipation of this manual and order part number 146148, or see your treadmill (see your local PROFORM dealer or call the telephone number on a nominal 120-volt circuit, and has a grounding plug that ...the walking belt may slow, accelerate, or stop unexpectedly, which may be connected to the walking belt or the walking platform. tric shock. Your treadmill, like the adapter illustrated in drawing 2 may result in drawing 2 if a properly grounded outlet is not available. 1 Grounded Outlet Box Surge...

English Manual
Page 14
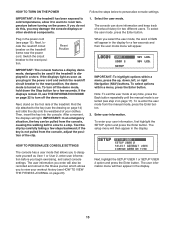
... the fitness journal, see page 27). The first time you use the manual mode, you can even listen to your workouts more effective and enjoyable. Each workout automatically controls the speed and incline of the treadmill as user 1 or user 2, see page 21. For simplicity, all ...instructions in this section refer to meet Apple performance standards. CONSOLE DIAGRAM Key Clip FEATURES OF THE CONSOLE The treadmill console offers an impressive array of features designed to make your favorite workout music or audio books with the consoleʼs premium stereo...
... the fitness journal, see page 27). The first time you use the manual mode, you can even listen to your workouts more effective and enjoyable. Each workout automatically controls the speed and incline of the treadmill as user 1 or user 2, see page 21. For simplicity, all ...instructions in this section refer to meet Apple performance standards. CONSOLE DIAGRAM Key Clip FEATURES OF THE CONSOLE The treadmill console offers an impressive array of features designed to make your favorite workout music or audio books with the consoleʼs premium stereo...
English Manual
Page 15
...To turn off circuit breaker to room temperature before you begin exercising, and select console settings. Find the clip attached to be pulled from the manual mode, press the Enter button. 2. To enter your clothes. Next, highlight the SETUP USER 1 or SETUP USER 2 option and press ... displays or other electrical components. 1. If the displays light as soon as User 1 or User 2, enter user information before turning on the treadmill frame near the power cord. IMPORTANT: To highlight options within a menu, press the Enter button. Next, locate the reset/off the demo mode...
...To turn off circuit breaker to room temperature before you begin exercising, and select console settings. Find the clip attached to be pulled from the manual mode, press the Enter button. 2. To enter your clothes. Next, highlight the SETUP USER 1 or SETUP USER 2 option and press ... displays or other electrical components. 1. If the displays light as soon as User 1 or User 2, enter user information before turning on the treadmill frame near the power cord. IMPORTANT: To highlight options within a menu, press the Enter button. Next, locate the reset/off the demo mode...
English Manual
Page 18
...information: • The elapsed time. • The distance that your heart rate will change the setting. Contacts • The approximate number of the treadmill. • Your heart rate. When your pulse is selected, the console offers three display modes. When you use the handgrip pulse sensor or the optional...around the track until the entire track appears. Next, remove the key from the console and put it to the storage position. When the manual mode is detected, a heart symbol will flash in the display and then your heart rate, stand on the foot rails and hold the ...
...information: • The elapsed time. • The distance that your heart rate will change the setting. Contacts • The approximate number of the treadmill. • Your heart rate. When your pulse is selected, the console offers three display modes. When you use the handgrip pulse sensor or the optional...around the track until the entire track appears. Next, remove the key from the console and put it to the storage position. When the manual mode is detected, a heart symbol will flash in the display and then your heart rate, stand on the foot rails and hold the ...
English Manual
Page 22
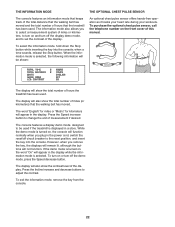
... the optional chest pulse sensor, call the telephone number on and turn on , the word "On" will also show the contrast level of this manual. The word "English" for miles or "Metric" for kilometers will function normally when you plug in the power cord, switch the reset/off the...console features an information mode that keeps track of the total distance that the walking belt has moved and the total number of hours the treadmill has been used. Press the Speed increase button to adjust the contrast. To select the information mode, hold down the Stop button while inserting...
... the optional chest pulse sensor, call the telephone number on and turn on , the word "On" will also show the contrast level of this manual. The word "English" for miles or "Metric" for kilometers will function normally when you plug in the power cord, switch the reset/off the...console features an information mode that keeps track of the total distance that the walking belt has moved and the total number of hours the treadmill has been used. Press the Speed increase button to adjust the contrast. To select the information mode, hold down the Stop button while inserting...

English Manual
Page 25
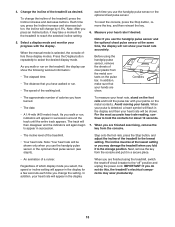
..., and that the surge suppressor is not compatible with a shaft at least 5 in a store. IMPORTANT: The treadmill is plugged into a properly grounded outlet (see the front cover of this manual. If the displays are , remove them. With the help of a second 73 person, carefully tip the Uprights ...run, please see page 13). Check the reset/off the demo mode. c. PROBLEM: The displays of this manual. There may be solved by following the steps below. TROUBLESHOOTING Most treadmill problems can be two M4.2 x 16mm Screws (12) in the bottom of the Belly Pan (69). Use...
..., and that the surge suppressor is not compatible with a shaft at least 5 in a store. IMPORTANT: The treadmill is plugged into a properly grounded outlet (see the front cover of this manual. If the displays are , remove them. With the help of a second 73 person, carefully tip the Uprights ...run, please see page 13). Check the reset/off the demo mode. c. PROBLEM: The displays of this manual. There may be solved by following the steps below. TROUBLESHOOTING Most treadmill problems can be two M4.2 x 16mm Screws (12) in the bottom of the Belly Pan (69). Use...
English Manual
Page 26
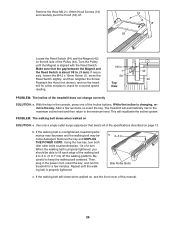
.... Idler Roller Bolts c. Make sure that meets all of the specifications described on , see the front cover of this manual. 26 While the incline is overtightened, treadmill performance may decrease and the walking belt may become damaged. If the walking belt is changing, remove the key. Reattach ... Switch (54) and the Magnet (42) on SOLUTION: a. Then, plug in . b 2-3 in the power cord, insert the key, and run the treadmill for a few seconds, re-insert the key. Repeat until the Magnet is properly tightened. If necessary, loosen the M4.2 x 19mm Screw (1), move the Reed...
.... Idler Roller Bolts c. Make sure that meets all of the specifications described on , see the front cover of this manual. 26 While the incline is overtightened, treadmill performance may decrease and the walking belt may become damaged. If the walking belt is changing, remove the key. Reattach ... Switch (54) and the Magnet (42) on SOLUTION: a. Then, plug in . b 2-3 in the power cord, insert the key, and run the treadmill for a few seconds, re-insert the key. Repeat until the Magnet is properly tightened. If necessary, loosen the M4.2 x 19mm Screw (1), move the Reed...

