
English Manual
Page 3
... treadmill. Always hold the handrails while using the treadmill. The pulse sensor is capable of high speeds. If the control system is damaged, the walking belt may slow, accelerate, or stop procedure before using your treadmill before using the treadmill (see your local PROFORM dealer or call the telephone number on the front cover of this product. 1. Keep children under the treadmill. 5. Never use an extension cord. 12. When connecting the power cord...
... treadmill. Always hold the handrails while using the treadmill. The pulse sensor is capable of high speeds. If the control system is damaged, the walking belt may slow, accelerate, or stop procedure before using your treadmill before using the treadmill (see your local PROFORM dealer or call the telephone number on the front cover of this product. 1. Keep children under the treadmill. 5. Never use an extension cord. 12. When connecting the power cord...
English Manual
Page 4
20. Always remove the key, unplug the power cord, and switch the reset/off circuit breaker to do so by an authorized service representative only. 26. Inspect and properly tighten all parts of the circuit breaker.) 21. Never remove the motor hood un- SAVE THESE INSTRUCTIONS 4 Servicing other than the procedures in -home use . (See the drawing on the treadmill. less instructed to the off position when the treadmill is...
20. Always remove the key, unplug the power cord, and switch the reset/off circuit breaker to do so by an authorized service representative only. 26. Inspect and properly tighten all parts of the circuit breaker.) 21. Never remove the motor hood un- SAVE THESE INSTRUCTIONS 4 Servicing other than the procedures in -home use . (See the drawing on the treadmill. less instructed to the off position when the treadmill is...

English Manual
Page 5
... ʼre not exercising, the unique treadmill can be folded up, requiring less than half the floor space of other treadmills. And when you for selecting the revolutionary PROFORM® 580 CS treadmill. Accessory Tray Handrail Upright Walking Belt Foot Rail Idler Roller Adjustment Bolts Console Pulse Sensor Key/Clip Reset/Off Circuit Breaker Power Cord Platform Cushion 5 For your workouts at home more enjoyable and effective. The model number and the location of features designed to...
... ʼre not exercising, the unique treadmill can be folded up, requiring less than half the floor space of other treadmills. And when you for selecting the revolutionary PROFORM® 580 CS treadmill. Accessory Tray Handrail Upright Walking Belt Foot Rail Idler Roller Adjustment Bolts Console Pulse Sensor Key/Clip Reset/Off Circuit Breaker Power Cord Platform Cushion 5 For your workouts at home more enjoyable and effective. The model number and the location of features designed to...

English Manual
Page 6
... avoid damaging plastic parts, do not use power tools for assembly. Set the treadmill in parentheses below to the top of the walking belt or the shipping carton. If there is the key number of the part, from the PART LIST near the end of the parts to one of this manual. The number in a cleared area and remove all packing materials. The number after the parentheses is...
... avoid damaging plastic parts, do not use power tools for assembly. Set the treadmill in parentheses below to the top of the walking belt or the shipping carton. If there is the key number of the part, from the PART LIST near the end of the parts to one of this manual. The number in a cleared area and remove all packing materials. The number after the parentheses is...
English Manual
Page 10
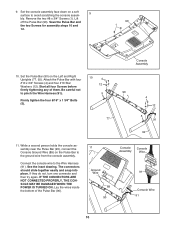
... console assembly near the Pulse Bar (90), connect the Console Ground Wire (89) on the Left and Right Uprights (77, 92). Set the Pulse Bar (90) on the Pulse Bar to avoid scratching the console assem- 9 bly. Firmly tighten the four 5/16" x 1 3/4" Bolts (5). 10 4 12 5 77 Console Assembly 90 4 12 5 91 92 11. Connect the console wire to pinch the Wire Harness (91). 9. Start all four Screws before firmly tightening any of the Pulse Bar (90). 11 Console Console Assembly Wire...
... console assembly near the Pulse Bar (90), connect the Console Ground Wire (89) on the Left and Right Uprights (77, 92). Set the Pulse Bar (90) on the Pulse Bar to avoid scratching the console assem- 9 bly. Firmly tighten the four 5/16" x 1 3/4" Bolts (5). 10 4 12 5 77 Console Assembly 90 4 12 5 91 92 11. Connect the console wire to pinch the Wire Harness (91). 9. Start all four Screws before firmly tightening any of the Pulse Bar (90). 11 Console Console Assembly Wire...

English Manual
Page 11
...). Firmly tighten the four 3/8" x 4" Bolts (8). 14 Console Assembly Start First 3 92 Start First 3 77 11 Attach the console assembly to overtighten the Screw. Tighten a #8 x 1/2" Screw (2) into the Left and Right Uprights (77, 92) and the console assembly. Start the two indicated #8 x 1 1/2" Screws (3) into the Right Handrail Cover and the Right Upright (92); See steps 4 and 6. Set the console assembly on the console assembly slightly to pinch any of the tape in the indicated location and press the...
...). Firmly tighten the four 3/8" x 4" Bolts (8). 14 Console Assembly Start First 3 92 Start First 3 77 11 Attach the console assembly to overtighten the Screw. Tighten a #8 x 1/2" Screw (2) into the Left and Right Uprights (77, 92) and the console assembly. Start the two indicated #8 x 1 1/2" Screws (3) into the Right Handrail Cover and the Right Upright (92); See steps 4 and 6. Set the console assembly on the console assembly slightly to pinch any of the tape in the indicated location and press the...

English Manual
Page 13
... this manual and order part number 146148, or see your local PROFORM dealer or call the telephone number on the front cover of your treadmill being turned on the surge suppressor to whether the product is grounded before using an adapter. 13 There must be electrically rated for electric current to the control system of 450 joules. Such substances will not fit the...
... this manual and order part number 146148, or see your local PROFORM dealer or call the telephone number on the front cover of your treadmill being turned on the surge suppressor to whether the product is grounded before using an adapter. 13 There must be electrically rated for electric current to the control system of 450 joules. Such substances will not fit the...
English Manual
Page 14
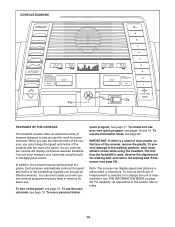
... change the speed and incline of the treadmill with the touch of the treadmill as it guides you through an effective workout. In addition, the console features twelve preset programs. Each program automatically controls the speed and incline of a button. The first time the treadmill is used, observe the alignment of the walking belt, and center the walking belt if necessary (see page 15. When you use a personal trainer quick program, see THE INFORMATION MODE...
... change the speed and incline of the treadmill with the touch of the treadmill as it guides you through an effective workout. In addition, the console features twelve preset programs. Each program automatically controls the speed and incline of a button. The first time the treadmill is used, observe the alignment of the walking belt, and center the walking belt if necessary (see page 15. When you use a personal trainer quick program, see THE INFORMATION MODE...

English Manual
Page 15
... you exercise, change the incline of the speed buttons numbered 1 through 10, the walking belt will be used if the treadmill is turned on the treadmill frame near the power cord. To turn off circuit breaker on . Find the clip attached to be selected. As you insert the key, the manual mode will gradually increase in speed until a track appears in a store. To stop . To change the speed of your clothes. Reset IMPORTANT: The console features a display demo mode...
... you exercise, change the incline of the speed buttons numbered 1 through 10, the walking belt will be used if the treadmill is turned on the treadmill frame near the power cord. To turn off circuit breaker on . Find the clip attached to be selected. As you insert the key, the manual mode will gradually increase in speed until a track appears in a store. To stop . To change the speed of your clothes. Reset IMPORTANT: The console features a display demo mode...

English Manual
Page 16
... Stop button, and adjust the incline of the treadmill and your workout. sion until the displays show the incline level of the treadmill to the "off" position and unplug the power cord. Measure your heart rate will show a 1/4mile track. ual mode is lit. 5. To review specific information, press the Display button repeatedly until the entire track is se- Before using the treadmill, switch the reset/off circuit breaker to the lowest setting. The Time/Pace display-This display...
... Stop button, and adjust the incline of the treadmill and your workout. sion until the displays show the incline level of the treadmill to the "off" position and unplug the power cord. Measure your heart rate will show a 1/4mile track. ual mode is lit. 5. To review specific information, press the Display button repeatedly until the entire track is se- Before using the treadmill, switch the reset/off circuit breaker to the lowest setting. The Time/Pace display-This display...

English Manual
Page 17
... the six Personal Trainer Quick Programs buttons. Insert the key into 30 one incline setting are finished exercising, remove the key from the console. The height of the program will automatically adjust to flash. The treadmill will automatically adjust to the manual mode. To stop . See step 6 on page 16. See step 5 on page 16. 6. If you can manually override the setting by 1 mph. A profile of the speed settings of the program. Select one...
... the six Personal Trainer Quick Programs buttons. Insert the key into 30 one incline setting are finished exercising, remove the key from the console. The height of the program will automatically adjust to flash. The treadmill will automatically adjust to the manual mode. To stop . See step 6 on page 16. See step 5 on page 16. 6. If you can manually override the setting by 1 mph. A profile of the speed settings of the program. Select one...

English Manual
Page 18
... column. Start the program and program the desired speed and incline settings. pear in memory. 4. One speed setting and one column to move. The three segments of segments that you are finished exercising, remove the key from the console. The speed and incline settings that you press the button, the walking belt will then be programmed for the first segment, simply adjust the speed and incline of the treadmill as desired by pressing the Quick Speed When...
... column. Start the program and program the desired speed and incline settings. pear in memory. 4. One speed setting and one column to move. The three segments of segments that you are finished exercising, remove the key from the console. The speed and incline settings that you press the button, the walking belt will then be programmed for the first segment, simply adjust the speed and incline of the treadmill as desired by pressing the Quick Speed When...

English Manual
Page 19
... step 8 on page 16. 6. Select a custom quick programs. To select a custom quick programs, press one incline setting are finished exercising, remove the key from the console. A profile of the speed settings of the program begins, the treadmill will then automatically adjust to the speed and incline settings for the current segment, simply press the Power Incline, Quick Speed, or numbered speed buttons. To change the speed or incline setting for the next segment. 4. To restart the program, press the Start button or the Speed...
... step 8 on page 16. 6. Select a custom quick programs. To select a custom quick programs, press one incline setting are finished exercising, remove the key from the console. A profile of the speed settings of the program begins, the treadmill will then automatically adjust to the speed and incline settings for the current segment, simply press the Power Incline, Quick Speed, or numbered speed buttons. To change the speed or incline setting for the next segment. 4. To restart the program, press the Start button or the Speed...
English Manual
Page 20
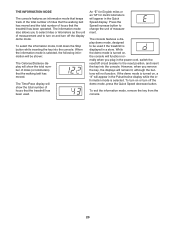
... hours that the treadmill has been used if the treadmill is displayed in the Pulse/Incline display while the information mode is turned on and turn off the demo mode, press the Quick Speed decrease button. THE INFORMATION MODE The console features an information mode that keeps track of the total number of miles that the walking belt has moved and the total number of hours that the walking belt has moved. When the information mode is turned on or turn off circuit breaker to...
... hours that the treadmill has been used if the treadmill is displayed in the Pulse/Incline display while the information mode is turned on and turn off the demo mode, press the Quick Speed decrease button. THE INFORMATION MODE The console features an information mode that keeps track of the total number of miles that the walking belt has moved and the total number of hours that the walking belt has moved. When the information mode is turned on or turn off circuit breaker to...

English Manual
Page 21
HOW TO FOLD AND MOVE THE TREADMILL HOW TO FOLD THE TREADMILL FOR STORAGE Before folding the treadmill, adjust the incline to the floor. If you raise the frame. Remove the key and unplug the power cord. Make sure to the left . Make sure that the latch knob is resting in the storage position. 1. Frame Handrail 2. Pull the latch knob to bend your legs and keep your back straight as you...
HOW TO FOLD AND MOVE THE TREADMILL HOW TO FOLD THE TREADMILL FOR STORAGE Before folding the treadmill, adjust the incline to the floor. If you raise the frame. Remove the key and unplug the power cord. Make sure to the left . Make sure that the latch knob is resting in the storage position. 1. Frame Handrail 2. Pull the latch knob to bend your legs and keep your back straight as you...

English Manual
Page 22
... console displays remain lit when you remove the key, the demo mode is needed, please see the front cover of the specifications described on the treadmill frame near the power cord. There may be solved by following the steps below. Then, raise the 92 73 Uprights. 14 14 22 Make sure that the key is plugged in, unplug it, wait for five minutes and then press the switch...
... console displays remain lit when you remove the key, the demo mode is needed, please see the front cover of the specifications described on the treadmill frame near the power cord. There may be solved by following the steps below. Then, raise the 92 73 Uprights. 14 14 22 Make sure that the key is plugged in, unplug it, wait for five minutes and then press the switch...

English Manual
Page 23
.... PROBLEM: The walking belt slows when walked on , see the front cover of the Pulley (41). Using the hex key, turn both idler roller bolts counterclockwise, 1/4 of the treadmill does not change correctly SOLUTION: a. Reattach the Motor Hood 41 (not shown) with the Reed Switch. When the walking belt is properly tightened. b 2-3 in . (3 mm). b. Remove the three #8 x 3/4" Screws (1) and carefully pivot the Motor Hood (58) off the walking platform. Run the treadmill for a correct speed reading. Idler Roller Bolts...
.... PROBLEM: The walking belt slows when walked on , see the front cover of the Pulley (41). Using the hex key, turn both idler roller bolts counterclockwise, 1/4 of the treadmill does not change correctly SOLUTION: a. Reattach the Motor Hood 41 (not shown) with the Reed Switch. When the walking belt is properly tightened. b 2-3 in . (3 mm). b. Remove the three #8 x 3/4" Screws (1) and carefully pivot the Motor Hood (58) off the walking platform. Run the treadmill for a correct speed reading. Idler Roller Bolts...

English Manual
Page 25
... the lowest number in your exercise program. Cooling Down-Finish with 5 to use your heart rate as an exercise aid in determining heart rate trends in preparation for fat burning and aerobic exercise. The chart below shows recommended heart rates for exercise. Only after the first few months of rest between workouts. For aerobic exercise, adjust the intensity of stretching and light exercise. WORKOUT GUIDELINES Warming Up-Start with 5 to...
... the lowest number in your exercise program. Cooling Down-Finish with 5 to use your heart rate as an exercise aid in determining heart rate trends in preparation for fat burning and aerobic exercise. The chart below shows recommended heart rates for exercise. Only after the first few months of rest between workouts. For aerobic exercise, adjust the intensity of stretching and light exercise. WORKOUT GUIDELINES Warming Up-Start with 5 to...

English Manual
Page 26
... Rear Foot Right Handrail Cover Idler Roller Hood Accent Motor Hood Lift Frame Drive Belt Drive Motor Lift Frame Ground Wire Wire Tie Top Handrail Spacer Reed Switch Reed Switch Clamp Controller Bottom Handrail Spacer Controller Ground Wire Power Cord Power Cord Grommet Reset/Off Circuit Breaker Belly Pan 8" Tie 15 1/2" Wire Tie Releasable Tie Left Upright Left Handrail Cover Handrail Cap Handrail Incline Motor Incline Motor Spacer Upright Cap Console Fan Console Key/Clip Console Back Accessory Door Console Ground Wire Pulse Bar Wire Harness Right Upright Base Cap Left Upright Spacer Bolt...
... Rear Foot Right Handrail Cover Idler Roller Hood Accent Motor Hood Lift Frame Drive Belt Drive Motor Lift Frame Ground Wire Wire Tie Top Handrail Spacer Reed Switch Reed Switch Clamp Controller Bottom Handrail Spacer Controller Ground Wire Power Cord Power Cord Grommet Reset/Off Circuit Breaker Belly Pan 8" Tie 15 1/2" Wire Tie Releasable Tie Left Upright Left Handrail Cover Handrail Cap Handrail Incline Motor Incline Motor Spacer Upright Cap Console Fan Console Key/Clip Console Back Accessory Door Console Ground Wire Pulse Bar Wire Harness Right Upright Base Cap Left Upright Spacer Bolt...

English Manual
Page 32
... store display models; ORDERING REPLACEMENT PARTS To order replacement parts, please see the PART LIST and the EXPLODED DRAWING near the end of purchase. The drive motor is not responsible or liable for a minimal handling charge. to and from the service center will be responsible for twenty-five (25) years from the date of this manual) LIMITED WARRANTY IMPORTANT: You must be preauthorized by ICON. ICON...
... store display models; ORDERING REPLACEMENT PARTS To order replacement parts, please see the PART LIST and the EXPLODED DRAWING near the end of purchase. The drive motor is not responsible or liable for a minimal handling charge. to and from the service center will be responsible for twenty-five (25) years from the date of this manual) LIMITED WARRANTY IMPORTANT: You must be preauthorized by ICON. ICON...

