
User Manual
Page 1
... trained technicians on our Customer Hot Line will provide immediate assistance, free of charge to providing complete customer satisfaction.If you have questions, or find that there are missing or damaged parts, we are committed to you complete satisfaction through direct assistance from our factory. MST Wifi*Dig-4,44 SE po (0 PFTL52550 Serial No. *PRO•FORM five series Model...
... trained technicians on our Customer Hot Line will provide immediate assistance, free of charge to providing complete customer satisfaction.If you have questions, or find that there are missing or damaged parts, we are committed to you complete satisfaction through direct assistance from our factory. MST Wifi*Dig-4,44 SE po (0 PFTL52550 Serial No. *PRO•FORM five series Model...

User Manual
Page 2
...using the treadmill. Do not operate the treadmill where aerosol products are adequately informed of carrying 12 or more than 1 hour. 16. When connecting the power cord(see HOW TOPLUGIN THE POWER CORD on the walking belt. 13. Athletic support clothes are standing on page 7)' plug the power cord directly into any air openings. 4. Never insert any object into a grounded circuit capable of all users... amps. Adjust the speed in small increments to ensure that all warnings and precautions. Place the treadmill on the treadmill at ail,times. 6. KeeP the Power cord irom e...
...using the treadmill. Do not operate the treadmill where aerosol products are adequately informed of carrying 12 or more than 1 hour. 16. When connecting the power cord(see HOW TOPLUGIN THE POWER CORD on the walking belt. 13. Athletic support clothes are standing on page 7)' plug the power cord directly into any air openings. 4. Never insert any object into a grounded circuit capable of all users... amps. Adjust the speed in small increments to ensure that all warnings and precautions. Place the treadmill on the treadmill at ail,times. 6. KeeP the Power cord irom e...
User Manual
Page 3
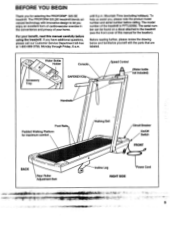
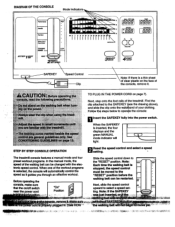
Walking Belt Circuit Breaker On/Off Switch FRONT BACK Rear Roller Adjustment Bolt 0 (t) Incline Leg RIGHT SIDE Power Cord 12 5 The model number of this manual carefully before calling. For your home. Before reading further, please review the drawing below and familiarize yourself with innovative design to the treadmill (see the front cover of the treadmill is PFTL52550. If you for selecting the PROFORM® 525 SE treadmill. Mountain Time (excluding holidays). To help...
Walking Belt Circuit Breaker On/Off Switch FRONT BACK Rear Roller Adjustment Bolt 0 (t) Incline Leg RIGHT SIDE Power Cord 12 5 The model number of this manual carefully before calling. For your home. Before reading further, please review the drawing below and familiarize yourself with innovative design to the treadmill (see the front cover of the treadmill is PFTL52550. If you for selecting the PROFORM® 525 SE treadmill. Mountain Time (excluding holidays). To help...
User Manual
Page 4
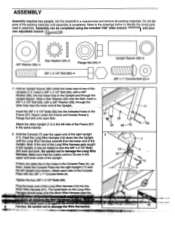
... latch on the Long Wire Tess should snap onto the Short Wire. Insert a 3/8" x 3 1/2" Bolt (65), with two 3/8" x 1" Console Bolts (2). Slide a Star Washer (22) onto the Bolt. Attach the other hole near the upper end of theUpright Insert the 3/8" x 3 1/2" Bolts (65) into the Upright, until assembly is completed. Plug the lower end of the Uprights (11). Hold the Console (7) near the lower end of the right Upright . (11). Attach...
... latch on the Long Wire Tess should snap onto the Short Wire. Insert a 3/8" x 3 1/2" Bolt (65), with two 3/8" x 1" Console Bolts (2). Slide a Star Washer (22) onto the Bolt. Attach the other hole near the upper end of theUpright Insert the 3/8" x 3 1/2" Bolts (65) into the Upright, until assembly is completed. Plug the lower end of the Uprights (11). Hold the Console (7) near the lower end of the right Upright . (11). Attach...
User Manual
Page 5
...: Note: Cover the floor beneath the treadmill to the walking belt or the walking platform. Press the Wrench Clip onto the Frame (57) in the indicated location. 3 Press the 3/16" Allen Wrench (77) into an appropriate outlet that each Incline Leg Foot (72) is turned so the flat side is properly installed and grounded in place by a qualified electrician. Plug the power cord into the...
...: Note: Cover the floor beneath the treadmill to the walking belt or the walking platform. Press the Wrench Clip onto the Frame (57) in the indicated location. 3 Press the 3/16" Allen Wrench (77) into an appropriate outlet that each Incline Leg Foot (72) is turned so the flat side is properly installed and grounded in place by a qualified electrician. Plug the power cord into the...
User Manual
Page 6
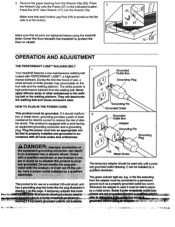
TO PLUG IN THE POWER CORD on the face of the walking belt can be restarted. Next, step onto the foot rails of the workout programs the 'RESET" position. The treadmill console features a manual mode and four Slide the speed control down to preset workout programs. In the manual mode, the speed of the console, remove it. console, make sure that the on/off switch near the power cord "On" Position Next, slide the speed control WO upward to...
TO PLUG IN THE POWER CORD on the face of the walking belt can be restarted. Next, step onto the foot rails of the workout programs the 'RESET" position. The treadmill console features a manual mode and four Slide the speed control down to preset workout programs. In the manual mode, the speed of the console, remove it. console, make sure that the on/off switch near the power cord "On" Position Next, slide the speed control WO upward to...
User Manual
Page 7
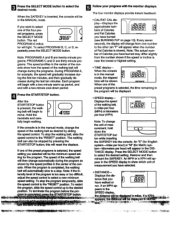
... the manual mode, the elapsed WEB time will automatically slow to the "RESET" position. CA Press the SELECT MODE button to show how the speed of the walking belt will begin walking. SPEED :ERs Note: To change from the number shown if the speed or incline is too easy or too difficult, adjust the speed control to the "RESET" position. if a. this will light. When the program is inserted, the console...
... the manual mode, the elapsed WEB time will automatically slow to the "RESET" position. CA Press the SELECT MODE button to show how the speed of the walking belt will begin walking. SPEED :ERs Note: To change from the number shown if the speed or incline is too easy or too difficult, adjust the speed control to the "RESET" position. if a. this will light. When the program is inserted, the console...
User Manual
Page 8
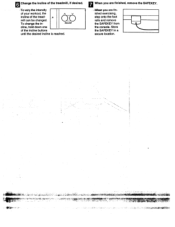
When you are finished exercising, step onto the foot rails and remove the SAFEKEY from the console. oi6 -s. -r . • • "44. 4mi.::A:- When you are finished, remove the SAFEKEY. To vary-theintensity of your workout, the incline of the incline buttons until the desired incline is reached. INCLINE cline, hold down one of the tread- .o mill can be changed. k z.A1140, Store the SAFEKEY in - 6 Change the incline of the treadmill, if desired. To change the in a secure location.
When you are finished exercising, step onto the foot rails and remove the SAFEKEY from the console. oi6 -s. -r . • • "44. 4mi.::A:- When you are finished, remove the SAFEKEY. To vary-theintensity of your workout, the incline of the incline buttons until the desired incline is reached. INCLINE cline, hold down one of the tread- .o mill can be changed. k z.A1140, Store the SAFEKEY in - 6 Change the incline of the treadmill, if desired. To change the in a secure location.
User Manual
Page 9
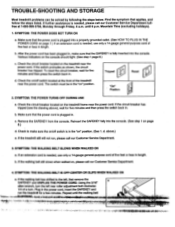
... and then press the switch back in. "On" Position a, 2. b. d. SYMPTOM: THE WALKING BELT IS OFF-CENTER OR SLIPS WHEN WALKED ON a. If further assistance is needed, use only a 14-gauge general-purpose cord of a turn. Remove the SAFEKEY from the console. b. Plug in the power cord, insert the SAFEKEY and run , please call our Customer Service Department. 4. Check the circuit breaker located on the treadmill near the power cord. If...
... and then press the switch back in. "On" Position a, 2. b. d. SYMPTOM: THE WALKING BELT IS OFF-CENTER OR SLIPS WHEN WALKED ON a. If further assistance is needed, use only a 14-gauge general-purpose cord of a turn. Remove the SAFEKEY from the console. b. Plug in the power cord, insert the SAFEKEY and run , please call our Customer Service Department. 4. Check the circuit breaker located on the treadmill near the power cord. If...
User Manual
Page 10
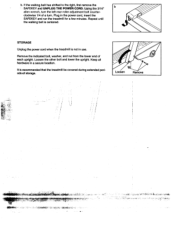
... walking belt is 'recommended that the treadmill be covered during extended periodsof storage. Keep all hardware in use. It is centered. If the walking belt has shifted to the right, first remove the SAFEKEY and UNPLUG THE POWER CORD. Remove the indicated bolt, washer, and nut from the lower end of a turn the left rear roller adjustment bolt counter- STORAGE Unplug the power cord when the treadmill is not in a secure location. Plug in the power cord...
... walking belt is 'recommended that the treadmill be covered during extended periodsof storage. Keep all hardware in use. It is centered. If the walking belt has shifted to the right, first remove the SAFEKEY and UNPLUG THE POWER CORD. Remove the indicated bolt, washer, and nut from the lower end of a turn the left rear roller adjustment bolt counter- STORAGE Unplug the power cord when the treadmill is not in a secure location. Plug in the power cord...
User Manual
Page 11
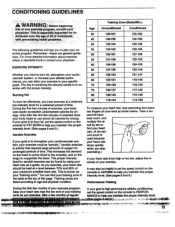
...exerciSe program, consult your heart rate as you to plan your body begin to the muscles, and on your body uses easily accessible carbohydrate calories for a sustained period of regular If your specific goals. Remember-these are listed according to help you exercise. Burning Fat To bum fat effectively, you must be helpful to set the speed control on the console... your training zone in . If your goal is to, bum fat, set the speed control on the console to FAT BURN to help you stop exercising and place two fingers on the lungs to find your exercise must exercise at ...
...exerciSe program, consult your heart rate as you to plan your body begin to the muscles, and on your body uses easily accessible carbohydrate calories for a sustained period of regular If your specific goals. Remember-these are listed according to help you exercise. Burning Fat To bum fat effectively, you must be helpful to set the speed control on the console... your training zone in . If your goal is to, bum fat, set the speed control on the console to FAT BURN to help you stop exercising and place two fingers on the lungs to find your exercise must exercise at ...
User Manual
Page 12
... the following information: • The MODEL NUMBER OF THE PRODUCT (PFTL52550). • The NAME OF THE PRODUCT (PROFORM® 525 SE treadmill). • The SERIAL NUMBER OF THE PRODUCT (see the front cover of this manual). • The KEY NUMBER OF THE PART(S) (see the EXPLODED DRAWING and PART LIST attached to the center of this manual). • The DESCRIPTION OF THE PART(S) (see the EXPLODED DRAWING and PART LIST attached to...
... the following information: • The MODEL NUMBER OF THE PRODUCT (PFTL52550). • The NAME OF THE PRODUCT (PROFORM® 525 SE treadmill). • The SERIAL NUMBER OF THE PRODUCT (see the front cover of this manual). • The KEY NUMBER OF THE PART(S) (see the EXPLODED DRAWING and PART LIST attached to the center of this manual). • The DESCRIPTION OF THE PART(S) (see the EXPLODED DRAWING and PART LIST attached to...
User Manual
Page 13
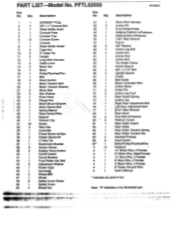
REMOVE THIS EXPLODED DRAWING AND PART LIST FROM THE MANUAL! Save this EXPLODED DRAWING and PART LIST for future reference. • =1.co A V ,r1
REMOVE THIS EXPLODED DRAWING AND PART LIST FROM THE MANUAL! Save this EXPLODED DRAWING and PART LIST for future reference. • =1.co A V ,r1

User Manual
Page 14
PFTL52550 R 1095A 5 42' 7 17 6 4 2 O o° 3 8 5 85 1 10 36_ 31 58 65 66 86 6 • • 56 0 9 6 16 6 0 0 13 87* 11 6 9 12 80 38 79 - EXPLODED DRAWING Model No. "".. 73 18 39 81 27 83 43 4 82 30 )/\ 78 76 75 46 72 18 73' 50 74
PFTL52550 R 1095A 5 42' 7 17 6 4 2 O o° 3 8 5 85 1 10 36_ 31 58 65 66 86 6 • • 56 0 9 6 16 6 0 0 13 87* 11 6 9 12 80 38 79 - EXPLODED DRAWING Model No. "".. 73 18 39 81 27 83 43 4 82 30 )/\ 78 76 75 46 72 18 73' 50 74
User Manual
Page 16
... Harness Incline Pin Front Roller/Pulley Walking Platform w/Fastener Walking Belt w/Fastener 7/32" Allen Wrench Frame 3/8" Washer Incline Leg Bolt Incline Nut Incline Rod Incline Bolt Tie Holder Clamp Incline Spacer 3/8" x 3 1/2" Bolt Upright Spacer Choke Belt Guide Motor Controller Wire Incline Motor Cotter Pin Incline Leg Foot Rear Guard Spring Incline Leg Right Rear Adjustment Bolt Left Rear Adjustment Bolt 3/16" Allen Wrench Rear Hood Foot Rail w/Fastener Platform Screw Rear Roller Guard Rear Roller Rear Roller Tension Spring Rear Roller Tension Nut Handrail Endcap Hood Screw Motor/Pulley...
... Harness Incline Pin Front Roller/Pulley Walking Platform w/Fastener Walking Belt w/Fastener 7/32" Allen Wrench Frame 3/8" Washer Incline Leg Bolt Incline Nut Incline Rod Incline Bolt Tie Holder Clamp Incline Spacer 3/8" x 3 1/2" Bolt Upright Spacer Choke Belt Guide Motor Controller Wire Incline Motor Cotter Pin Incline Leg Foot Rear Guard Spring Incline Leg Right Rear Adjustment Bolt Left Rear Adjustment Bolt 3/16" Allen Wrench Rear Hood Foot Rail w/Fastener Platform Screw Rear Roller Guard Rear Roller Rear Roller Tension Spring Rear Roller Tension Nut Handrail Endcap Hood Screw Motor/Pulley...

