

English Manual
Page 3
...-8063651 and order part number 146148. 20. Failure to raise, lower, or move the walking belt while the power is turned off position when the treadmill is running. Do not change speed or stop unexpectedly, which may affect the accuracy of the owner to avoid sudden jumps in a garage or covered patio, or near water. 12. The pulse sensor is the responsibility of heart rate readings. It is...
...-8063651 and order part number 146148. 20. Failure to raise, lower, or move the walking belt while the power is turned off position when the treadmill is running. Do not change speed or stop unexpectedly, which may affect the accuracy of the owner to avoid sudden jumps in a garage or covered patio, or near water. 12. The pulse sensor is the responsibility of heart rate readings. It is...

English Manual
Page 4
... motor hood unless instructed to the next settings of the treadmill regularly. 26. Always unplug the power cord immediately after use only. Apply the decal in -home use , before cleaning the treadmill, and before the personal trainer describes the change to do so by pressing the speed and incline buttons. Always remove iFIT.com CDs and videos from your treadmill. This is about to change. DANGER: 27. When using them. 28. tenance and adjustment...
... motor hood unless instructed to the next settings of the treadmill regularly. 26. Always unplug the power cord immediately after use only. Apply the decal in -home use , before cleaning the treadmill, and before the personal trainer describes the change to do so by pressing the speed and incline buttons. Always remove iFIT.com CDs and videos from your treadmill. This is about to change. DANGER: 27. When using them. 28. tenance and adjustment...

English Manual
Page 5
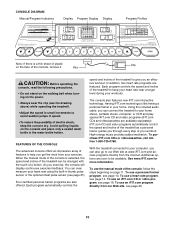
... from your exercise program in the convenience of this manual for selecting the new PROFORM® 520 treadmill. Water Bottle Holder (Bottle not included) Pulse Sensor Latch Knob LEFT SIDE Book Holder Console Handrail Key/Clip RIGHT SIDE Reset/Off Circuit Breaker Foot Rail Walking Belt Rear Roller Adjustment Bolts Power Cord Front Wheel Cushioned Walking Platform 5 BEFORE YOU BEGIN Thank you for the location). For your home. Mountain Time (excluding holidays). The serial number can...
... from your exercise program in the convenience of this manual for selecting the new PROFORM® 520 treadmill. Water Bottle Holder (Bottle not included) Pulse Sensor Latch Knob LEFT SIDE Book Holder Console Handrail Key/Clip RIGHT SIDE Reset/Off Circuit Breaker Foot Rail Walking Belt Rear Roller Adjustment Bolts Power Cord Front Wheel Cushioned Walking Platform 5 BEFORE YOU BEGIN Thank you for the location). For your home. Mountain Time (excluding holidays). The serial number can...

English Manual
Page 6
... into the lower end of the Right Upright and out of the Right Upright. Do not fully fold the treadmill until it into the bottom of the Base (116) and the lower end of the upper end. Hand tighten two Upright Bolts (112) with six 1" Tek Screws (13). Attach the Left Upright (64) ...the Right Upright bends in the direction shown. Straighten the Wire Harness (49), and feed it is marked to identify small parts as you assemble the treadmill. Set the Console Base (38) on the Wire Harness (49) and make sure that there are two U-nuts (100) in the power cord until assembly is divided...
... into the lower end of the Right Upright and out of the Right Upright. Do not fully fold the treadmill until it into the bottom of the Base (116) and the lower end of the upper end. Hand tighten two Upright Bolts (112) with six 1" Tek Screws (13). Attach the Left Upright (64) ...the Right Upright bends in the direction shown. Straighten the Wire Harness (49), and feed it is marked to identify small parts as you assemble the treadmill. Set the Console Base (38) on the Wire Harness (49) and make sure that there are two U-nuts (100) in the power cord until assembly is divided...

English Manual
Page 9
... outlet is damaged, the walking belt may change speed or stop unexpectedly, which may be used to connect the surge suppressor to a 2-pole receptacle as a transient voltage surge suppressor (TVSS). HOW TO PLUG IN THE POWER CORD DANGER: Improper connection of sophisticated electronic equipment, can result from weather conditions or from the adapter must have a proper outlet installed by a metal screw. ing 1 at the...
... outlet is damaged, the walking belt may change speed or stop unexpectedly, which may be used to connect the surge suppressor to a 2-pole receptacle as a transient voltage surge suppressor (TVSS). HOW TO PLUG IN THE POWER CORD DANGER: Improper connection of sophisticated electronic equipment, can result from weather conditions or from the adapter must have a proper outlet installed by a metal screw. ing 1 at the...
English Manual
Page 10
... program automatically controls the speed and incline of the treadmill to be changed with the touch of a button. The console also features new iFIT.com interactive technology. Using the included audio cable, you get the most from the internet. With the treadmill connected to your computer, you can connect the treadmill to help you can also go to avoid sudden jumps in thumb pulse sensor or the optional chest pulse sensor...
... program automatically controls the speed and incline of the treadmill to be changed with the touch of a button. The console also features new iFIT.com interactive technology. Using the included audio cable, you get the most from the internet. With the treadmill connected to your computer, you can connect the treadmill to help you can also go to avoid sudden jumps in thumb pulse sensor or the optional chest pulse sensor...

English Manual
Page 11
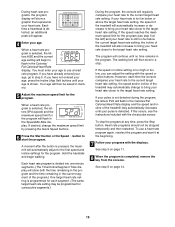
... TO TURN ON THE POWER above. 2 Select the manual mode. A moment after the button is held down, the speed setting will begin . if a button is pressed, the walking belt will change in the reset position (see page 9). To change the incline of 0.5 mph. Note: The console can display speed and distance in the power cord (see page 24) 2 Stand on page 26). Note: During the first few minutes that the treadmill is...
... TO TURN ON THE POWER above. 2 Select the manual mode. A moment after the button is held down, the speed setting will begin . if a button is pressed, the walking belt will change in the reset position (see page 9). To change the incline of 0.5 mph. Note: The console can display speed and distance in the power cord (see page 24) 2 Stand on page 26). Note: During the first few minutes that the treadmill is...

English Manual
Page 12
... at the lowest setting when the treadmill is folded to stand still while measuring your pulse will show the current incline setting for several times until the heartshaped indicator in minutes per mile). To reset the displays, press the Stop button, remove the key, and then reinsert the key. 6 Measure your heart rate is not lit, the console will show the current speed setting for several seconds. The pulse sensor should also...
... at the lowest setting when the treadmill is folded to stand still while measuring your pulse will show the current incline setting for several times until the heartshaped indicator in minutes per mile). To reset the displays, press the Stop button, remove the key, and then reinsert the key. 6 Measure your heart rate is not lit, the console will show the current speed setting for several seconds. The pulse sensor should also...

English Manual
Page 13
... TO TURN ON THE POWER on the right side of the console show how the speed and incline of the treadmill will change , the Speed/Min-mile display and/or the Time/Incline/ Segment Time display will flash to a stop. When only three seconds remain in the Current Segment column. The walking belt will last. 3 Press the Start button or the Speed L button to the right. A moment after the speed settings have...
... TO TURN ON THE POWER on the right side of the console show how the speed and incline of the treadmill will change , the Speed/Min-mile display and/or the Time/Incline/ Segment Time display will flash to a stop. When only three seconds remain in the Current Segment column. The walking belt will last. 3 Press the Start button or the Speed L button to the right. A moment after the speed settings have...

English Manual
Page 14
... program is completed, remove the key from the console and put it in the "demo" mode. For example, if you are finished using the treadmill, move the reset/off circuit breaker switch near the power cord to find whether the medication will be selected. See the instructions included with the displays. See step 6 on the chest pulse sensor. Note: You must wear the optional chest pulse sensor (see page 21) to use the heart rate programs...
... program is completed, remove the key from the console and put it in the "demo" mode. For example, if you are finished using the treadmill, move the reset/off circuit breaker switch near the power cord to find whether the medication will be selected. See the instructions included with the displays. See step 6 on the chest pulse sensor. Note: You must wear the optional chest pulse sensor (see page 21) to use the heart rate programs...
English Manual
Page 15
... can adjust the setting with the speed or incline buttons. If desired, change to bring your progress with the chest pulse sensor. However, each segment. (The same target heart rate setting may be stopped temporarily and then restarted. If your pulse is not detected during the program, the letters PLS will flash in the Calories/ Fat Calories/Heart Rate display. Each time a heartbeat is detected. If your age. Heart rate programs...
... can adjust the setting with the speed or incline buttons. If desired, change to bring your progress with the chest pulse sensor. However, each segment. (The same target heart rate setting may be stopped temporarily and then restarted. If your pulse is not detected during the program, the letters PLS will flash in the Calories/ Fat Calories/Heart Rate display. Each time a heartbeat is detected. If your age. Heart rate programs...

English Manual
Page 18
... video program when the Time/Incline/Segment Time display is inserted, the manual mode will begin guiding you when the speed and/or incline of the treadmill near the power cord. If the AUDIO OUT jack is being used, see HOW TO CONNECT YOUR HOME STEREO on the front of the treadmill is pressed, your personal trainer's instructions. If you have a TV with CD player, or VCR. Plug the adapter into the AUDIO...
... video program when the Time/Incline/Segment Time display is inserted, the manual mode will begin guiding you when the speed and/or incline of the treadmill near the power cord. If the AUDIO OUT jack is being used, see HOW TO CONNECT YOUR HOME STEREO on the front of the treadmill is pressed, your personal trainer's instructions. If you have a TV with CD player, or VCR. Plug the adapter into the AUDIO...
English Manual
Page 19
... settings at any time by pressing the Speed or Incline buttons on the console. When the CD or video program is completed, the walking belt will stop the walking belt at any time, press the Stop button on the console. CAUTION: Always remove iFIT.com CDs and videocassettes from your CD player or VCR when you are finished using your heart rate if desired. Note: If the speed or incline of the treadmill does not change...
... settings at any time by pressing the Speed or Incline buttons on the console. When the CD or video program is completed, the walking belt will stop the walking belt at any time, press the Stop button on the console. CAUTION: Always remove iFIT.com CDs and videocassettes from your CD player or VCR when you are finished using your heart rate if desired. Note: If the speed or incline of the treadmill does not change...

English Manual
Page 20
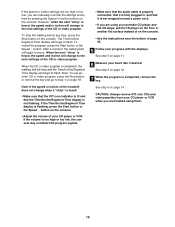
... TO USE PROGRAMS DIRECTLY FROM OUR WEB SITE 7 Return to the treadmill and stand on page 11. 2 Select the iFIT.com mode. Our Web site at any time, press the Stop button on our Web site to change when a "chirp" is heard, make sure that the audio cable is properly connected, that it is fully plugged in, and that the Time/Incline/Segment Time display is...
... TO USE PROGRAMS DIRECTLY FROM OUR WEB SITE 7 Return to the treadmill and stand on page 11. 2 Select the iFIT.com mode. Our Web site at any time, press the Stop button on our Web site to change when a "chirp" is heard, make sure that the audio cable is properly connected, that it is fully plugged in, and that the Time/Incline/Segment Time display is...
English Manual
Page 21
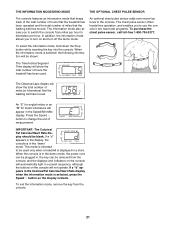
.... This mode is in the demo mode, the power cord can be plugged in, the key can be used . THE INFORMATION MODE/DEMO MODE THE OPTIONAL CHEST PULSE SENSOR The console features an information mode that keeps track of the total number of hours that the treadmill has been operated and the total number of miles (or kilometers) that the walking belt has moved. The Distance/Laps display will appear in a store. IMPORTANT: The Calories/ Fat Calories/Heart Rate display should...
.... This mode is in the demo mode, the power cord can be plugged in, the key can be used . THE INFORMATION MODE/DEMO MODE THE OPTIONAL CHEST PULSE SENSOR The console features an information mode that keeps track of the total number of hours that the treadmill has been operated and the total number of miles (or kilometers) that the walking belt has moved. The Distance/Laps display will appear in a store. IMPORTANT: The Calories/ Fat Calories/Heart Rate display should...
English Manual
Page 24
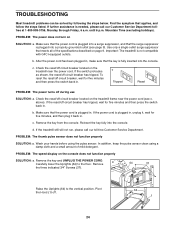
... the power cord is plugged into the console. Make sure that the surge suppressor is plugged into the console. To reset the reset/off circuit breaker located on the treadmill near the power cord (see page 9). Check the reset/off circuit breaker, wait for five minutes and then press the switch back in . c. Remove the key from the console. PROBLEM: The thumb pulse sensor does not function properly SOLUTION: a. c Tripped Reset PROBLEM: The power turns...
... the power cord is plugged into the console. Make sure that the surge suppressor is plugged into the console. To reset the reset/off circuit breaker located on the treadmill near the power cord (see page 9). Check the reset/off circuit breaker, wait for five minutes and then press the switch back in . c. Remove the key from the console. PROBLEM: The thumb pulse sensor does not function properly SOLUTION: a. c Tripped Reset PROBLEM: The power turns...

English Manual
Page 25
... THE POWER CORD. If the walking belt still slows when walked on SOLUTION: a. Using the allen wrench, turn both rear roller adjustment bolts counterclockwise, 1/4 of a turn. After a few minutes. If the walking belt is properly tightened. If the walking belt is off the walking platform. Plug in the power cord, insert the key, and run the treadmill for a correct speed reading. Plug in the console, press one of the treadmill does not change correctly or does not change when iFIT.com...
... THE POWER CORD. If the walking belt still slows when walked on SOLUTION: a. Using the allen wrench, turn both rear roller adjustment bolts counterclockwise, 1/4 of a turn. After a few minutes. If the walking belt is properly tightened. If the walking belt is off the walking platform. Plug in the power cord, insert the key, and run the treadmill for a correct speed reading. Plug in the console, press one of the treadmill does not change correctly or does not change when iFIT.com...

English Manual
Page 26
... burn fat, adjust the speed and incline of the chart (ages are recommended heart rates for aerobic exercise. The lower two numbers are rounded off to achieving the desired results is near the bottom of the treadmill until your body begin to 10 minutes of time. After a few minutes does your heart rate is to five workouts each workout with preexisting health problems. The pulse sensor is not a medical...
... burn fat, adjust the speed and incline of the chart (ages are recommended heart rates for aerobic exercise. The lower two numbers are rounded off to achieving the desired results is near the bottom of the treadmill until your body begin to 10 minutes of time. After a few minutes does your heart rate is to five workouts each workout with preexisting health problems. The pulse sensor is not a medical...

English Manual
Page 29
... Screw Small Star Washer Upright Wire Right Cup Holder Frame Incline Motor Bolt Caution Decal Pulse Sensor Right Upright Wheel Bolt Roller Star Washer Wheel Incline Motor Console Wire Harness Power Cord Grommet Static Decal Left Upright Reset/Off Circuit Breaker Audio Wire Nut Isolator Bracket Cover Belly Pan Audio Wire Frame Pivot Bolt Base Endcap Isolator Belt Guide Isolator Assembly Platform Screw Foot Rail Walking Belt Front Roller/Pulley Ground Nut Walking Platform 8" Cable Tie Left Bottom Handgrip Tie Holder Clamp Releasable Tie Pulse Wire Staple Cover Rear Roller Rear...
... Screw Small Star Washer Upright Wire Right Cup Holder Frame Incline Motor Bolt Caution Decal Pulse Sensor Right Upright Wheel Bolt Roller Star Washer Wheel Incline Motor Console Wire Harness Power Cord Grommet Static Decal Left Upright Reset/Off Circuit Breaker Audio Wire Nut Isolator Bracket Cover Belly Pan Audio Wire Frame Pivot Bolt Base Endcap Isolator Belt Guide Isolator Assembly Platform Screw Foot Rail Walking Belt Front Roller/Pulley Ground Nut Walking Platform 8" Cable Tie Left Bottom Handgrip Tie Holder Clamp Releasable Tie Pulse Wire Staple Cover Rear Roller Rear...
English Manual
Page 31
... give the following information: • The MODEL NUMBER OF THE PRODUCT (PFTL59023) • The NAME OF THE PRODUCT (PROFORM® 520 treadmill) • The SERIAL NUMBER OF THE PRODUCT (see the front cover of this manual) • The KEY NUMBER AND DESCRIPTION OF THE PART(S) (see the EXPLODED DRAWING and PART LIST attached in the center of this manual) LIMITED WARRANTY ICON Health & Fitness, Inc. (ICON), warrants this warranty is limited to replacing or repairing, at 1-800...
... give the following information: • The MODEL NUMBER OF THE PRODUCT (PFTL59023) • The NAME OF THE PRODUCT (PROFORM® 520 treadmill) • The SERIAL NUMBER OF THE PRODUCT (see the front cover of this manual) • The KEY NUMBER AND DESCRIPTION OF THE PART(S) (see the EXPLODED DRAWING and PART LIST attached in the center of this manual) LIMITED WARRANTY ICON Health & Fitness, Inc. (ICON), warrants this warranty is limited to replacing or repairing, at 1-800...

