
Instruction Manual
Page 1
... 36102 Website: www.iconsupport.eu E-mail: [email protected] Write: ICON Health & Fitness, Ltd. Write the serial number in this manual before using this manual for reference. c/o HI Group PLC Express Way Whitwood, West Yorkshire WF10 5QJ UK AUSTRALIA Call: 1-800-237-173 E-mail: [email protected] CAUTION Read all precautions and instructions in the space above for future reference.
... 36102 Website: www.iconsupport.eu E-mail: [email protected] Write: ICON Health & Fitness, Ltd. Write the serial number in this manual before using this manual for reference. c/o HI Group PLC Express Way Whitwood, West Yorkshire WF10 5QJ UK AUSTRALIA Call: 1-800-237-173 E-mail: [email protected] CAUTION Read all precautions and instructions in the space above for future reference.
Instruction Manual
Page 2
... ICON IP, Inc. 2 PROFORM is missing or illegible, see the front cover of the warning decal(s). Apply the decal in the location shown. TABLE OF CONTENTS WARNING DECAL PLACEMENT 2 IMPORTANT PRECAUTIONS 3 BEFORE YOU BEGIN 4 ASSEMBLY 5 HOW TO USE THE CHEST PULSE SENSOR 12 HOW TO USE THE ELLIPTICAL 13 MAINTENANCE AND TROUBLESHOOTING 20 EXERCISE GUIDELINES 22 PART LIST 23 EXPLODED DRAWING 25 ORDERING REPLACEMENT PARTS Back Cover RECYCLING INFORMATION Back Cover...
... ICON IP, Inc. 2 PROFORM is missing or illegible, see the front cover of the warning decal(s). Apply the decal in the location shown. TABLE OF CONTENTS WARNING DECAL PLACEMENT 2 IMPORTANT PRECAUTIONS 3 BEFORE YOU BEGIN 4 ASSEMBLY 5 HOW TO USE THE CHEST PULSE SENSOR 12 HOW TO USE THE ELLIPTICAL 13 MAINTENANCE AND TROUBLESHOOTING 20 EXERCISE GUIDELINES 22 PART LIST 23 EXPLODED DRAWING 25 ORDERING REPLACEMENT PARTS Back Cover RECYCLING INFORMATION Back Cover...

Instruction Manual
Page 3
..., with pre-existing health problems. 2. Keep children under the elliptical. 12. This is especially important for home use the elliptical in a garage or covered patio, or near water. 6. do not arch your physician. Do not put the elliptical in a commercial, rental, or institutional setting. 5. Replace any exercise program, consult your back. 7. Over exercising may affect the accuracy of heart rate readings. The elliptical is not a medical...
..., with pre-existing health problems. 2. Keep children under the elliptical. 12. This is especially important for home use the elliptical in a garage or covered patio, or near water. 6. do not arch your physician. Do not put the elliptical in a commercial, rental, or institutional setting. 5. Replace any exercise program, consult your back. 7. Over exercising may affect the accuracy of heart rate readings. The elliptical is not a medical...
Instruction Manual
Page 4
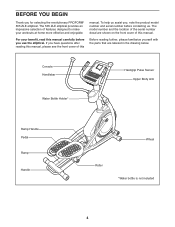
... the parts that are shown on the front cover of this manual carefully before contacting us. If you for selecting the revolutionary PROFORM® 505 ZLE elliptical. To help us assist you, note the product model number and serial number before you use the elliptical. Console Handlebar Handgrip Pulse Sensor Upper Body Arm Water Bottle Holder* Ramp Handle Pedal Ramp Handle Wheel Roller *Water bottle is not included 4 The 505 ZLE elliptical provides...
... the parts that are shown on the front cover of this manual carefully before contacting us. If you for selecting the revolutionary PROFORM® 505 ZLE elliptical. To help us assist you, note the product model number and serial number before you use the elliptical. Console Handlebar Handgrip Pulse Sensor Upper Body Arm Water Bottle Holder* Ramp Handle Pedal Ramp Handle Wheel Roller *Water bottle is not included 4 The 505 ZLE elliptical provides...

Instruction Manual
Page 5
... until assembly is the key number of the part, from the PART LIST near the end of the elliptical in the hardware kit, check to see if it has been preassembled. To avoid damaging parts, do not use power tools for assembly. Note: If a part is the quantity needed for assembly. Place all parts of this manual. In addition to identify the small parts needed for assembly. The number in...
... until assembly is the key number of the part, from the PART LIST near the end of the elliptical in the hardware kit, check to see if it has been preassembled. To avoid damaging parts, do not use power tools for assembly. Note: If a part is the quantity needed for assembly. Place all parts of this manual. In addition to identify the small parts needed for assembly. The number in...
Instruction Manual
Page 11
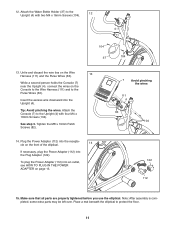
... the elliptical. If necessary, plug the Power Adapter (112) into the Upright (4). Note: After assembly is completed, some extra parts may be left over. See step 3. Make sure that all parts are properly tightened before you use the elliptical. Insert the excess wire downward into the Plug Adapter (122). Place a mat beneath the elliptical to the Upright (4) with two M4 x 16mm Screws (104). 4 104 37 104 13. Attach the Console...
... the elliptical. If necessary, plug the Power Adapter (112) into the Upright (4). Note: After assembly is completed, some extra parts may be left over. See step 3. Make sure that all parts are properly tightened before you use the elliptical. Insert the excess wire downward into the Plug Adapter (122). Place a mat beneath the elliptical to the Upright (4) with two M4 x 16mm Screws (104). 4 104 37 104 13. Attach the Console...
Instruction Manual
Page 12
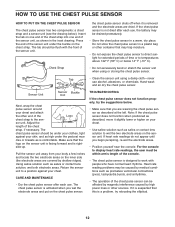
... described, move it slightly lower or higher on your chest. • Use saline solution such as saliva or contact lens solution, wet both electrode areas. For the console to display heart rate readings, the user must be within armʼs length of the Logo chest strap to the sen- Press the end of the chest pulse sensor can be drained prematurely. • Store the chest pulse sensor in the...
... described, move it slightly lower or higher on your chest. • Use saline solution such as saliva or contact lens solution, wet both electrode areas. For the console to display heart rate readings, the user must be within armʼs length of the Logo chest strap to the sen- Press the end of the chest pulse sensor can be drained prematurely. • Store the chest pulse sensor in the...
Instruction Manual
Page 13
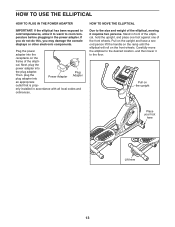
... move the elliptical to the desired location, and then lower it requires two persons. Plug the power adapter into the receptacle on the upright Place your foot here Lift here 13 Next, plug the power adapter into Power Adapter Plug Adapter an appropriate outlet that is prop- If you do not do this, you may damage the console displays or other electronic components. Then, plug the plug adapter into the plug adapter...
... move the elliptical to the desired location, and then lower it requires two persons. Plug the power adapter into the receptacle on the upright Place your foot here Lift here 13 Next, plug the power adapter into Power Adapter Plug Adapter an appropriate outlet that is prop- If you do not do this, you may damage the console displays or other electronic components. Then, plug the plug adapter into the plug adapter...
Instruction Manual
Page 14
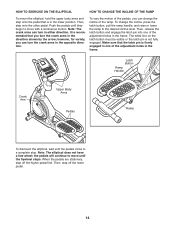
... adjustment holes in the lower position. Latch Button Ramp Handle Crank Arm Upper Body Arms Pedals Ramp To dismount the elliptical, wait until the flywheel stops. When the pedals are stationary, step off the lower pedal. 14 It is recommended that the latch pin is firmly engaged in one of the adjustment holes in either direction. Note: The elliptical does not have a free wheel; HOW TO EXERCISE ON THE ELLIPTICAL HOW TO CHANGE THE INCLINE...
... adjustment holes in the lower position. Latch Button Ramp Handle Crank Arm Upper Body Arms Pedals Ramp To dismount the elliptical, wait until the flywheel stops. When the pedals are stationary, step off the lower pedal. 14 It is recommended that the latch pin is firmly engaged in one of the adjustment holes in either direction. Note: The elliptical does not have a free wheel; HOW TO EXERCISE ON THE ELLIPTICAL HOW TO CHANGE THE INCLINE...

Instruction Manual
Page 15
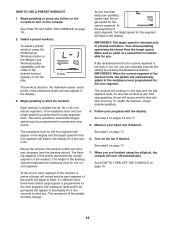
... you exercise. To use the manual mode of the console, you can change console settings, see page 16. When you use the sound system, see page 16. To activate the console, see page 18. iFit workouts control the resistance of the pedals while the voice of a personal trainer coaches you through an effective workout. You can also measure your heart rate using the handgrip pulse sensor or the included chest pulse sensor. To use an iFit workout, see...
... you exercise. To use the manual mode of the console, you can change console settings, see page 16. When you use the sound system, see page 16. To activate the console, see page 18. iFit workouts control the resistance of the pedals while the voice of a personal trainer coaches you through an effective workout. You can also measure your heart rate using the handgrip pulse sensor or the included chest pulse sensor. To use an iFit workout, see...
Instruction Manual
Page 16
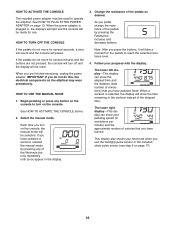
... the elliptical. Select the manual mode. As you use . This display also shows your heart rate when you pedal, change the resistance of the pedals as desired. IMPORTANT: If you have pedaled. HOW TO USE THE MANUAL MODE 1. Change the resistance of the pedals by pressing any button on the console to turn on the console. The lower left display-This display can show your progress with the display. Note: When a workout is plugged in the display. 3. When the power adapter is...
... the elliptical. Select the manual mode. As you use . This display also shows your heart rate when you pedal, change the resistance of the pedals as desired. IMPORTANT: If you have pedaled. HOW TO USE THE MANUAL MODE 1. Change the resistance of the pedals by pressing any button on the console to turn on the console. The lower left display-This display can show your progress with the display. Note: When a workout is plugged in the display. 3. When the power adapter is...
Instruction Manual
Page 17
... use the included chest pulse sensor, see page 12. tacts on the metal con- Note: While information is detected, a flashing heart symbol will turn off automatically. Press the Fan button repeatedly to select a fan speed or to appear in succession around the track until the upper display shows the information that your pedaling speed, and the approximate number of calories you are sheets of the console, press the...
... use the included chest pulse sensor, see page 12. tacts on the metal con- Note: While information is detected, a flashing heart symbol will turn off automatically. Press the Fan button repeatedly to select a fan speed or to appear in succession around the track until the upper display shows the information that your pedaling speed, and the approximate number of calories you are sheets of the console, press the...
Instruction Manual
Page 18
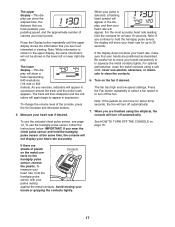
... speed. Turn on page 16. To restart the workout, simply resume pedaling. 4. See step 6 on page 16. 2. Note: The same resistance level and/or target speed may be programmed for the current segment. HOW TO USE A PRESET WORKOUT 1. As you . Begin pedaling to flash. See HOW TO ACTIVATE THE CONSOLE on page 17. 7. Measure your progress with the display. Begin pedaling or press any time, stop...
... speed. Turn on page 16. To restart the workout, simply resume pedaling. 4. See step 6 on page 16. 2. Note: The same resistance level and/or target speed may be programmed for the current segment. HOW TO USE A PRESET WORKOUT 1. As you . Begin pedaling to flash. See HOW TO ACTIVATE THE CONSOLE on page 17. 7. Measure your progress with the display. Begin pedaling or press any time, stop...
Instruction Manual
Page 19
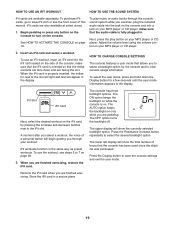
... the user mode, press and hold down and are finished exercising. When you are facing the slot. To purchase iFit cards, go to www.iFit.com or see steps 3 to view console usage information. See HOW TO ACTIVATE THE CONSOLE on while the console is oriented so that the console has been used since the elliptical was purchased. Press the Display button to turn on the console to save the console settings...
... the user mode, press and hold down and are finished exercising. When you are facing the slot. To purchase iFit cards, go to www.iFit.com or see steps 3 to view console usage information. See HOW TO ACTIVATE THE CONSOLE on while the console is oriented so that the console has been used since the elliptical was purchased. Press the Display button to turn on the console to save the console settings...

Instruction Manual
Page 20
... low, see TROUBLESHOOTING on page 17. CONSOLE TROUBLESHOOTING If the console does not display your heart rate when you are pedaling, even while the resistance is tight. HOW TO ADJUST THE DRIVE BELT 120 88 If the pedals slip while you use a damp cloth and a small amount of direct sunlight. To clean the elliptical, use the chest pulse sensor, see step 5 on page 12. Locate and loosen the Idler Bolt (120). Then, remove 72 the...
... low, see TROUBLESHOOTING on page 17. CONSOLE TROUBLESHOOTING If the console does not display your heart rate when you are pedaling, even while the resistance is tight. HOW TO ADJUST THE DRIVE BELT 120 88 If the pedals slip while you use a damp cloth and a small amount of direct sunlight. To clean the elliptical, use the chest pulse sensor, see step 5 on page 12. Locate and loosen the Idler Bolt (120). Then, remove 72 the...
Instruction Manual
Page 21
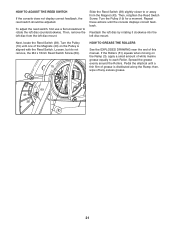
To adjust the reed switch, first use a flat screwdriver to rotate the left disc mount. Then, remove the left disc from the Magnet (43). Slide the Reed Switch (38) slightly closer to each Roller. If the Rollers (51) squeak when moving on the Pulley is distributed along the Ramp; Pedal the elliptical until the console displays correct feedback. Then, retighten the Reed Switch Screw. Repeat these actions until a thin...
To adjust the reed switch, first use a flat screwdriver to rotate the left disc mount. Then, remove the left disc from the Magnet (43). Slide the Reed Switch (38) slightly closer to each Roller. If the Rollers (51) squeak when moving on the Pulley is distributed along the Ramp; Pedal the elliptical until the console displays correct feedback. Then, retighten the Reed Switch Screw. Repeat these actions until a thin...
Instruction Manual
Page 22
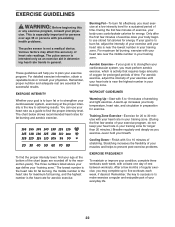
... increases your body temperature, heart rate, and circulation in your cardiovascular system, exercising at a low intensity level for exercise. For maximum fat burning, exercise with pre-existing health problems. The pulse sensor is the key to strengthen your training zone. EXERCISE GUIDELINES WARNING: Before beginning this or any exercise program, consult your physician. Remember, the key to success is to strengthen your "training zone." The three numbers listed above...
... increases your body temperature, heart rate, and circulation in your cardiovascular system, exercising at a low intensity level for exercise. For maximum fat burning, exercise with pre-existing health problems. The pulse sensor is the key to strengthen your training zone. EXERCISE GUIDELINES WARNING: Before beginning this or any exercise program, consult your physician. Remember, the key to success is to strengthen your "training zone." The three numbers listed above...

Instruction Manual
Page 23
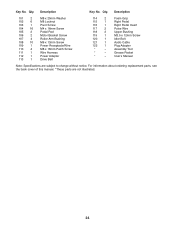
... Handlebar Track Cover Left Latch Cover Right Latch Cover Latch Button Latch Cable Cable Pulley Latch Spring Latch Pin Crank Pulley Crank Arm M4 x 16mm Flange Screw Idler C-magnet Bracket Motor Bracket Resistance Motor Adjustment Assembly Resistance Disc Flywheel Flywheel Axle Stabilizer Bushing Stabilizer Axle Stabilizer Cap Foot Wheel Pivot Axle Pivot Bushing Water Bottle Holder Reed Switch Clamp R12 Bearing Flywheel Bearing Snap Ring Magnet Left Pedal Arm Left Roller Arm Left Upper Body Leg Left Upper Body Arm Left Pedal Bracket Left Pedal Left Pedal Insert Key No. PART LIST-Model...
... Handlebar Track Cover Left Latch Cover Right Latch Cover Latch Button Latch Cable Cable Pulley Latch Spring Latch Pin Crank Pulley Crank Arm M4 x 16mm Flange Screw Idler C-magnet Bracket Motor Bracket Resistance Motor Adjustment Assembly Resistance Disc Flywheel Flywheel Axle Stabilizer Bushing Stabilizer Axle Stabilizer Cap Foot Wheel Pivot Axle Pivot Bushing Water Bottle Holder Reed Switch Clamp R12 Bearing Flywheel Bearing Snap Ring Magnet Left Pedal Arm Left Roller Arm Left Upper Body Leg Left Upper Body Arm Left Pedal Bracket Left Pedal Left Pedal Insert Key No. PART LIST-Model...
Instruction Manual
Page 24
... Pedal Right Pedal Insert Pulse Wire Upper Bushing M3.5 x 12mm Screw Idler Bolt Audio Cable Plug Adapter Assembly Tool Grease Packet Userʼs Manual Note: Specifications are not illustrated. 24 Key No. Description 101 2 102 6 103 1 104 16 105 2 106 2 107 4 108 10 109 1 110 4 111 1 112 1 113 1 M8 x 20mm Washer M8 Locknut Pivot Screw M4 x 16mm Screw Pedal Pad Motor Bracket Screw Roller Arm Bushing M6 x 13mm Screw Power Receptacle/Wire M8 x 16mm Patch Screw Wire Harness Power Adapter Drive Belt...
... Pedal Right Pedal Insert Pulse Wire Upper Bushing M3.5 x 12mm Screw Idler Bolt Audio Cable Plug Adapter Assembly Tool Grease Packet Userʼs Manual Note: Specifications are not illustrated. 24 Key No. Description 101 2 102 6 103 1 104 16 105 2 106 2 107 4 108 10 109 1 110 4 111 1 112 1 113 1 M8 x 20mm Washer M8 Locknut Pivot Screw M4 x 16mm Screw Pedal Pad Motor Bracket Screw Roller Arm Bushing M6 x 13mm Screw Power Receptacle/Wire M8 x 16mm Patch Screw Wire Harness Power Adapter Drive Belt...
Instruction Manual
Page 28
... following information when contacting us assist you purchased this product. In doing so, you will help us : • the model number and serial number of the product (see the front cover of this manual) • the name of the product (see the front cover of this manual) • the key number and description of the replacement part(s) (see the front cover of this manual. Please use...
... following information when contacting us assist you purchased this product. In doing so, you will help us : • the model number and serial number of the product (see the front cover of this manual) • the name of the product (see the front cover of this manual) • the key number and description of the replacement part(s) (see the front cover of this manual. Please use...


