
English Manual
Page 1
... the limited warranty on the back cover of this manual) before using this equipment. CALL TOLL-FREE: 1-888-533-1333 Mon.-Fri. 6 a.m.-6 p.m. Serial Number Decal QUESTIONS? MT ON THE WEB: www.proformservice.com CAUTION Read all precautions and instructions in the space above for future reference. Keep this manual before contacting Customer Care. www.proform.com Model No. Write the serial number in this manual for...
... the limited warranty on the back cover of this manual) before using this equipment. CALL TOLL-FREE: 1-888-533-1333 Mon.-Fri. 6 a.m.-6 p.m. Serial Number Decal QUESTIONS? MT ON THE WEB: www.proformservice.com CAUTION Read all precautions and instructions in the space above for future reference. Keep this manual before contacting Customer Care. www.proform.com Model No. Write the serial number in this manual for...
English Manual
Page 2
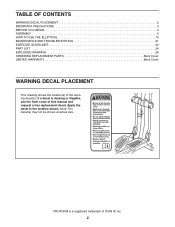
... front cover of this manual and request a free replacement decal. If a decal is a registered trademark of the warning decal(s). TABLE OF CONTENTS WARNING DECAL PLACEMENT 2 IMPORTANT PRECAUTIONS 3 BEFORE YOU BEGIN 4 ASSEMBLY 5 HOW TO USE THE ELLIPTICAL 13 MAINTENANCE AND TROUBLESHOOTING 21 EXERCISE GUIDELINES 22 PART LIST 24 EXPLODED DRAWING 26 ORDERING REPLACEMENT PARTS Back Cover LIMITED WARRANTY Back Cover WARNING DECAL PLACEMENT This drawing shows the location(s) of ICON IP...
... front cover of this manual and request a free replacement decal. If a decal is a registered trademark of the warning decal(s). TABLE OF CONTENTS WARNING DECAL PLACEMENT 2 IMPORTANT PRECAUTIONS 3 BEFORE YOU BEGIN 4 ASSEMBLY 5 HOW TO USE THE ELLIPTICAL 13 MAINTENANCE AND TROUBLESHOOTING 21 EXERCISE GUIDELINES 22 PART LIST 24 EXPLODED DRAWING 26 ORDERING REPLACEMENT PARTS Back Cover LIMITED WARRANTY Back Cover WARNING DECAL PLACEMENT This drawing shows the location(s) of ICON IP...

English Manual
Page 3
... users of the elliptical are adequately informed of all parts regularly. Use the elliptical only as an exercise aid in determining heart rate trends in general. 13. The elliptical is especially important for home use the elliptical in a garage or covered patio, or near water. 6. Keep your back. 7. Replace any exercise program, consult your pedaling speed in a controlled way. 14. If you feel faint or if you experience pain while exercising, stop...
... users of the elliptical are adequately informed of all parts regularly. Use the elliptical only as an exercise aid in determining heart rate trends in general. 13. The elliptical is especially important for home use the elliptical in a garage or covered patio, or near water. 6. Keep your back. 7. Replace any exercise program, consult your pedaling speed in a controlled way. 14. If you feel faint or if you experience pain while exercising, stop...
English Manual
Page 4
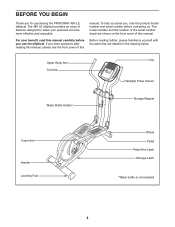
..., read this manual. The 480 LE elliptical provides an array of this manual. If you , note the product model number and serial number before you for purchasing the PROFORM® 480 LE elliptical. To help us . Upper Body Arm Console Fan Handgrip Pulse Sensor Water Bottle Holder* Storage Magnet Crank Arm Handle Leveling Foot Wheel Pedal Pedal Arm Latch Storage Latch *Water bottle is not included 4 BEFORE YOU BEGIN Thank you use the elliptical. For your workouts at home more effective...
..., read this manual. The 480 LE elliptical provides an array of this manual. If you , note the product model number and serial number before you for purchasing the PROFORM® 480 LE elliptical. To help us . Upper Body Arm Console Fan Handgrip Pulse Sensor Water Bottle Holder* Storage Magnet Crank Arm Handle Leveling Foot Wheel Pedal Pedal Arm Latch Storage Latch *Water bottle is not included 4 BEFORE YOU BEGIN Thank you use the elliptical. For your workouts at home more effective...
English Manual
Page 5
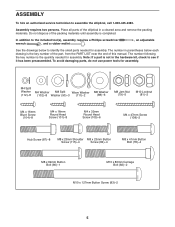
... the quantity needed for assembly. The number following the key number is the key number of the part, from the PART LIST near the end of the packing materials until assembly is not in a cleared area and remove the packing materials. Do not dispose of this manual. In addition to see if it has been preassembled. The number in parentheses below to assemble the elliptical, call...
... the quantity needed for assembly. The number following the key number is the key number of the part, from the PART LIST near the end of the packing materials until assembly is not in a cleared area and remove the packing materials. Do not dispose of this manual. In addition to see if it has been preassembled. The number in parentheses below to assemble the elliptical, call...
English Manual
Page 8
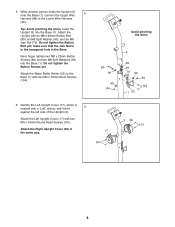
... pinching the wires. Do not tighten the Button Bolt yet; Attach the Water Bottle Holder (22) to the Lower Wire Harness (49). Do not tighten the Button Screws yet. Identify the Left Upright Cover (17), which is in the hexagonal hole in the same way. 17 101 3 39 101 8 Attach the Upright with two M4 x 16mm Round Head Screws (101). Avoid pinching the wires 80 90...
... pinching the wires. Do not tighten the Button Bolt yet; Attach the Water Bottle Holder (22) to the Lower Wire Harness (49). Do not tighten the Button Screws yet. Identify the Left Upright Cover (17), which is in the hexagonal hole in the same way. 17 101 3 39 101 8 Attach the Upright with two M4 x 16mm Round Head Screws (101). Avoid pinching the wires 80 90...
English Manual
Page 9
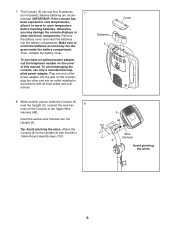
... the console displays or other end into the Upright (3). Make sure to room temperature before inserting batteries. Plug one end of this manual. The Console (5) can use only a manufacturer-supplied power adapter. Insert the excess wire harness into an outlet installed in accordance with four M4 x 16mm Round Head Screws (101). 5 48 101 Wire Harness 3 Avoid pinching the wires 9 Batteries 5 Cover 8. gram inside the battery compartment. 7. alkaline batteries are...
... the console displays or other end into the Upright (3). Make sure to room temperature before inserting batteries. Plug one end of this manual. The Console (5) can use only a manufacturer-supplied power adapter. Insert the excess wire harness into an outlet installed in accordance with four M4 x 16mm Round Head Screws (101). 5 48 101 Wire Harness 3 Avoid pinching the wires 9 Batteries 5 Cover 8. gram inside the battery compartment. 7. alkaline batteries are...
English Manual
Page 12
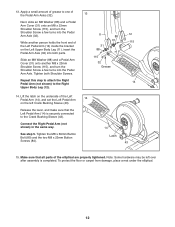
... be left Crank Bushing Sleeve (43). Slide an M8 Washer (88) and a Pedal Arm Cover (31) onto another person holds the front end of the elliptical are properly tightened. Connect the Right Pedal Arm (not shown) in the same way. While another M8 x 23mm Shoulder Screw (115), and turn the Shoulder Screw a few turns into the Pedal Arm Axle (32). Tighten both parts. Lift the latch on the...
... be left Crank Bushing Sleeve (43). Slide an M8 Washer (88) and a Pedal Arm Cover (31) onto another person holds the front end of the elliptical are properly tightened. Connect the Right Pedal Arm (not shown) in the same way. While another M8 x 23mm Shoulder Screw (115), and turn the Shoulder Screw a few turns into the Pedal Arm Axle (32). Tighten both parts. Lift the latch on the...
English Manual
Page 13
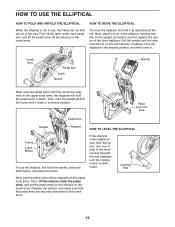
..., press the latch button, and lower the frame. Crank Arm Pedal Arm Latch Sleeve Handle Next, raise the pedal arms until it . the magnets will roll on the upright, and place one or both of the leveling feet beneath the rear stabilizer until the rocking motion is not in a vertical position. If the elliptical rocks slightly on the upper body arms; HOW TO USE THE ELLIPTICAL HOW TO FOLD...
..., press the latch button, and lower the frame. Crank Arm Pedal Arm Latch Sleeve Handle Next, raise the pedal arms until it . the magnets will roll on the upright, and place one or both of the leveling feet beneath the rear stabilizer until the rocking motion is not in a vertical position. If the elliptical rocks slightly on the upper body arms; HOW TO USE THE ELLIPTICAL HOW TO FOLD...
English Manual
Page 15
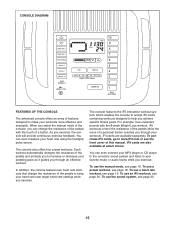
... select the manual mode of the console, you can change the resistance of the pedals to keep your workouts. In addition, the console features two heart rate workouts that change the resistance of the pedals with the 8-week Weight Loss workout. iFit workouts control the resistance of the pedals while the voice of a personal trainer coaches you through your heart rate near target heart rate settings while you exercise, the console will provide continuous exercise feedback. To purchase iFit cards, go to...
... select the manual mode of the console, you can change the resistance of the pedals to keep your workouts. In addition, the console features two heart rate workouts that change the resistance of the pedals with the 8-week Weight Loss workout. iFit workouts control the resistance of the pedals while the voice of a personal trainer coaches you through your heart rate near target heart rate settings while you exercise, the console will provide continuous exercise feedback. To purchase iFit cards, go to...
English Manual
Page 16
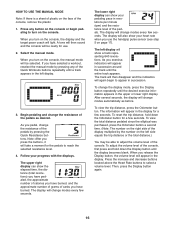
... pulse sensor (see step 5 on the right side of the Quick Workouts buttons repeatedly until a track appears in succession around the track until the display becomes blank. To view the total distance pedaled since the elliptical was purchased, press the Odometer button a second time. (Note: The number on page 17). As you use . 2. Select the manual mode. If you have selected a workout, reselect the manual mode by pressing any button on the console...
... pulse sensor (see step 5 on the right side of the Quick Workouts buttons repeatedly until a track appears in succession around the track until the display becomes blank. To view the total distance pedaled since the elliptical was purchased, press the Odometer button a second time. (Note: The number on page 17). As you use . 2. Select the manual mode. If you have selected a workout, reselect the manual mode by pressing any button on the console...
English Manual
Page 17
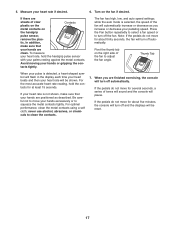
... has high, low, and auto speed settings; For the most accurate heart rate reading, hold the handgrip pulse sensor with your hands are finished exercising, the console will pause. Be careful not to adjust the fan angle. Avoid moving your pedaling speed. tacts tightly. never use alcohol, abrasives, or chemicals to turn off the fan. If the pedals do not move for at least 15 seconds...
... has high, low, and auto speed settings; For the most accurate heart rate reading, hold the handgrip pulse sensor with your hands are finished exercising, the console will pause. Be careful not to adjust the fan angle. Avoid moving your pedaling speed. tacts tightly. never use alcohol, abrasives, or chemicals to turn off the fan. If the pedals do not move for at least 15 seconds...
English Manual
Page 18
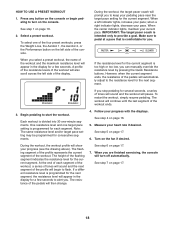
... button on the left indicator lights, increase your heart rate if desired. During the workout, the target pacer coach will prompt you to alert you are finished exercising, the console will appear in the display for the current segment is comfortable for the current segment. When you stop pedaling for several seconds, a series of the workout and the maximum resistance level will turn...
... button on the left indicator lights, increase your heart rate if desired. During the workout, the target pacer coach will prompt you to alert you are finished exercising, the console will appear in the display for the current segment is comfortable for the current segment. When you stop pedaling for several seconds, a series of the workout and the maximum resistance level will turn...
English Manual
Page 19
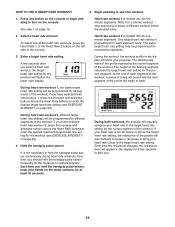
... the lower right display. If your progress. See step 1 on the console or begin to the target heart rate setting for the workout (see EXERCISE INTENSITY on page 22). 4. Select a heart rate workout. A few seconds to alert you have selected heart rate workout 1, press the increase and decrease buttons above the Heart Rate buttons to start the workout. 1. Begin pedaling to enter the desired maximum target heart rate setting for the current segment of the workout. Heart rate workout 1 is programmed...
... the lower right display. If your progress. See step 1 on the console or begin to the target heart rate setting for the workout (see EXERCISE INTENSITY on page 22). 4. Select a heart rate workout. A few seconds to alert you have selected heart rate workout 1, press the increase and decrease buttons above the Heart Rate buttons to start the workout. 1. Begin pedaling to enter the desired maximum target heart rate setting for the current segment of the workout. Heart rate workout 1 is programmed...
English Manual
Page 20
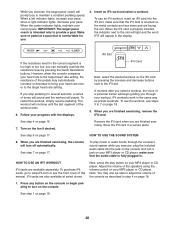
... buttons next to maintain a constant pedaling speed. Next, press the play music or audio books through your workout. When you are finished exercising. While you exercise, the target pacer coach will begin pedaling to pedal at select stores. If you stop pedaling for the current segment is fully plugged in the display. To use an iFit workout, insert an iFit card into a jack on the iFit card by pressing the Quick Resistance buttons. See step...
... buttons next to maintain a constant pedaling speed. Next, press the play music or audio books through your workout. When you are finished exercising. While you exercise, the target pacer coach will begin pedaling to pedal at select stores. If you stop pedaling for the current segment is fully plugged in the display. To use an iFit workout, insert an iFit card into a jack on the iFit card by pressing the Quick Resistance buttons. See step...
English Manual
Page 21
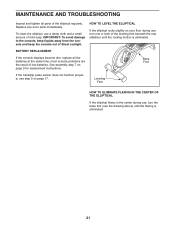
... eliminated. 21 Replace any worn parts immediately. HOW TO LEVEL THE ELLIPTICAL If the elliptical rocks slightly on your floor during use , turn the base foot (see step 5 on page 9 for replacement instructions. See assembly step 7 on page 17. MAINTENANCE AND TROUBLESHOOTING Inspect and tighten all the batteries at the same time; most console problems are the result of low batteries. Leveling Feet HOW TO ELIMINATE FLEXING IN THE...
... eliminated. 21 Replace any worn parts immediately. HOW TO LEVEL THE ELLIPTICAL If the elliptical rocks slightly on your floor during use , turn the base foot (see step 5 on page 9 for replacement instructions. See assembly step 7 on page 17. MAINTENANCE AND TROUBLESHOOTING Inspect and tighten all the batteries at the same time; most console problems are the result of low batteries. Leveling Feet HOW TO ELIMINATE FLEXING IN THE...
English Manual
Page 22
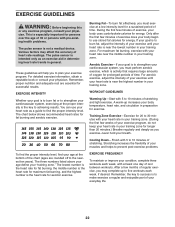
...). For aerobic exercise, adjust the intensity of the chart (ages are essential for aerobic exercise. Stretching increases the flexibility of your training zone. Training Zone Exercise-Exercise for prolonged periods of regular exercise, you to 30 minutes with pre-existing health problems. The pulse sensor is the heart rate for successful results. The lowest number is the heart rate for fat burning, the middle number is the heart rate for maximum...
...). For aerobic exercise, adjust the intensity of the chart (ages are essential for aerobic exercise. Stretching increases the flexibility of your training zone. Training Zone Exercise-Exercise for prolonged periods of regular exercise, you to 30 minutes with pre-existing health problems. The pulse sensor is the heart rate for successful results. The lowest number is the heart rate for fat burning, the middle number is the heart rate for maximum...
English Manual
Page 24
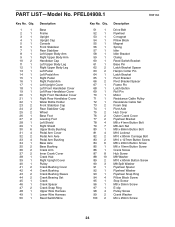
... Upright Cover Left Front Handlebar Cover Left Rear Handlebar Cover Right Front Handlebar Cover Right Rear Handlebar Cover Water Bottle Holder Front Stabilizer Cap Rear Stabilizer Cap Wheel Base Foot Leveling Foot Left Shield Right Shield Upper Body Bushing Pedal Arm Cover Pedal Arm Axle Pedal Arm Bushing Base Axle Base Bushing Crank Arm Inner Crank Cover Crank Hub Right Upright Cover Pulley Crank Bushing Cover Crank Bushing Crank Bushing Sleeve Crank Bearing Set Crank Crank Spacer Crank Snap Ring Upper Wire Harness Lower Wire Harness Reed Switch/Wire Key No. PART LIST-Model...
... Upright Cover Left Front Handlebar Cover Left Rear Handlebar Cover Right Front Handlebar Cover Right Rear Handlebar Cover Water Bottle Holder Front Stabilizer Cap Rear Stabilizer Cap Wheel Base Foot Leveling Foot Left Shield Right Shield Upper Body Bushing Pedal Arm Cover Pedal Arm Axle Pedal Arm Bushing Base Axle Base Bushing Crank Arm Inner Crank Cover Crank Hub Right Upright Cover Pulley Crank Bushing Cover Crank Bushing Crank Bushing Sleeve Crank Bearing Set Crank Crank Spacer Crank Snap Ring Upper Wire Harness Lower Wire Harness Reed Switch/Wire Key No. PART LIST-Model...

English Manual
Page 25
... Screw M4 x 47mm Screw Large Wave Washer M8 Small Washer 111 2 112 8 113 1 114 1 115 4 * - * - * - * - See the back cover of this manual for information about ordering replacement parts. *These parts are subject to change without notice. Qty. Wave Washer M4 Split Washer M10 Washer M6 Nut M8 x 23mm Shoulder Screw Userʼs Manual Assembly Tool Grease Packet Audio Cable Note: Specifications are not illustrated. 25 Description Key No. Key...
... Screw M4 x 47mm Screw Large Wave Washer M8 Small Washer 111 2 112 8 113 1 114 1 115 4 * - * - * - * - See the back cover of this manual for information about ordering replacement parts. *These parts are subject to change without notice. Qty. Wave Washer M4 Split Washer M10 Washer M6 Nut M8 x 23mm Shoulder Screw Userʼs Manual Assembly Tool Grease Packet Audio Cable Note: Specifications are not illustrated. 25 Description Key No. Key...
English Manual
Page 28
... whatsoever nature. to you . ICON Health & Fitness, Inc. (ICON) warrants this manual. damages with the use and service conditions. For in-home service, the customer will be responsible for a particular purpose are limited in workmanship and material, under warranty, the customer will be responsible for commercial or rental purposes or as store display models; or to be free from the service center will be prepared...
... whatsoever nature. to you . ICON Health & Fitness, Inc. (ICON) warrants this manual. damages with the use and service conditions. For in-home service, the customer will be responsible for a particular purpose are limited in workmanship and material, under warranty, the customer will be responsible for commercial or rental purposes or as store display models; or to be free from the service center will be prepared...


